review_creality_sermoon_s1
Review and Comparison Creality Sermoon S1
Table of Contents
- Review and Comparison Creality Sermoon S1
- My Background
- Scanning Setup
- Hardware
- Scan Results
- Conclusion
- My designs for the Sermoon S1
My Background
First of all: My english may be excused, it’s not my native language so there may be some idioms I translated from German and didn’t notice. Second all designs and improvements for the S1 featured in this review are downloadable as STL and STEP on my Printables page (link at the bottom of this review).
I started with 3D-printing roughly 7 years ago and from thereon constantly increased my fleet of printers. From building a Voron to designing a custom printer to adding a Stealthburner to my trusty CR-10S Pro. Currently I use mainly BambuLab and Creality K1 and K2 printers as my daily drivers.
After some years of designing with callipers and reference pictures I decided it was time for a 3D-scanner (5 years ago). I fiddled around with the Kinect of my Xbox (can be used as a quite crude scanner with the right software, but the results were subpar with maybe 1-2cm of accuracy). These bad experiences initially stopped me from scanning and 2 years ago I started anew with scanning: At first a cheap 3DMakerPro scanner and then the original Creality Raptor Scanner.
Scan results of the Raptor were great for smaller parts but I mainly wanted to scanner medium to large parts (PC cases, car parts, drone components, etc.) so I got myself the MetroX and later since it still lacked the ability to scan large parts like car panels the Range2.
Both scanners were great for the price I paid for but still left a lot to desire. The MetroX has quite a small scanning area and the max depth of view (400mm) limits the marker recognition, therefore a lot of markers are needed. With the Range2 the main problem was the low framerate of under 10FPS in wireless mode, which causes quite a lot of tracking issues since you have to move very slowly.
With an increasing number of projects (personal and for customers) a more professional scanner was required. Initially I got the Otter (awesome for scanning large parts quickly) but I didn’t need the small scanning modes of the it since for this I mainly use laser scanners.
With the Revopoint Trackit incoming to scan whole cars I also wanted to upgrade my handheld laser scanner whilst reducing the total amount of scanners needed. Therefore, the announcement of the Sermoon S1 came at the right time, and I preordered it to benefit from the reduced price whilst snagging a bundle with a Creality Hi Combo. While writing this review some pictures of the Sermoon X1 emerged from IFA in Berlin as well as a placeholder listing on the store for 6000€. I’m already excited for what to come but also hope nice software improvements will still come for the Sermoon S1.
Scanning Setup
After trying different setups for quite some time (scanner and PC wise) I finally settled on following:
Desktop
Specs:
- AMD Ryzen 7700X
- Mini ITX motherboard with WiFI 6E
- 64GB DDR5 RAM
- Nvidia RTX 5070Ti
- 2TB of NVME Gen4 SSD
- Dan A4 H2O Mini ITX Case
- TP-Link WR902AC travel router to use RDP over LAN (LAN was necessary since the connection to the Scan Bridge occupies my WiFi cars)
To transport all of this I have a nice hardcase from Peli. It contains the PC, power-cord, MR-Headset, scanning-spray and all other small necessities used for scanning. For smaller projects I simply use my notebook, but its specs and cooling aren’t too well suited for scanning which leads it to settle at roughly 20FPS in laser mode.
Scanner
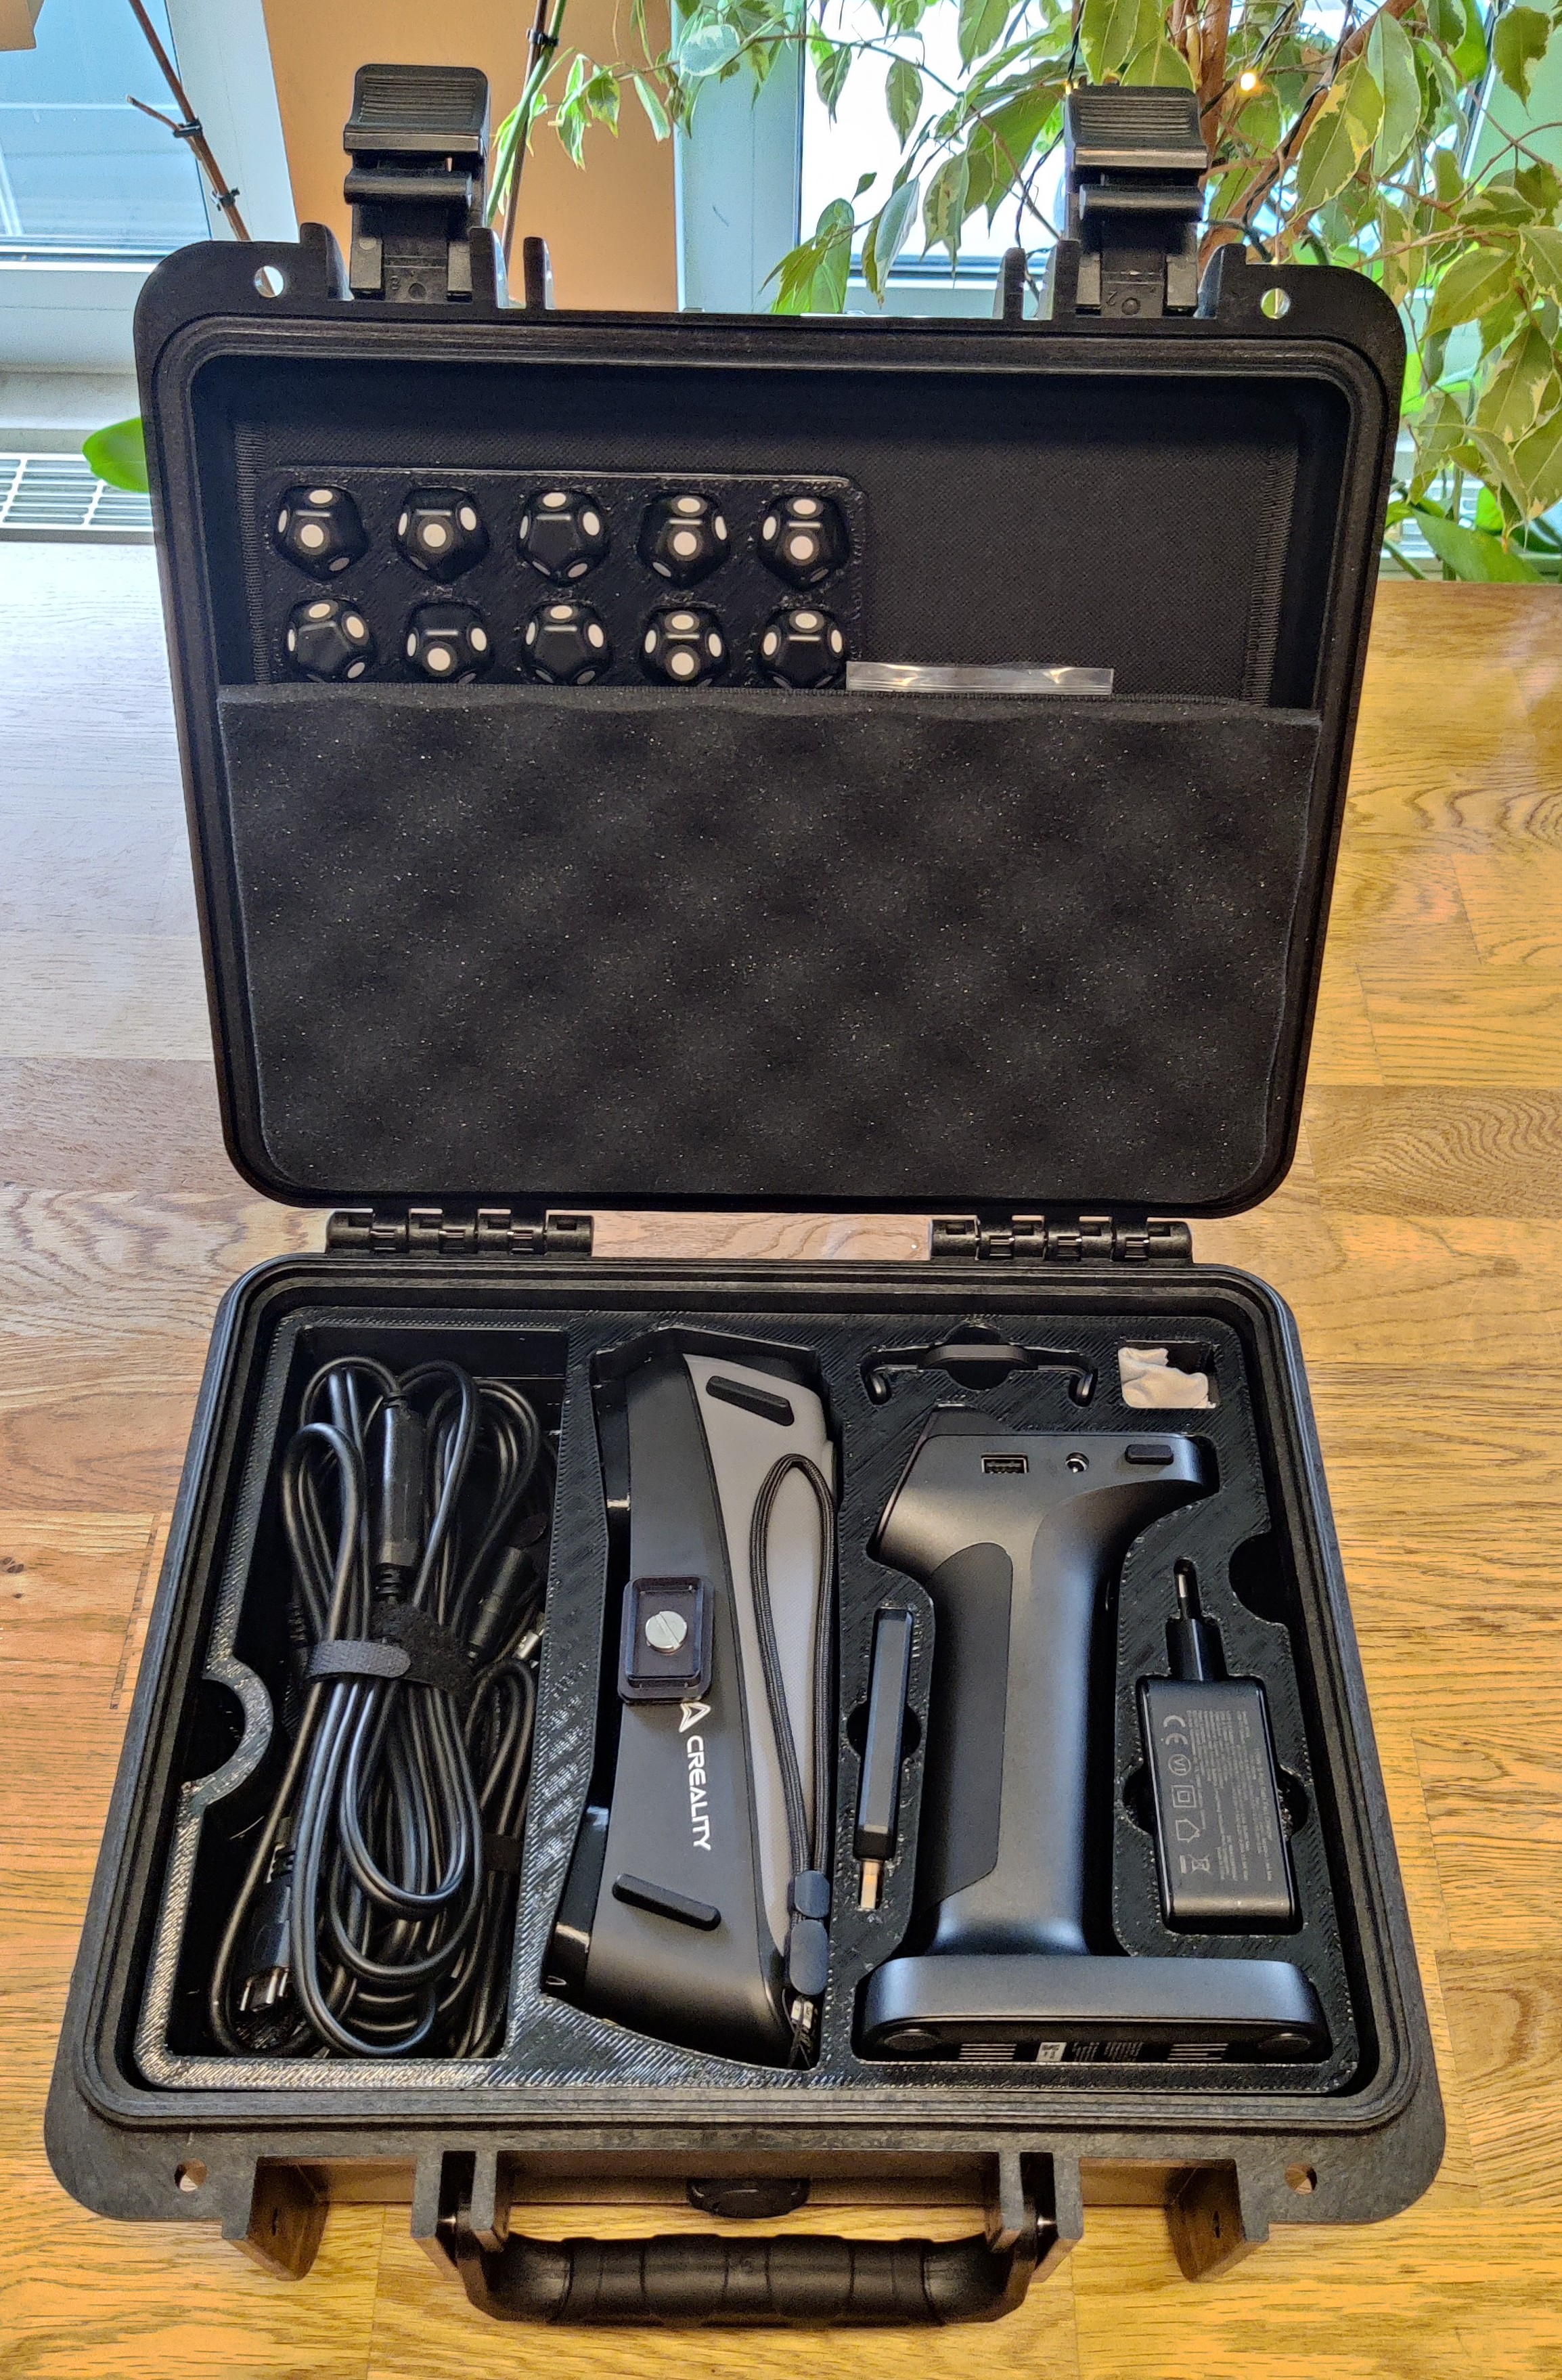
The initial unboxing of the scanner is quite satisfying. The provided hardcase is very sturdy and quality-wise at the level of Peli cases. After getting the Scan Bridge I needed to modify the insert of the case to make room for the bridge as you can see in the picture. The printed insert only replaces the central foam and leaves the underlying calibration plate in place.
| Case Insert | Cable Stowaway |
|---|---|
 |
 |
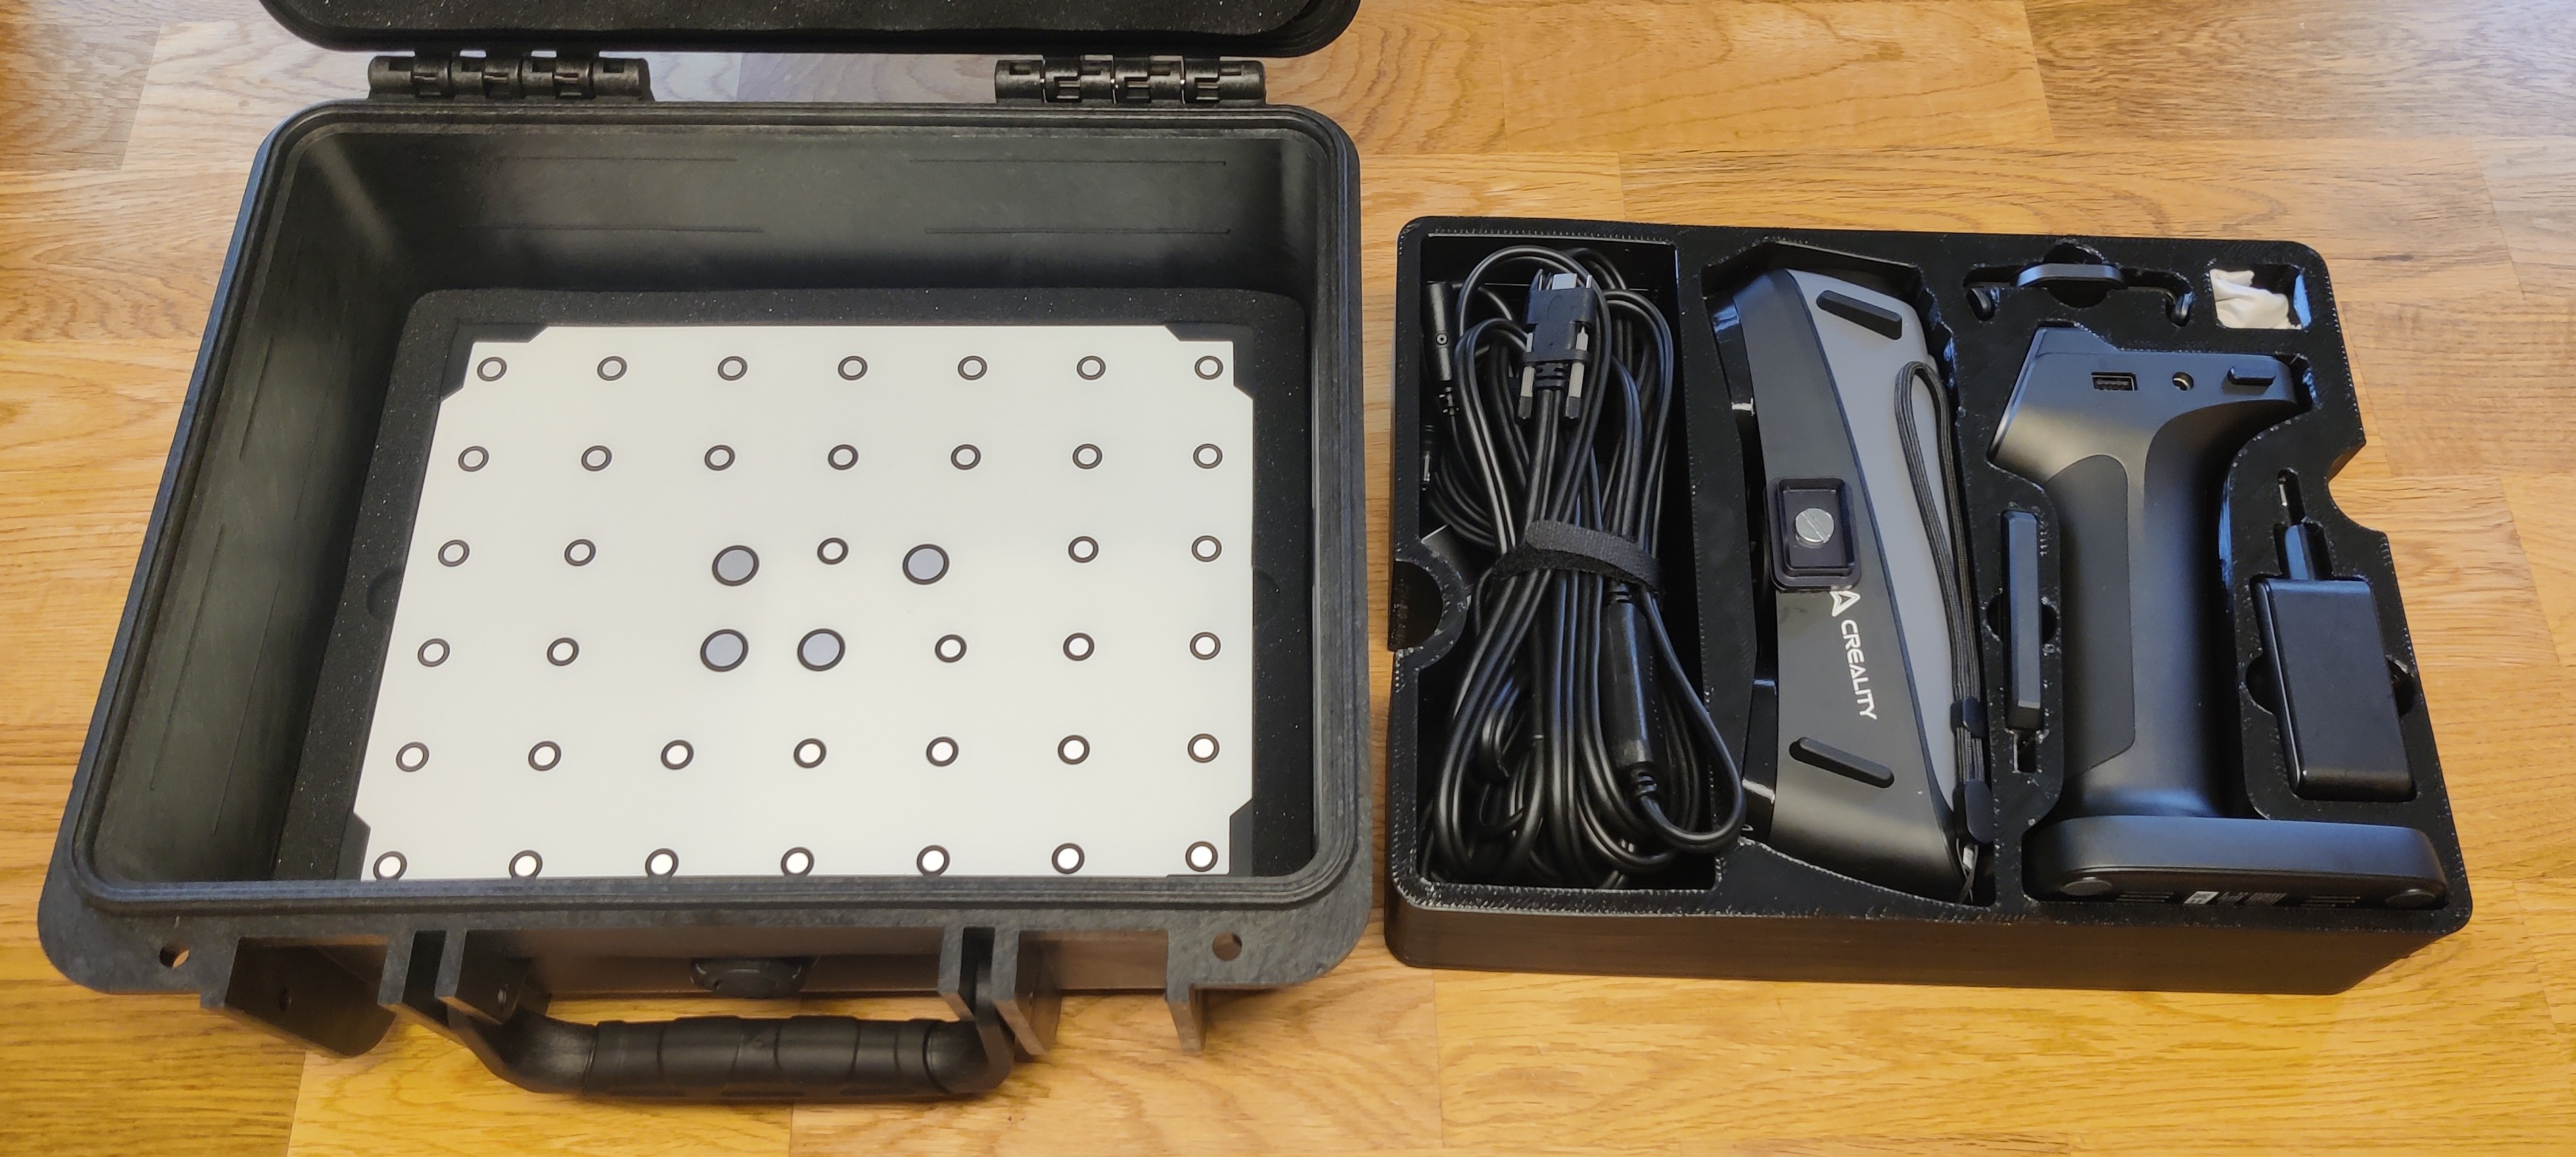
I always try to use the space of cases as effectively as possible. The new insert is printed from TPU, CNC-cut closed-cell foam may be even nicer since the print took nearly 800gr. of TPU. To have space for some marker geometries I designed an insert for the lid to nicely organize the markers (must be printed from TPU since the geometries are snap-fit into the holder).
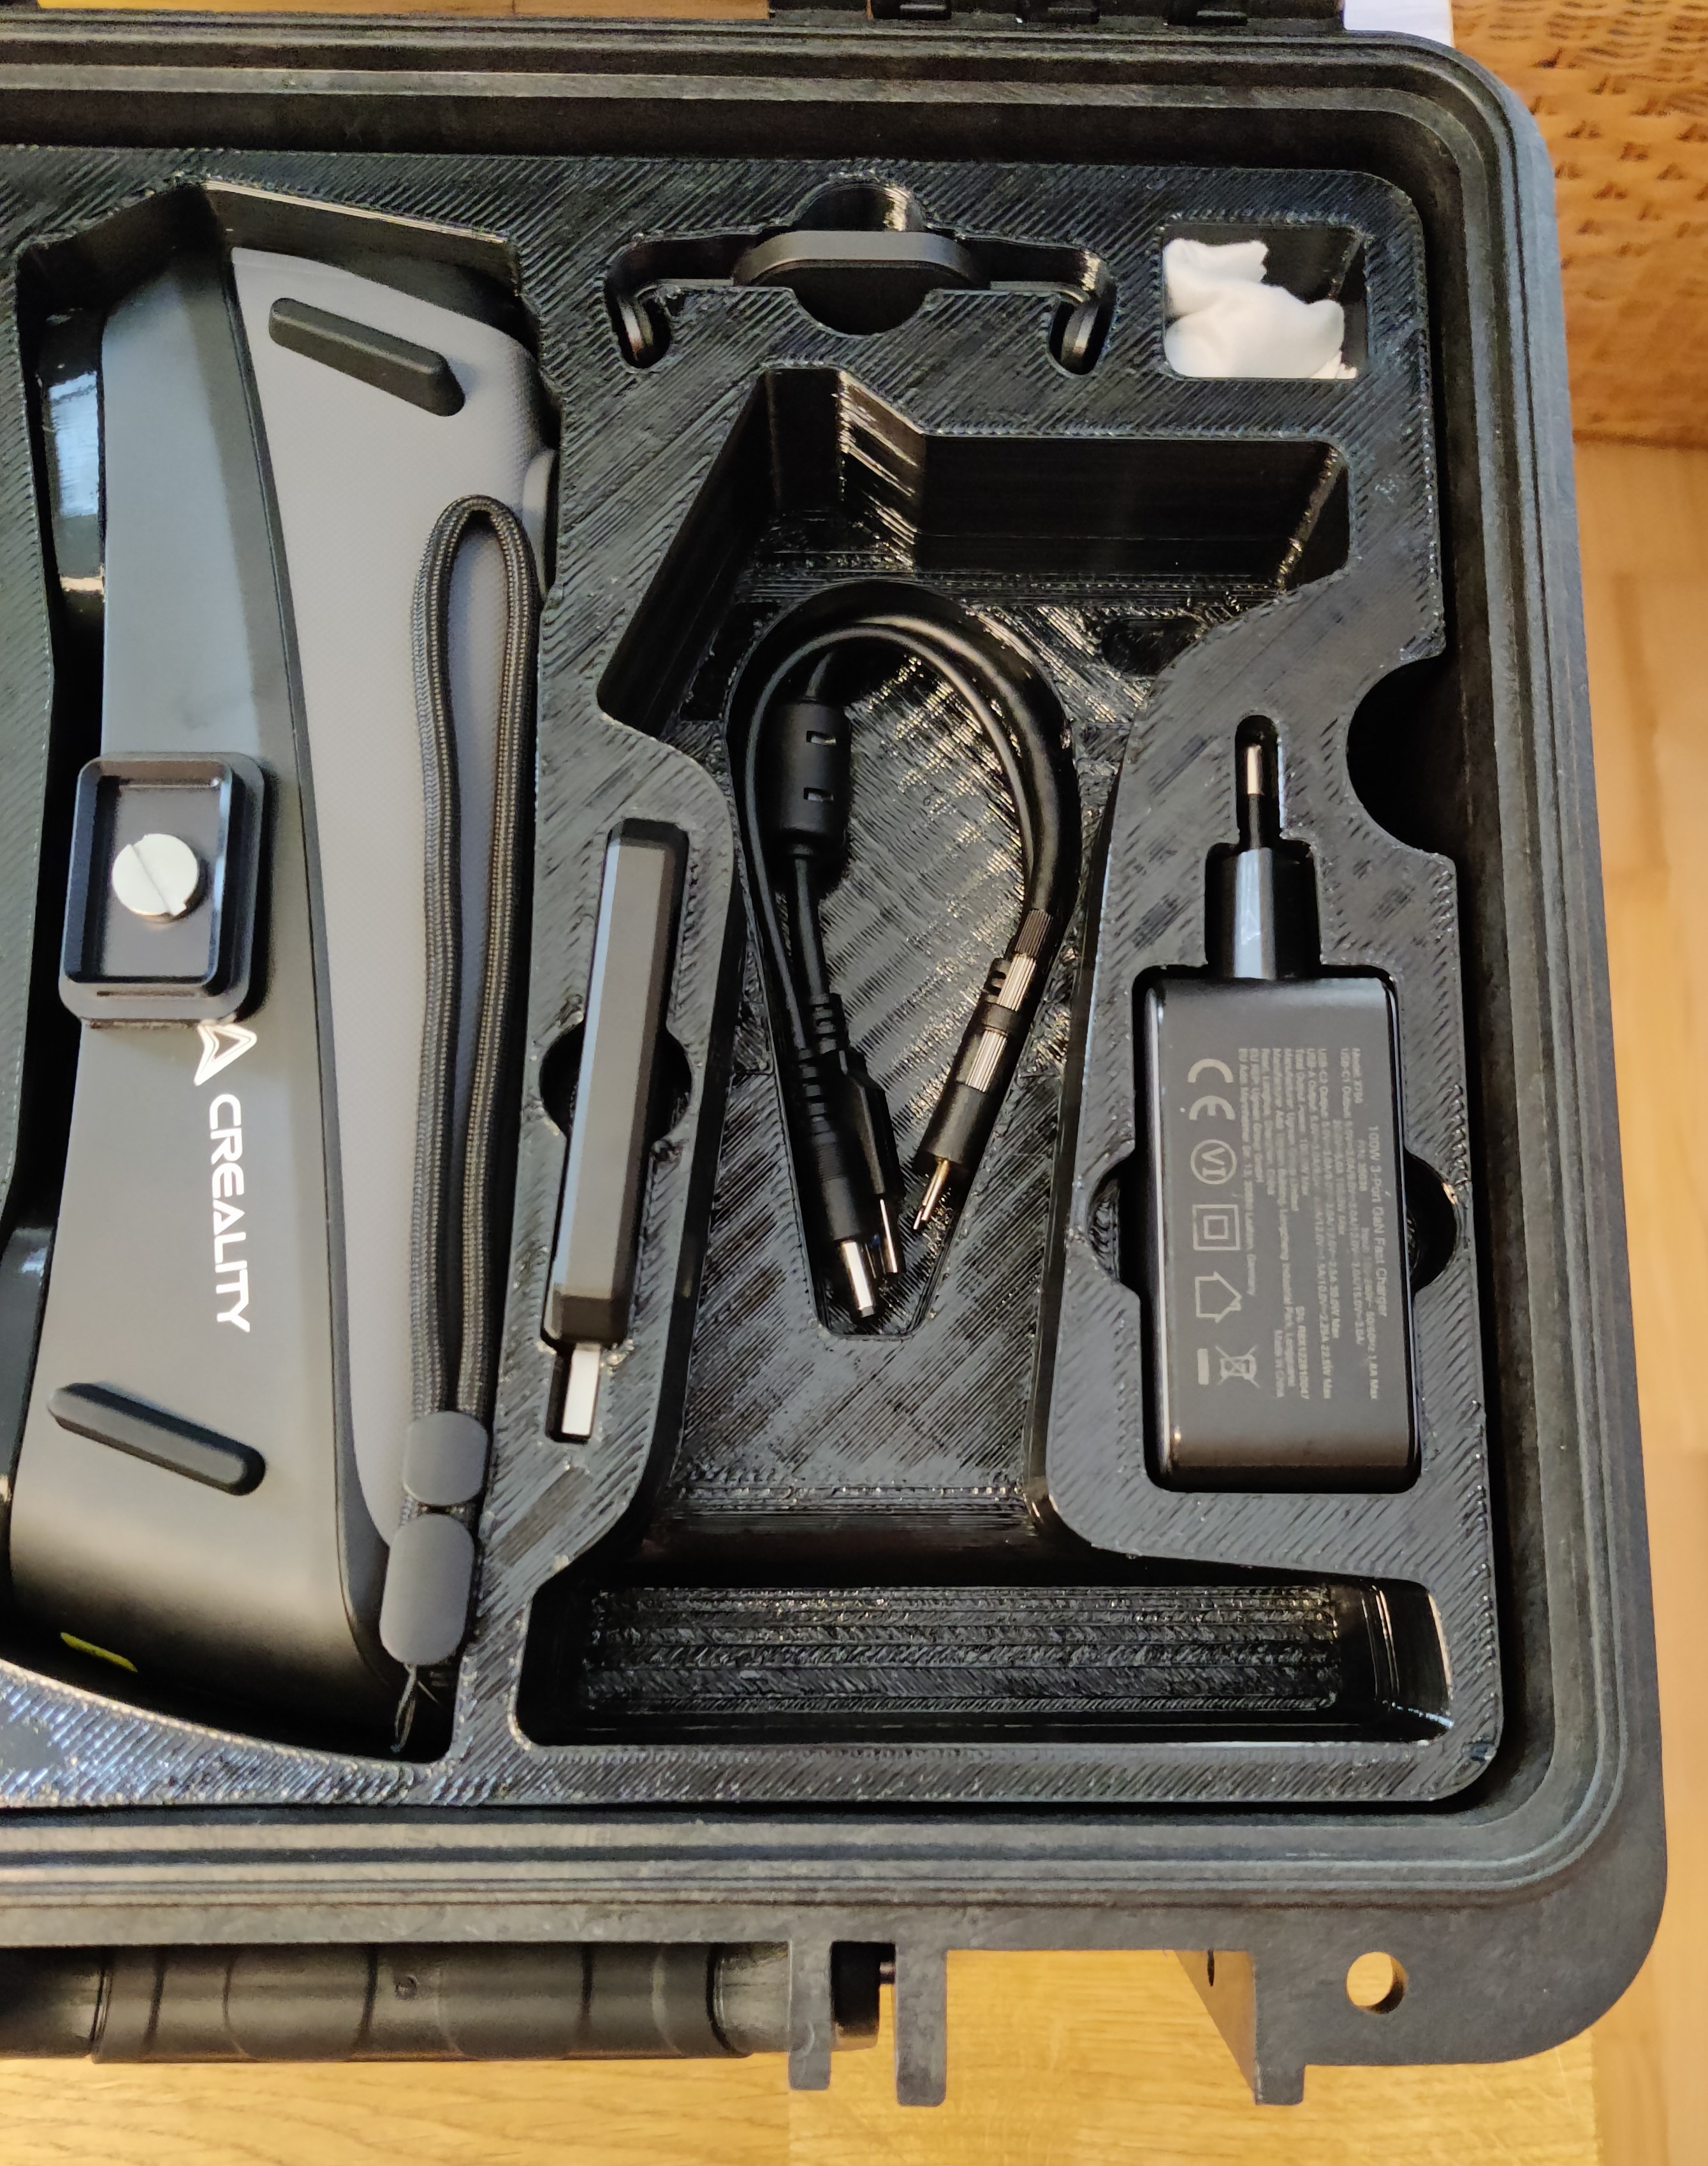
Contents of the case:
- Scanner (with printed lens protectors from TPU)
- Marker geometries
- Markers
- BlueTack to fix small parts for scanning
- Scan Bridge and underlying cable for it (with wider printed screw heads)
- WiFi card for the bridge (WiFi of my PC is good enough but better be safe than sorry)
- Phone holder for the bridge
- Lens cleaning cloth
- UGREEN Nexode 100W charger (EU-version)
- 12V USB-C PD to DC cable to power the scanner when used wired
- Charging cable for the bridge
- 4m USB-cable from the RaptorX (like the original one which is 2m long)
- 30cm USB-A female to USB-C male 20Gbps cable as a strain relief for my USB-ports (prevents me from trashing my motherboard when stumbling over the scanner-cable)
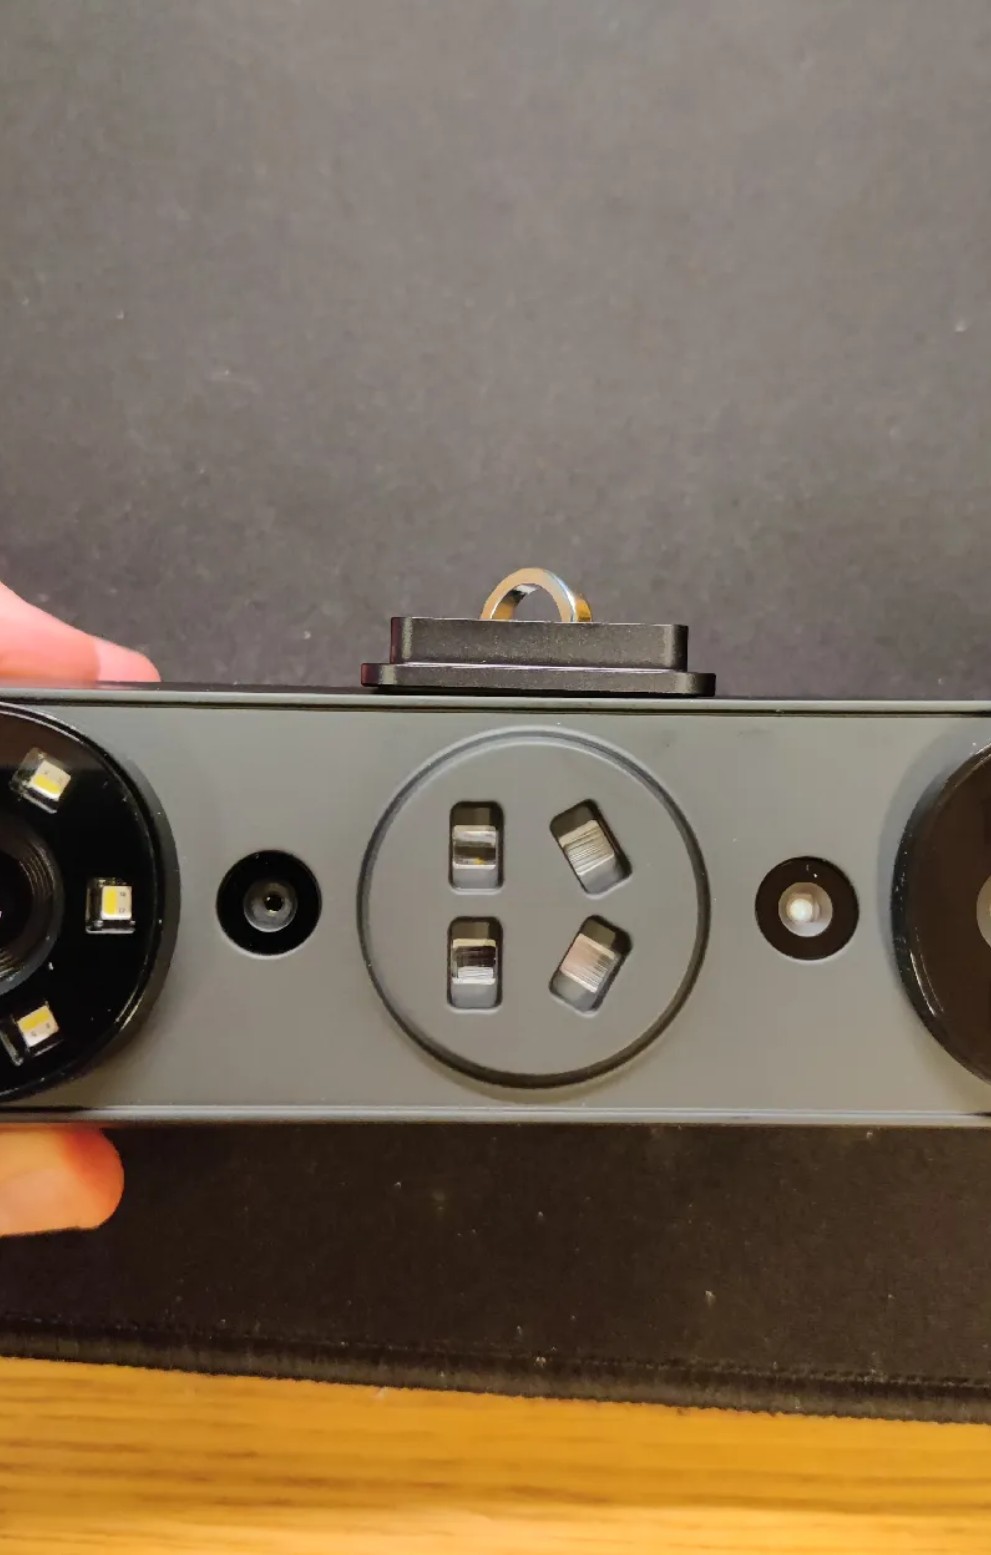
Hardware
Scanner
The scanner itself feels great. Its shape is quite comfortable to held after I was initially sceptical since it is quite heavily influenced by aesthetically pleasing curves and the low weight allow longer wired scanning without any issues. A small problem I encountered was that the lenses are relatively exposed and you cannot lay the scanner with the lenses down. To remedy this, I designed some lens-protectors printed from TPU.
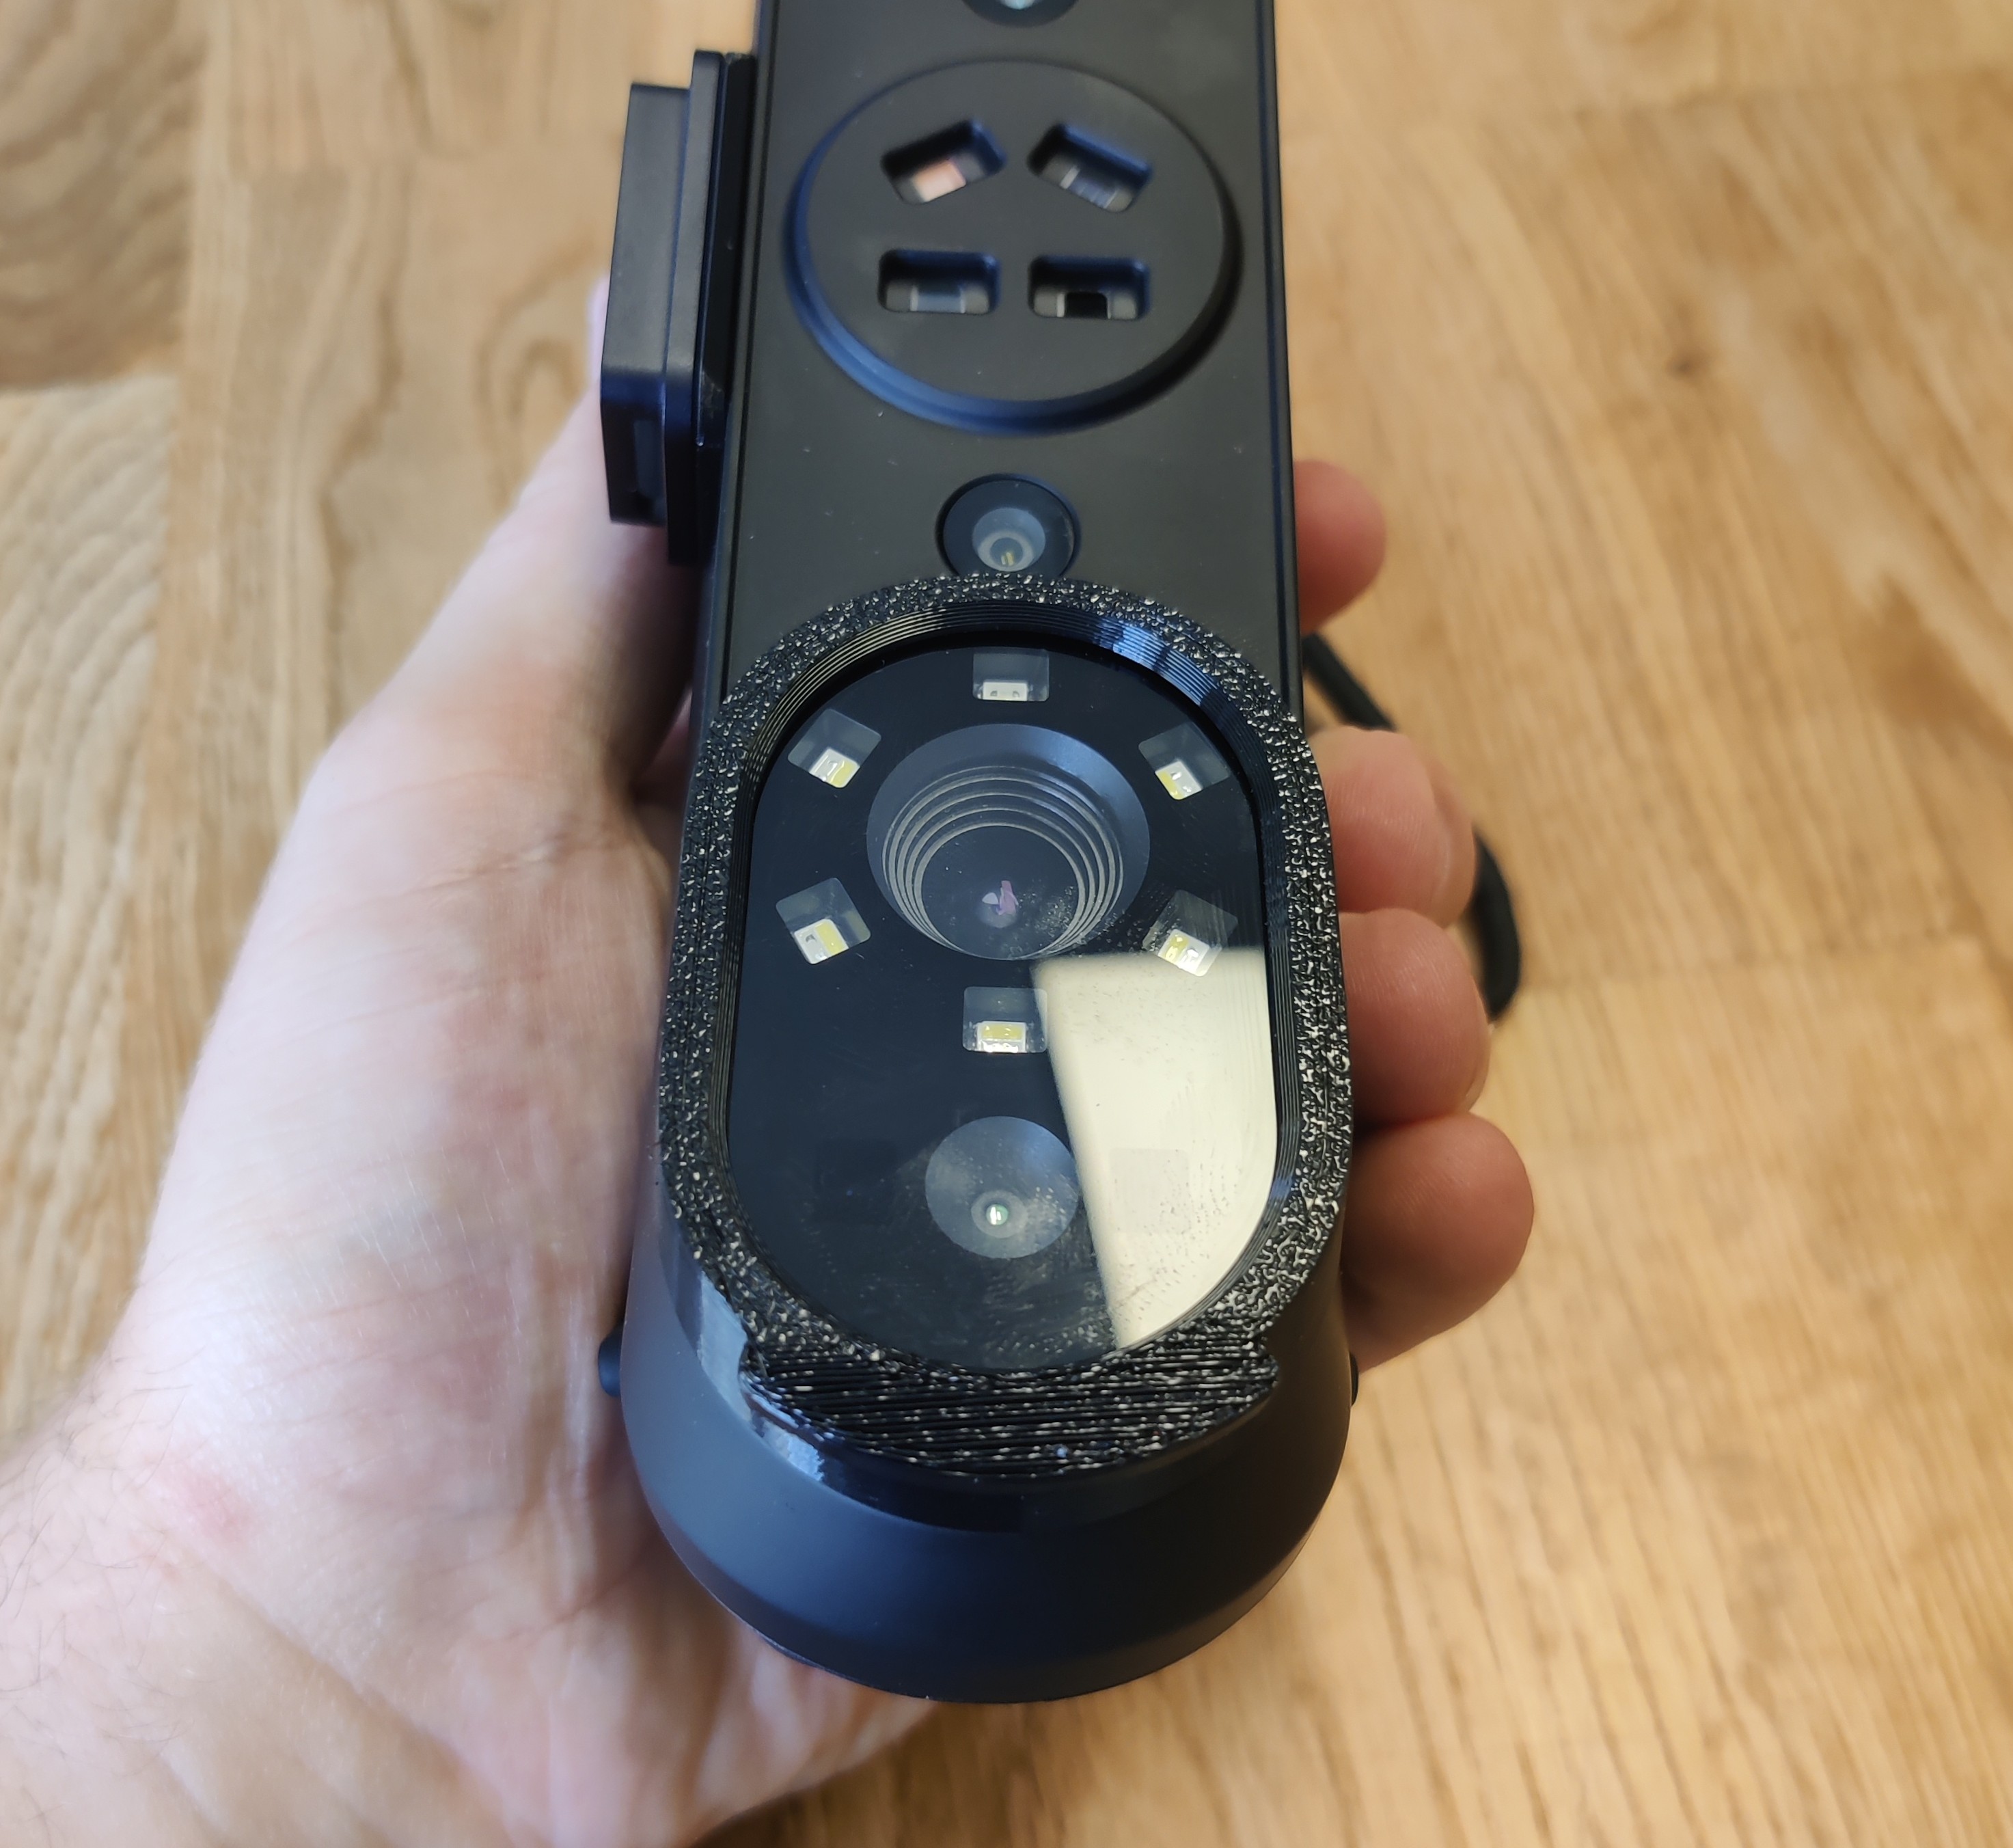
Coming from an Otter this is quite a positive change thinking about the slippery metallic case and awkward to use touch-buttons. The included data-cable for the scanner is too short (~2m) in my opinion. I replaced it with the cable of an RaptorX (~4.5m) which drastically improves the wired usability for larger scans. With the original cable you’re basically forced to either carry your pc/notebook under your arm while scanning or buying the Scan Bridge.
Scan Software
The increase in FPS is welcome since the speed improvement is quite noticeable. Only current downside is the limitation to wired scanning. With the bridge the scanner only reaches 40FPS (seems to be artificially limited by the software) in laser mode. Bandwidth used caps at 250Mbps whereas it reaches 350Mbps in NIR mode at 30FPS. This suggests that there may be some more headroom to improve the frame rate. Hopefully this improvement isn’t kept as an exclusive to the upcoming X1 if it should have it.
Talking about possible software improvements we must talk about markerless laser scanning. The hardware is there in the Sermoon S1, but we need to wait for Creality to decide whether to implement it or not. Having this feature at a price point of 2800€ would be disruptive. At 6000€ in a more premium X1, Creality suddenly has to compete with the Einscan Rigil, Revopoint Trackit and 3DEVOK MT and at least for Einscan and 3DEVOK their software…
Talking software: Creality improved a lot of features in Creality Scan 4 and generally made the workflow more intuitive. Two major complaints are the lack of SpaceMouse support and the current limitation of only one meshed file within a project folder at a time. So, when you want to crate multiple meshed files, you must export the current file and the mesh the new one while overwriting the old one. These issues should be easily fixable with coming updates and Creality already seems to be aware of them. Sadly the latest update decreased the FPS reached in laser-mode (from stable 90 in cross-lines to 65 with a desktop RTX 5070Ti), hopefully they will also fix this.
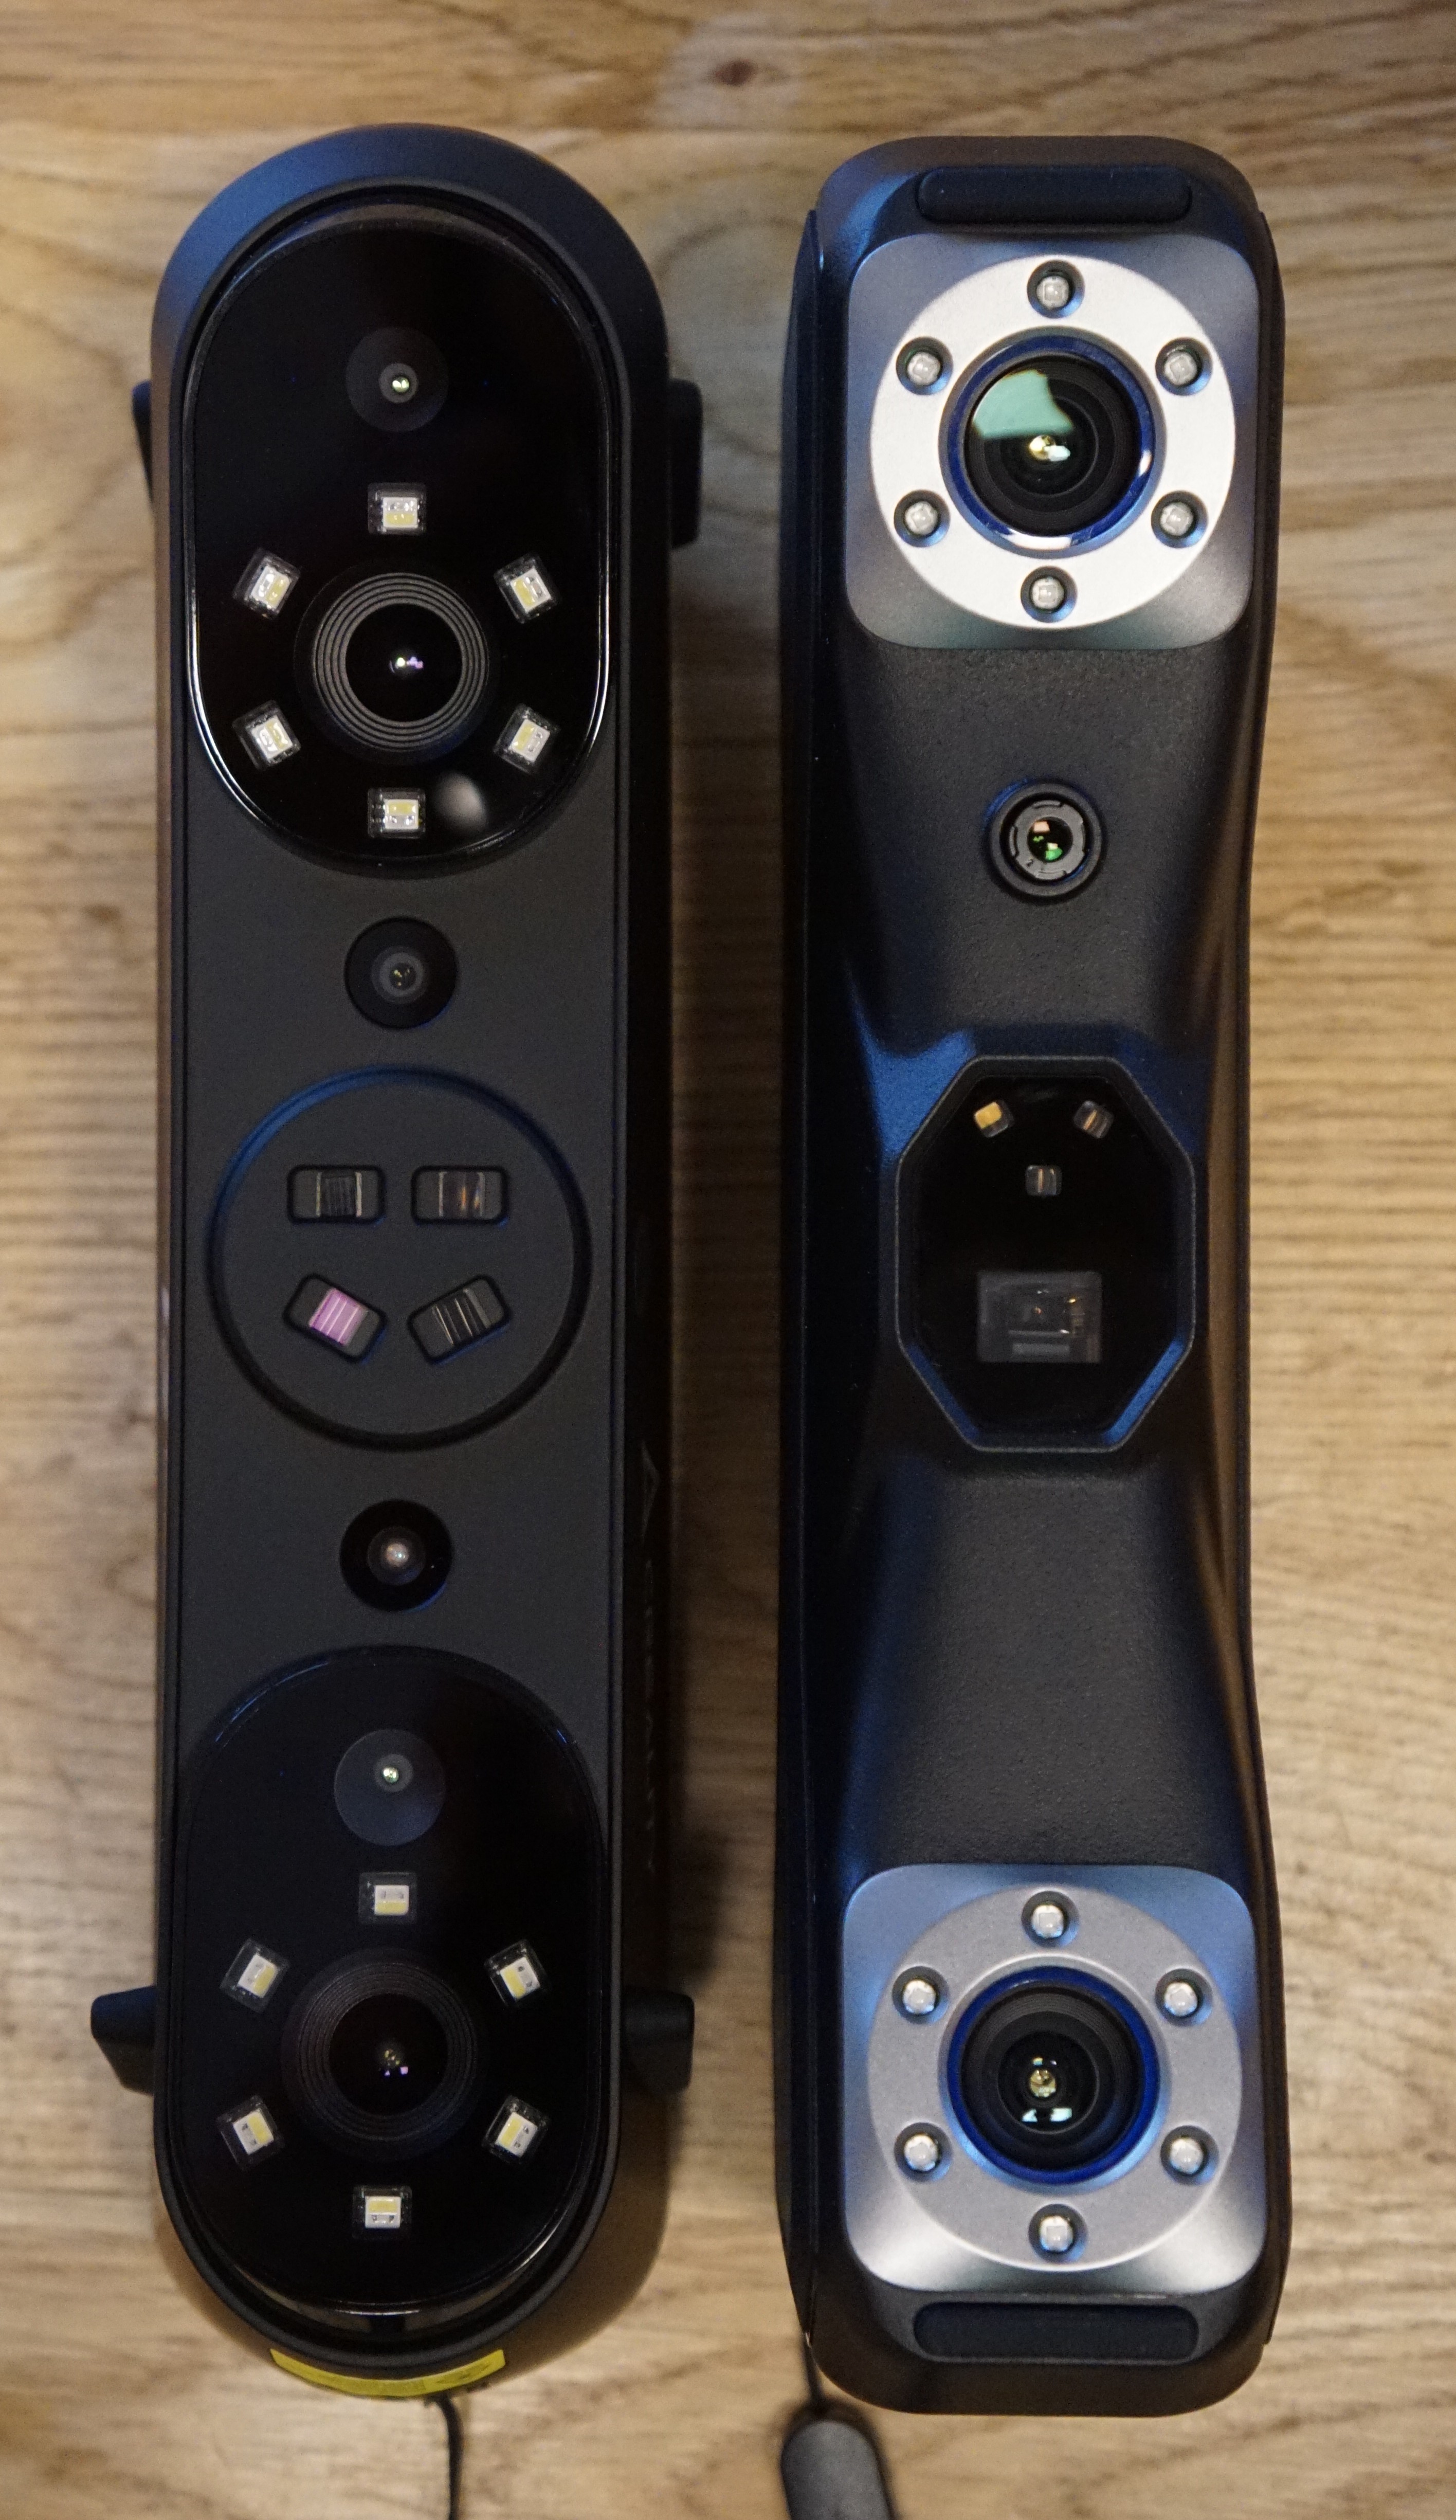
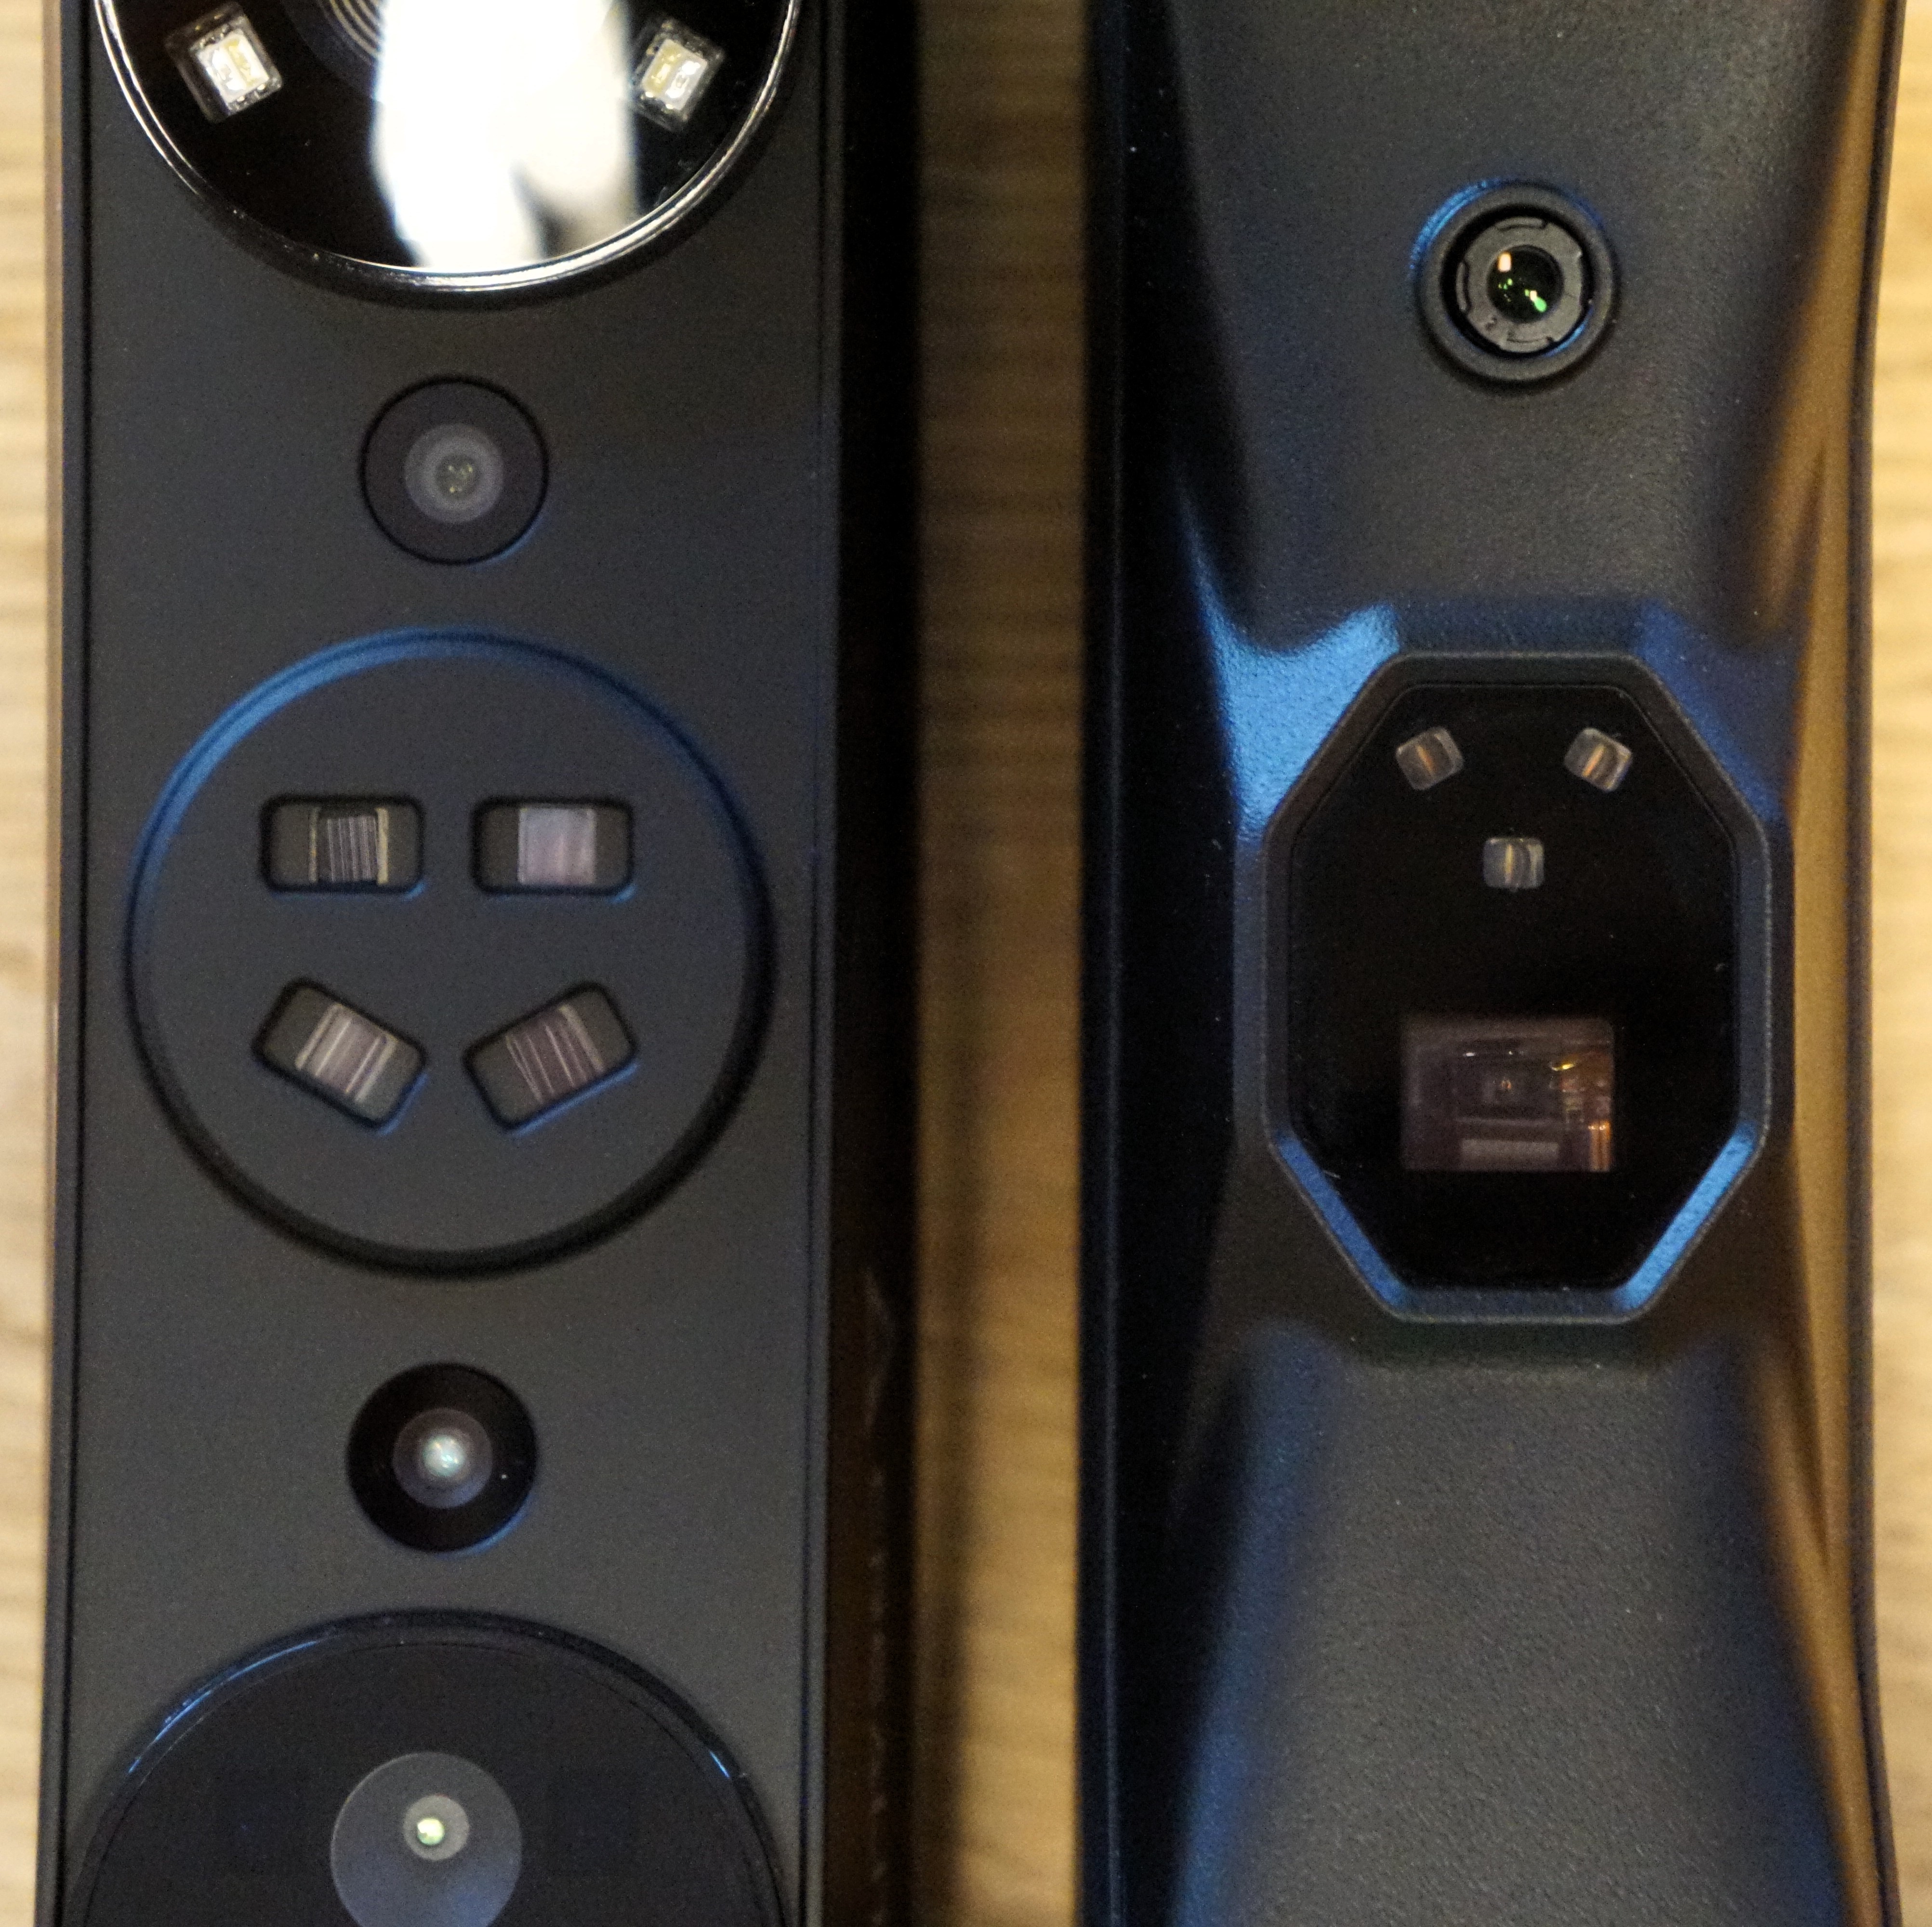
Comparison to MetroX
As a disclaimer you must keep in mind the price difference between the scanners. The MetroX is available for roughly 1000€ whereas the Sermoon S1 is roughly 3100€ including the Scan Bridge. I got the Sermoon S1 as a preorder with some other discounts for around 2000€.
| Front View | Back View |
|---|---|
 |
 |
| Emitter Closeup | Side View |
 |
 |
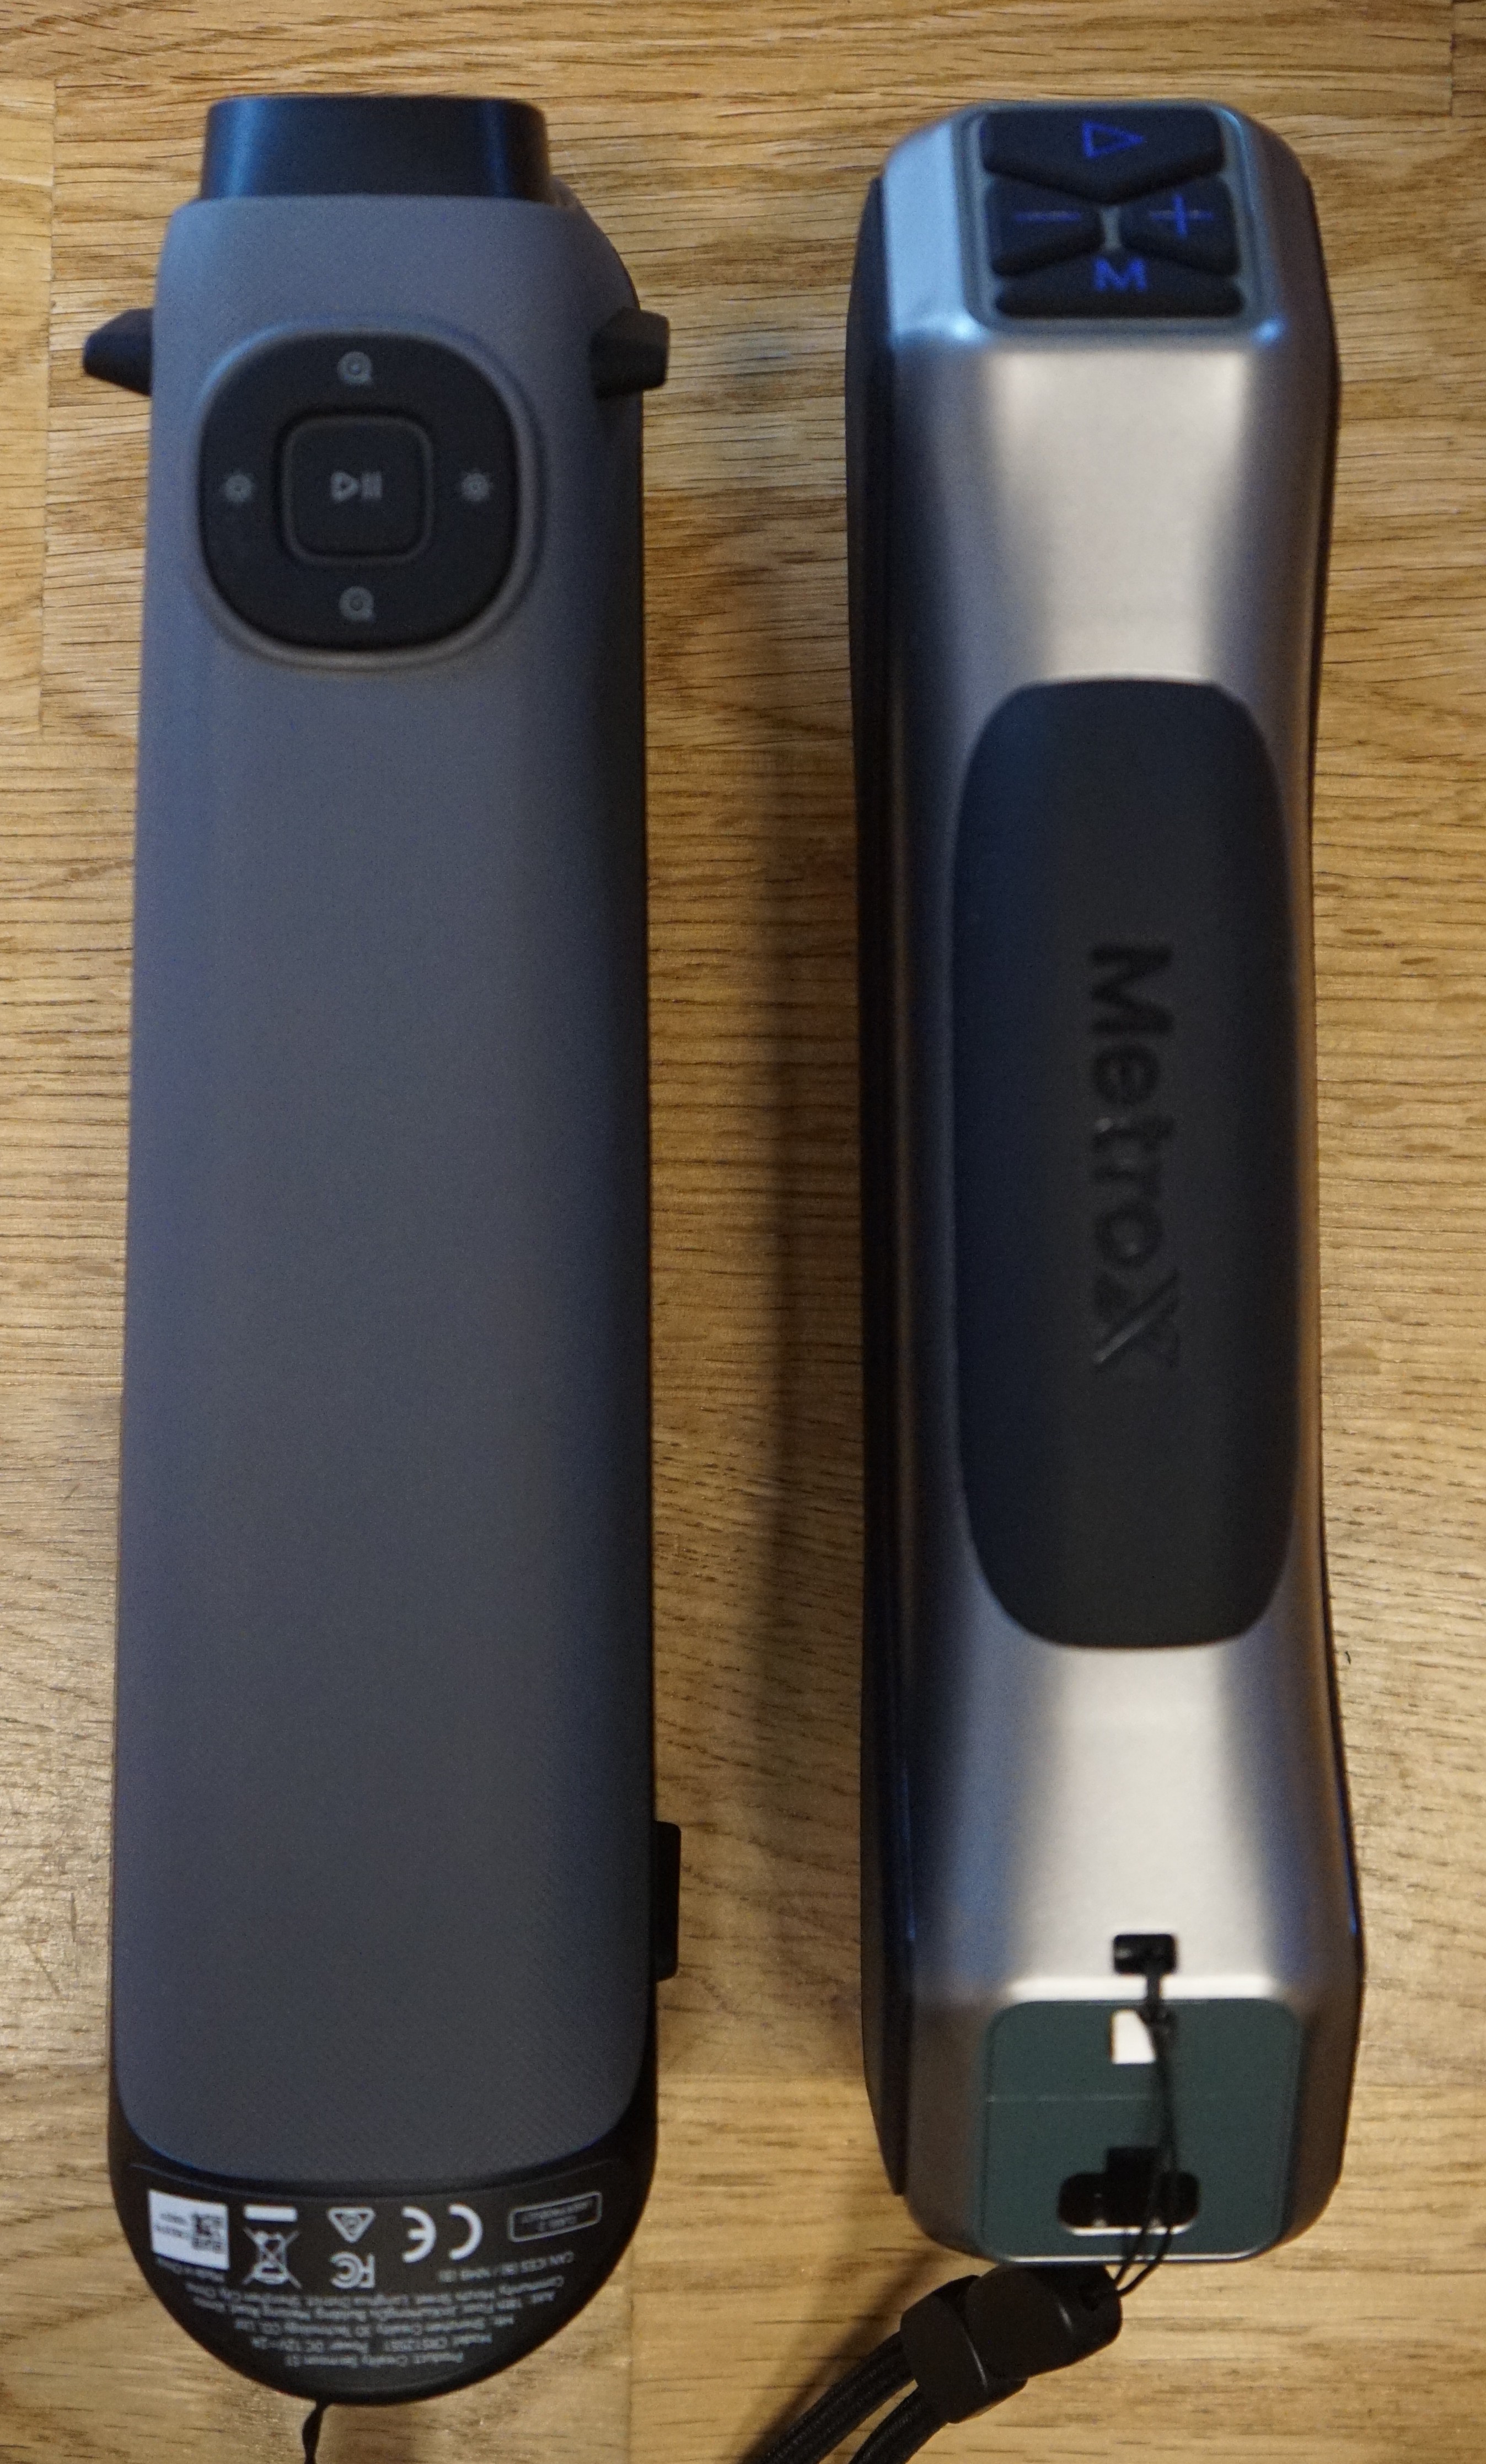
I was quite happy with with the ergonomics of the MetroX but due to the increased depth of the MetroX it gets tiresome to hold it for longer times. Whereas the Sermoon S1 feels quite like the original Raptor I had. Other differences are the narrower camera distance to enable deep single line scanning. The two wide angle cameras look quite similar to the Otter I had and are spaced the same as the high-resolution cameras.
Looking at the laser emitters one directly notices the drastic size difference. This may convey to the scanning results or be based on the larger depth of field and therefore brighter lasers needed.
Personally, I didn’t notice the lasers of the S1 to be brighter. More practical variations are observable in the parallel line mode. Like the experiences with my original Raptor the lines are extremely fine and nearly invisible at lowest power which translates to better detail scanning. The MetroX apparently uses the same emitters for parallel and cross mode since no differences in scan quality or laser line brightness or width are noticeable.
Additionally, the scan range for the different laser modes is similar in the MetroX (S1 requires to be closer to the scanned part in parallel line mode).
Addressing the newly announced MetroY and Metr Y Pro: FOV and depth of field are nearly similar to the MetroX therefore I don’t expect much improvement in marker recognition. The usage of 15 lines for parallel scanning suggests that Revopoint again used the same emitters for both modes. Scanning performance is still not known, future will tell.
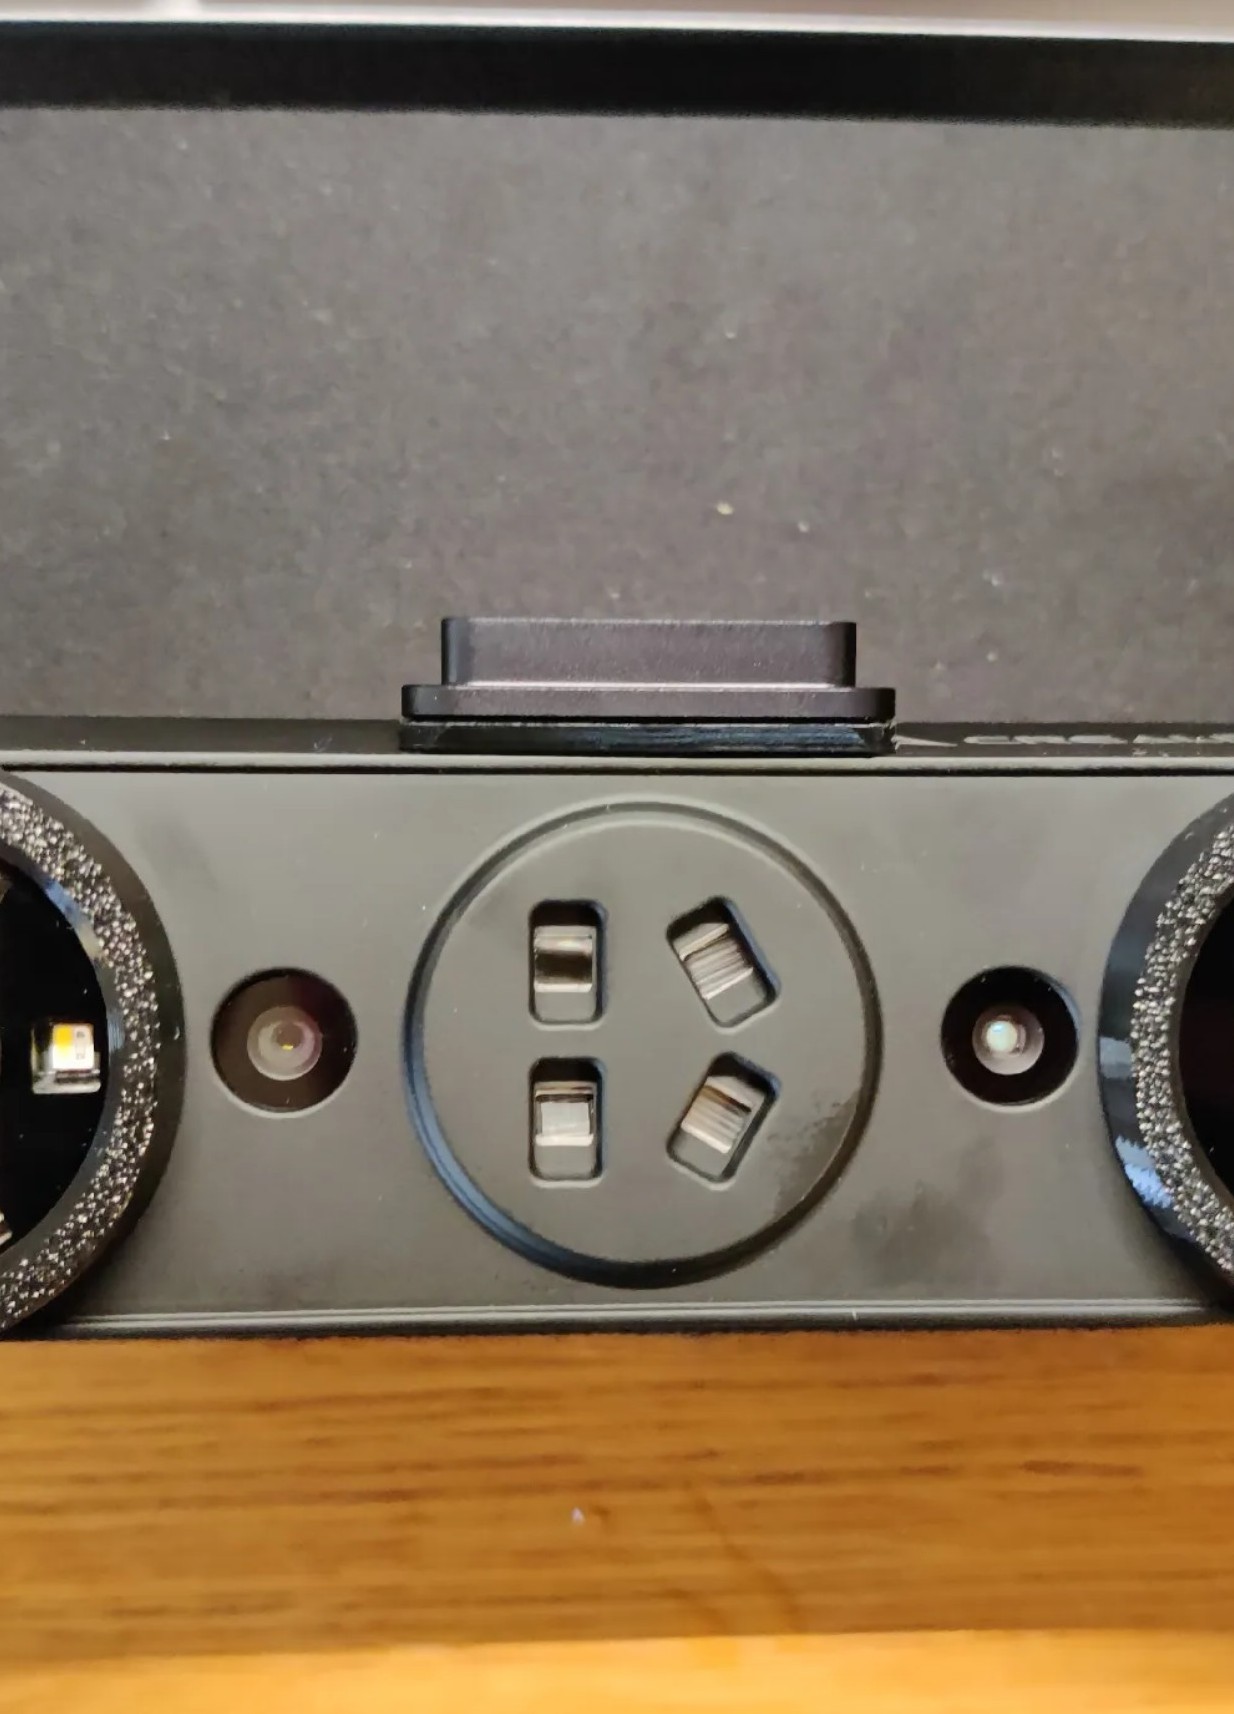
Scan Bridge
My initial impression of the bridge was excellent. Scanning and screen-casting to my smartphone worked immediately. You must keep the additional weight of the bridge and smartphone in mind when planning to buy the bridge. For me it is acceptable but took some time to get used to since I have quite a hefty smartphone. Often, I simply prefer to screen-cast to my tablet and place it on the workbench to eliminate the additional weight.
Only afterthought was the crooked mounting of the quick-release connector on the Sermoon S1. Nothing a 3D-print and longer 1/4in screw can’t fix (design provided on my Printables-page).
| Before Print | After Print |
|---|---|
 |
 |
Range seemed limited at first with only 3 to 4 meters while using the built-in WiFi on my motherboard. After further contemplation I decided to switch the pathetic stubby antennas on my motherboard with the original ones and suddenly the range increased dramatically (should have though earlier about it with my IT background…). Now I’m able to go two rooms down the hall (only draywall) and scan from there without any dropouts or decrease in framerate.
NIR scanning with the Bridge is extremely enjoyable with nearly no difference to wired scanning since it hits the full 30FPS. The limitation to 40FPS in laser-mode makes me sometimes consciously use the cable to increase data acquisition speed – especially for parallel and single line – for very high-resolution scans. When scanning big parts and therefore setting the target point-distance to a value greater than 0.7mm and using cross lines it reaches the target point-distance nearly in real time so no need to use the cable.
Scan Results
When looking at the scans I will focus on giving you the context and settings of the scan to highlight the capabilities of the Sermoon S1. Where suitable I will include comparisons to create a relative impression of performance.
First Impressions
My stream of mind: Damn this scanner is fast in acquiring markers and scanning.
Laser-Scanning
Marker Detection
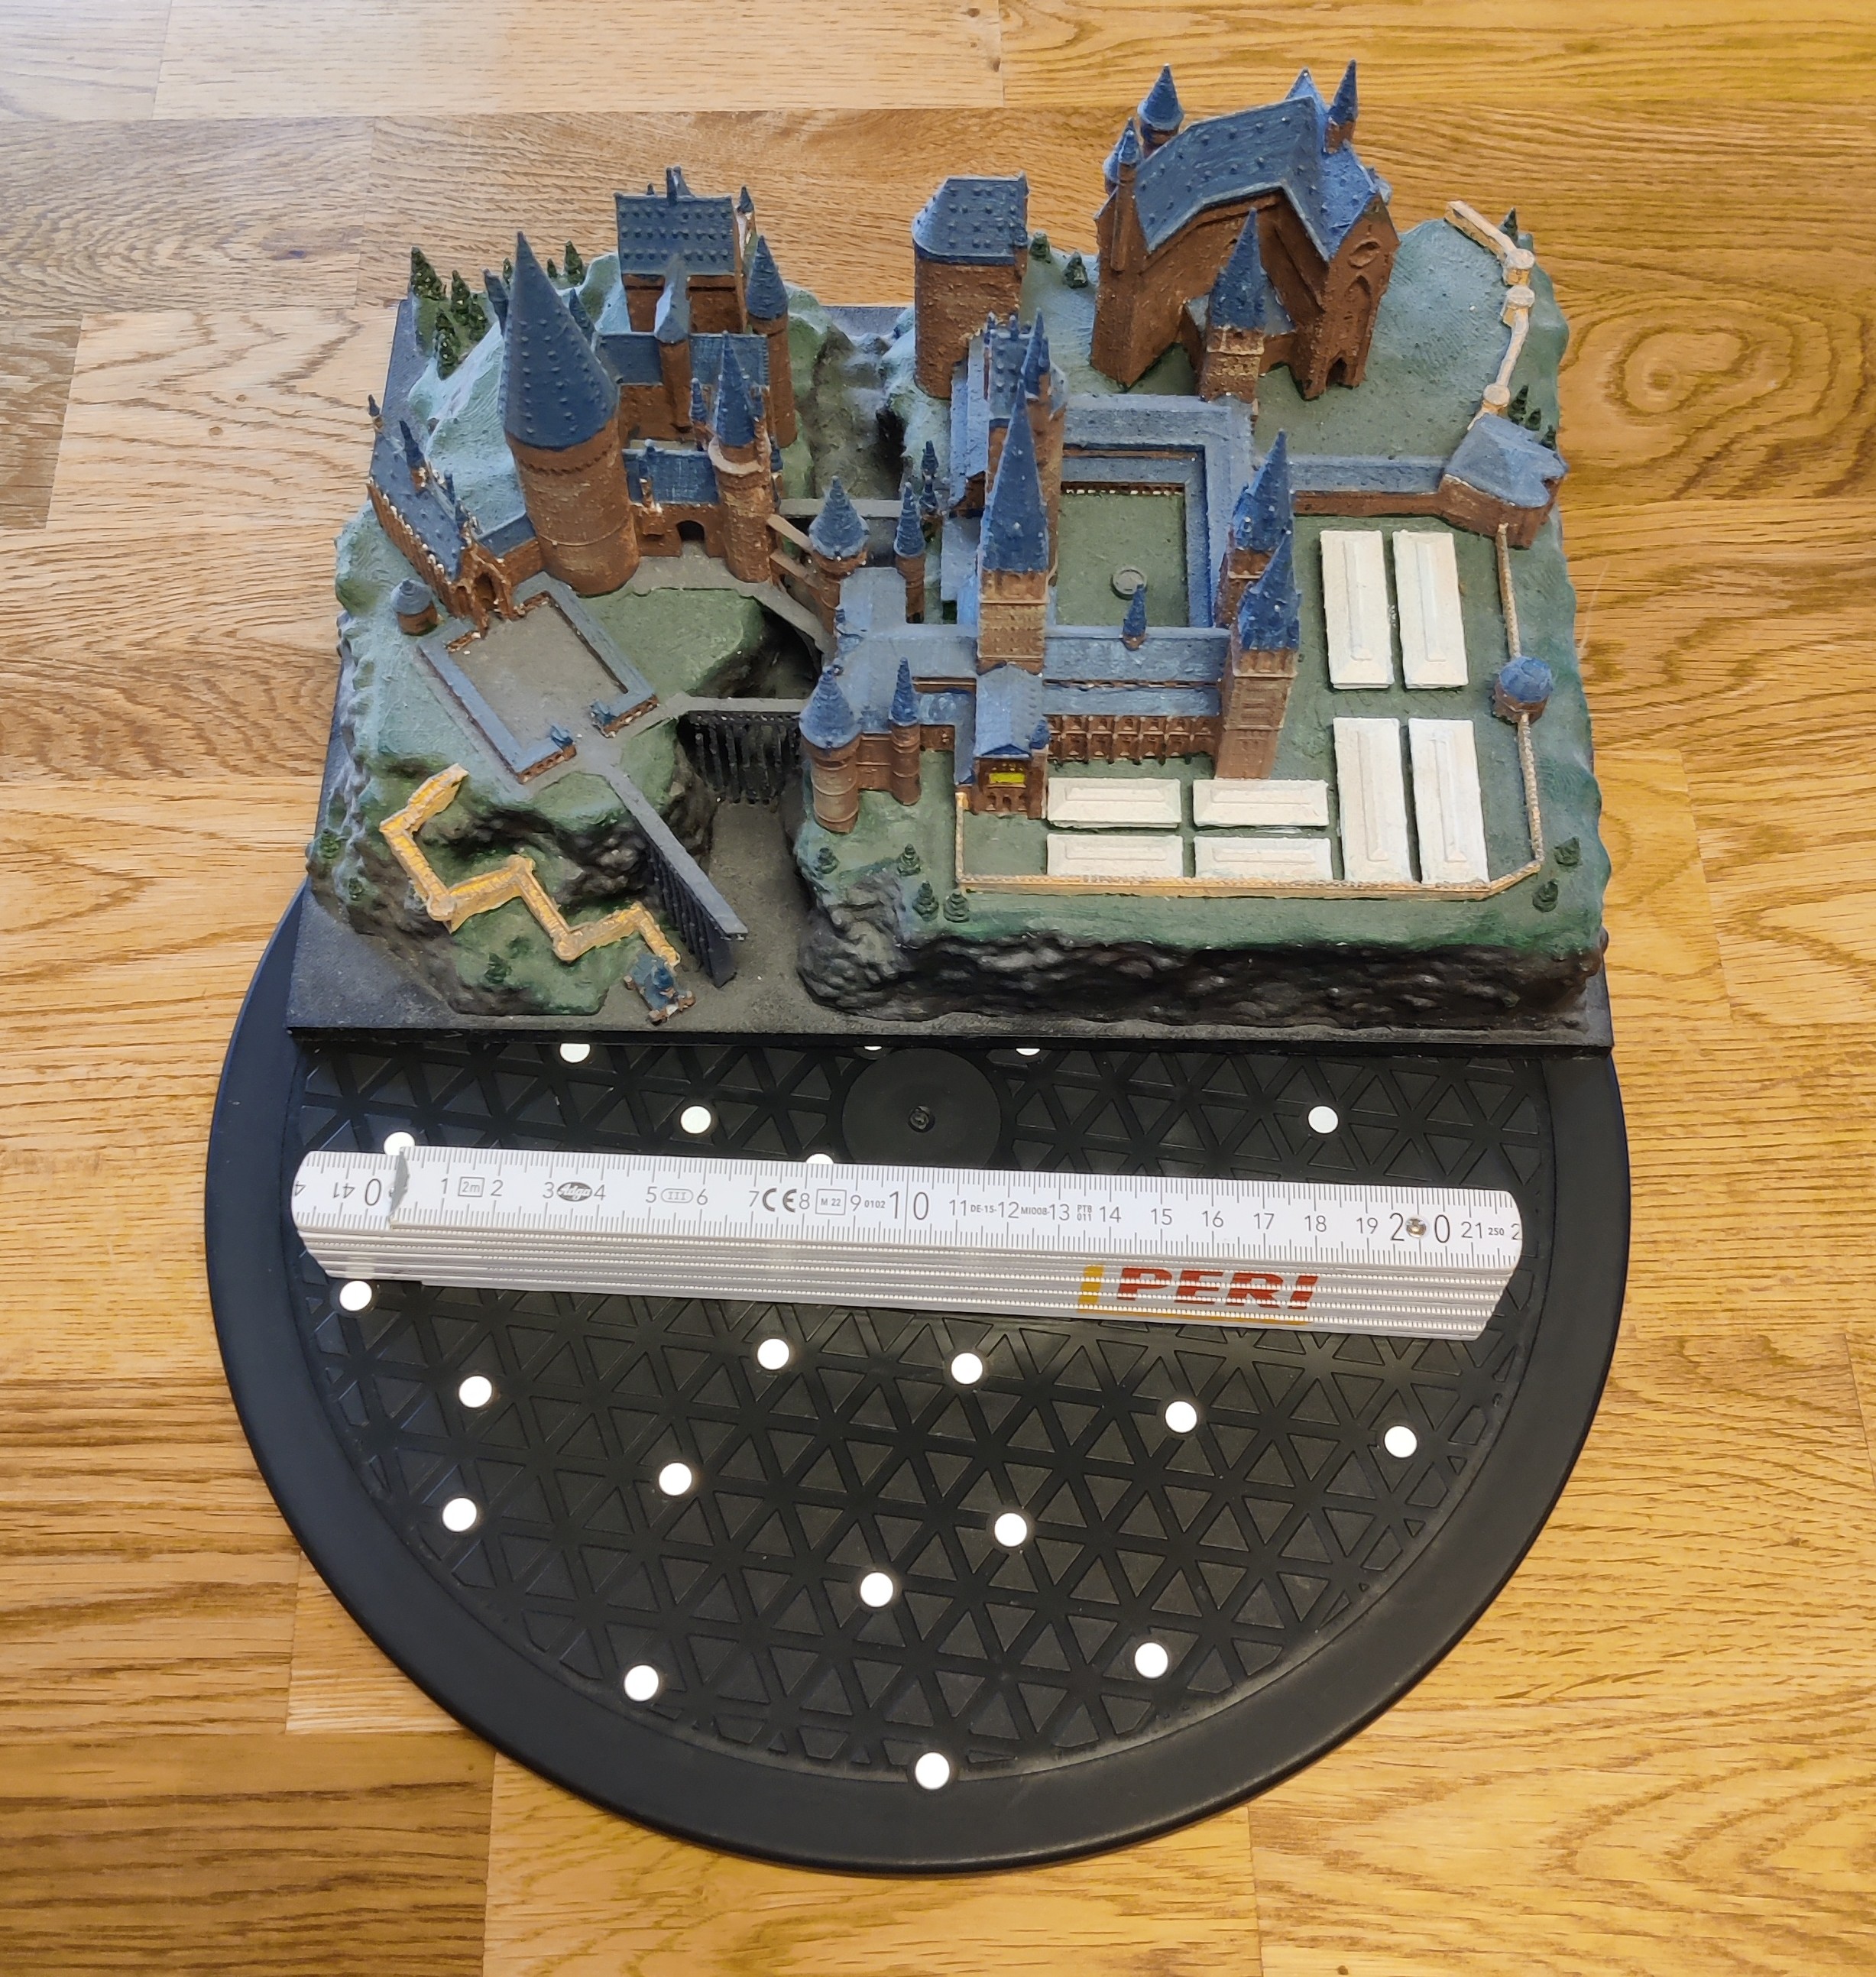
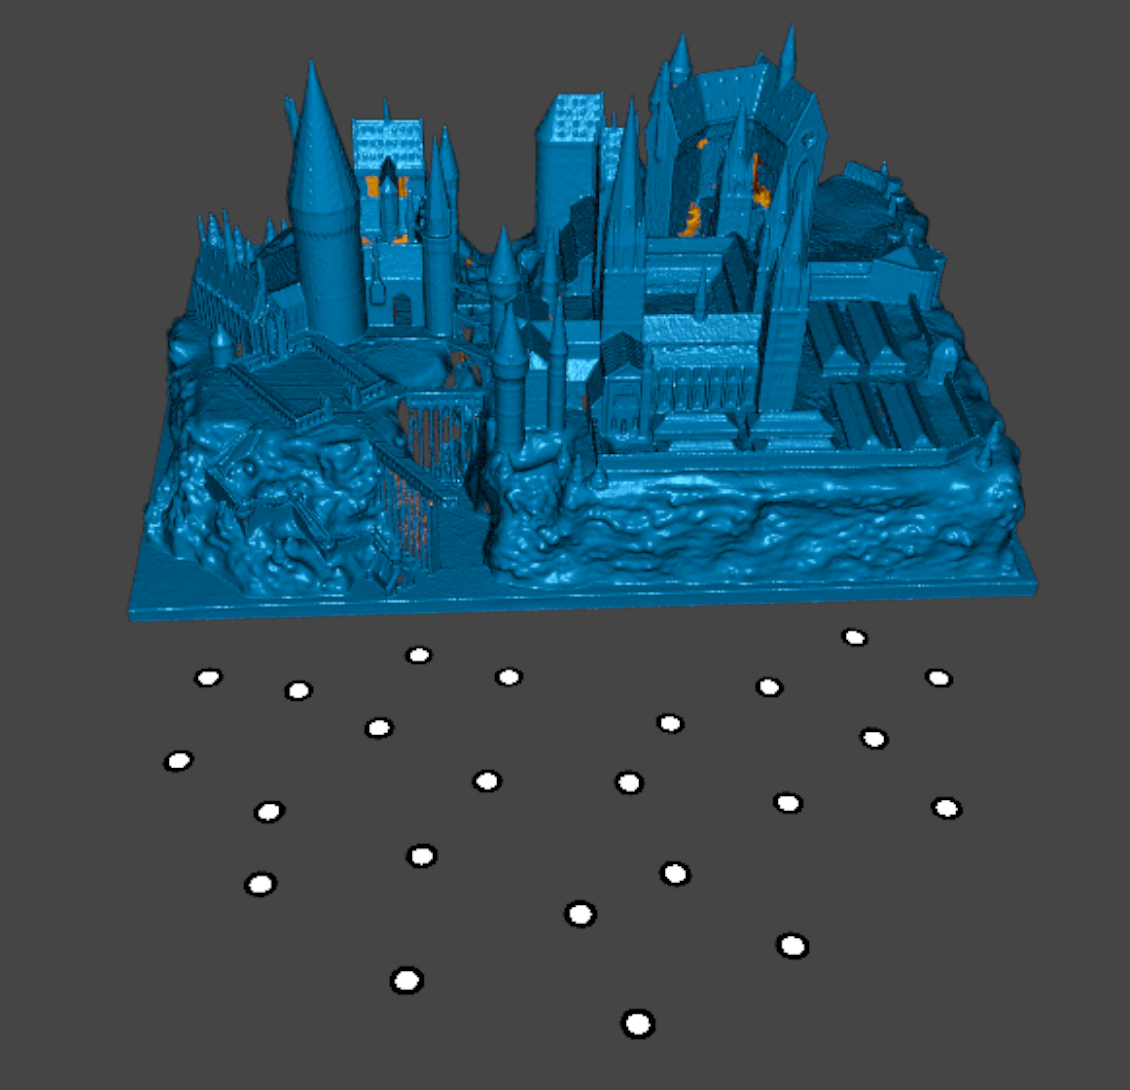
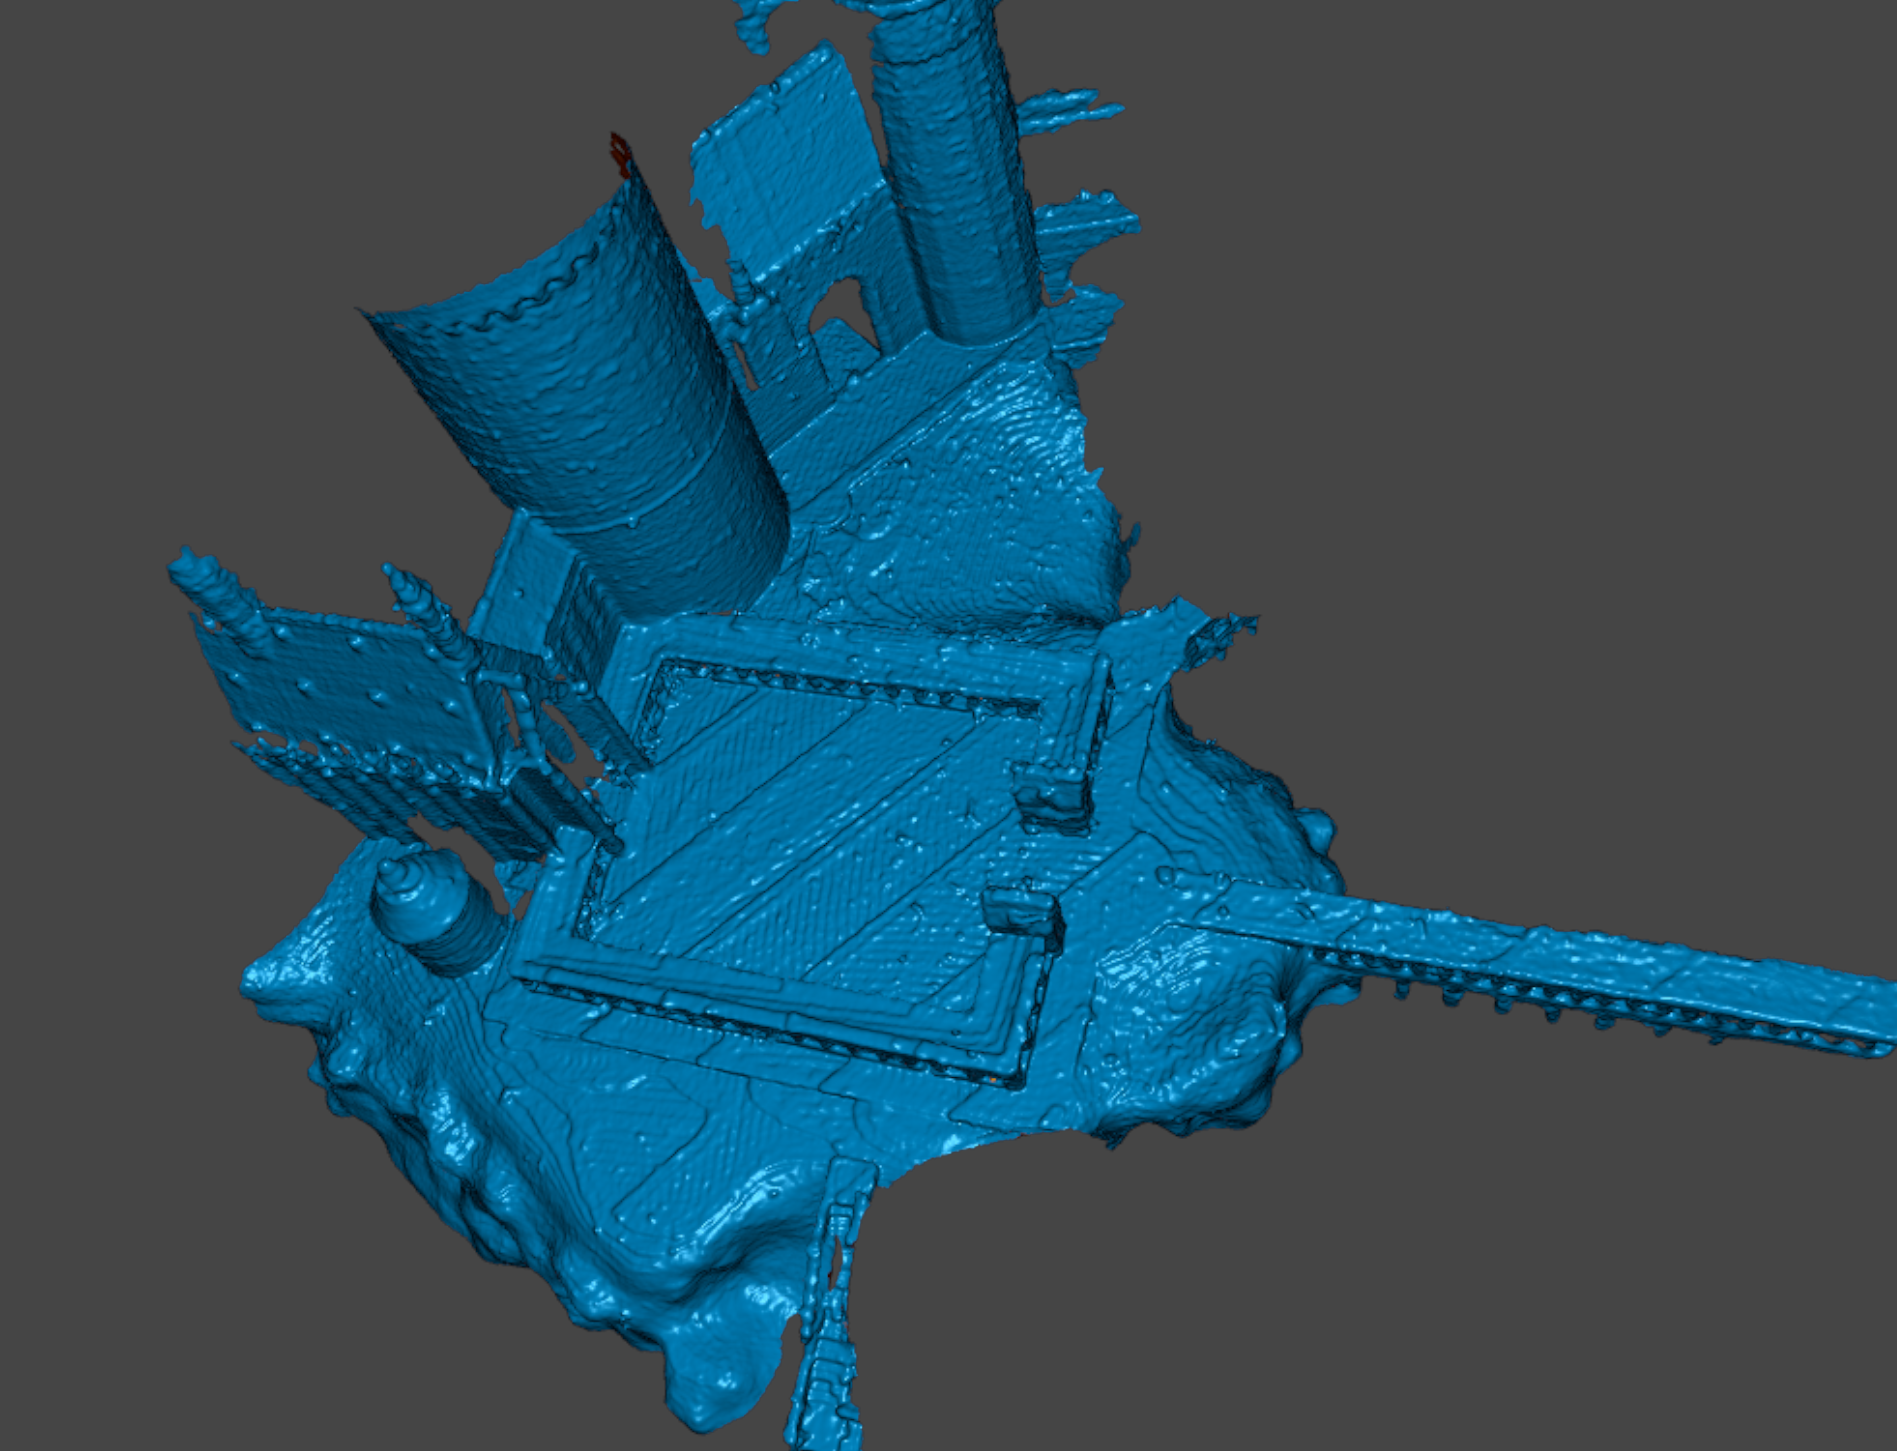
Coming from the MetroX with quite a small depth of field the Sermoon S1 fells like a blessing. The following scan demonstrates the impressive marker detection even under objectively “bad” conditions:
| Scan Setup | Front View Scan |
|---|---|
 |
 |
| Scan Top | Scan Back |
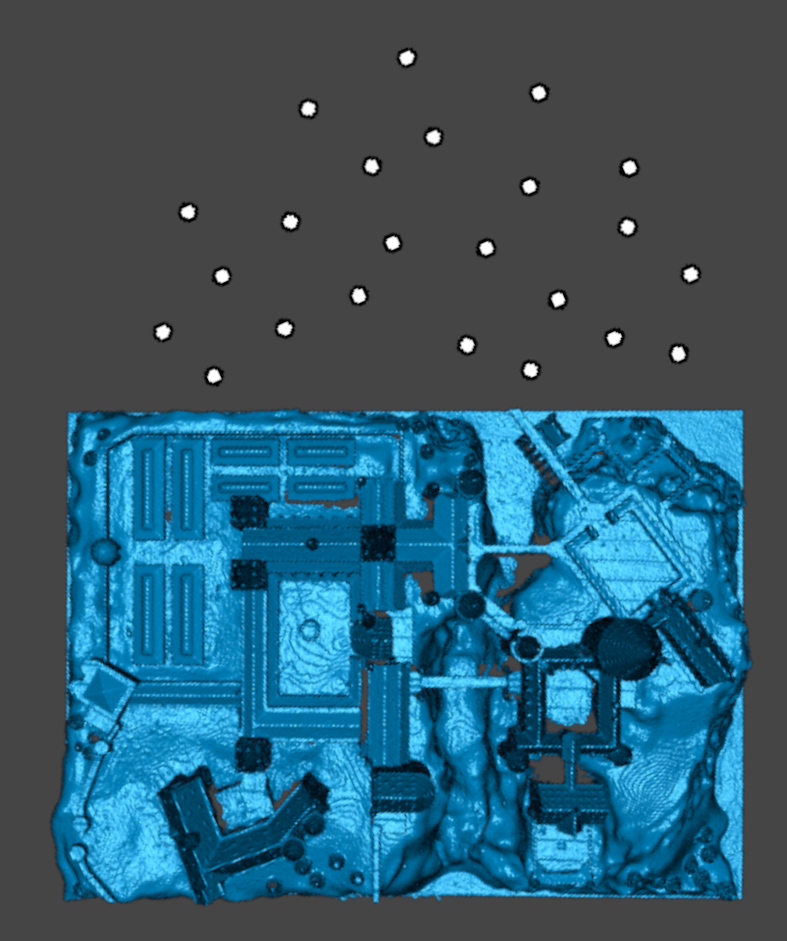 |
 |
The only markers used were on the turntable and my goal was to capture as much of the castle as possible. I used all three laser modes and the Scan Bridge to move freely around the model and capture the deep crevices of the model. Nearly the whole castle was scanned in the end and left me impressed.
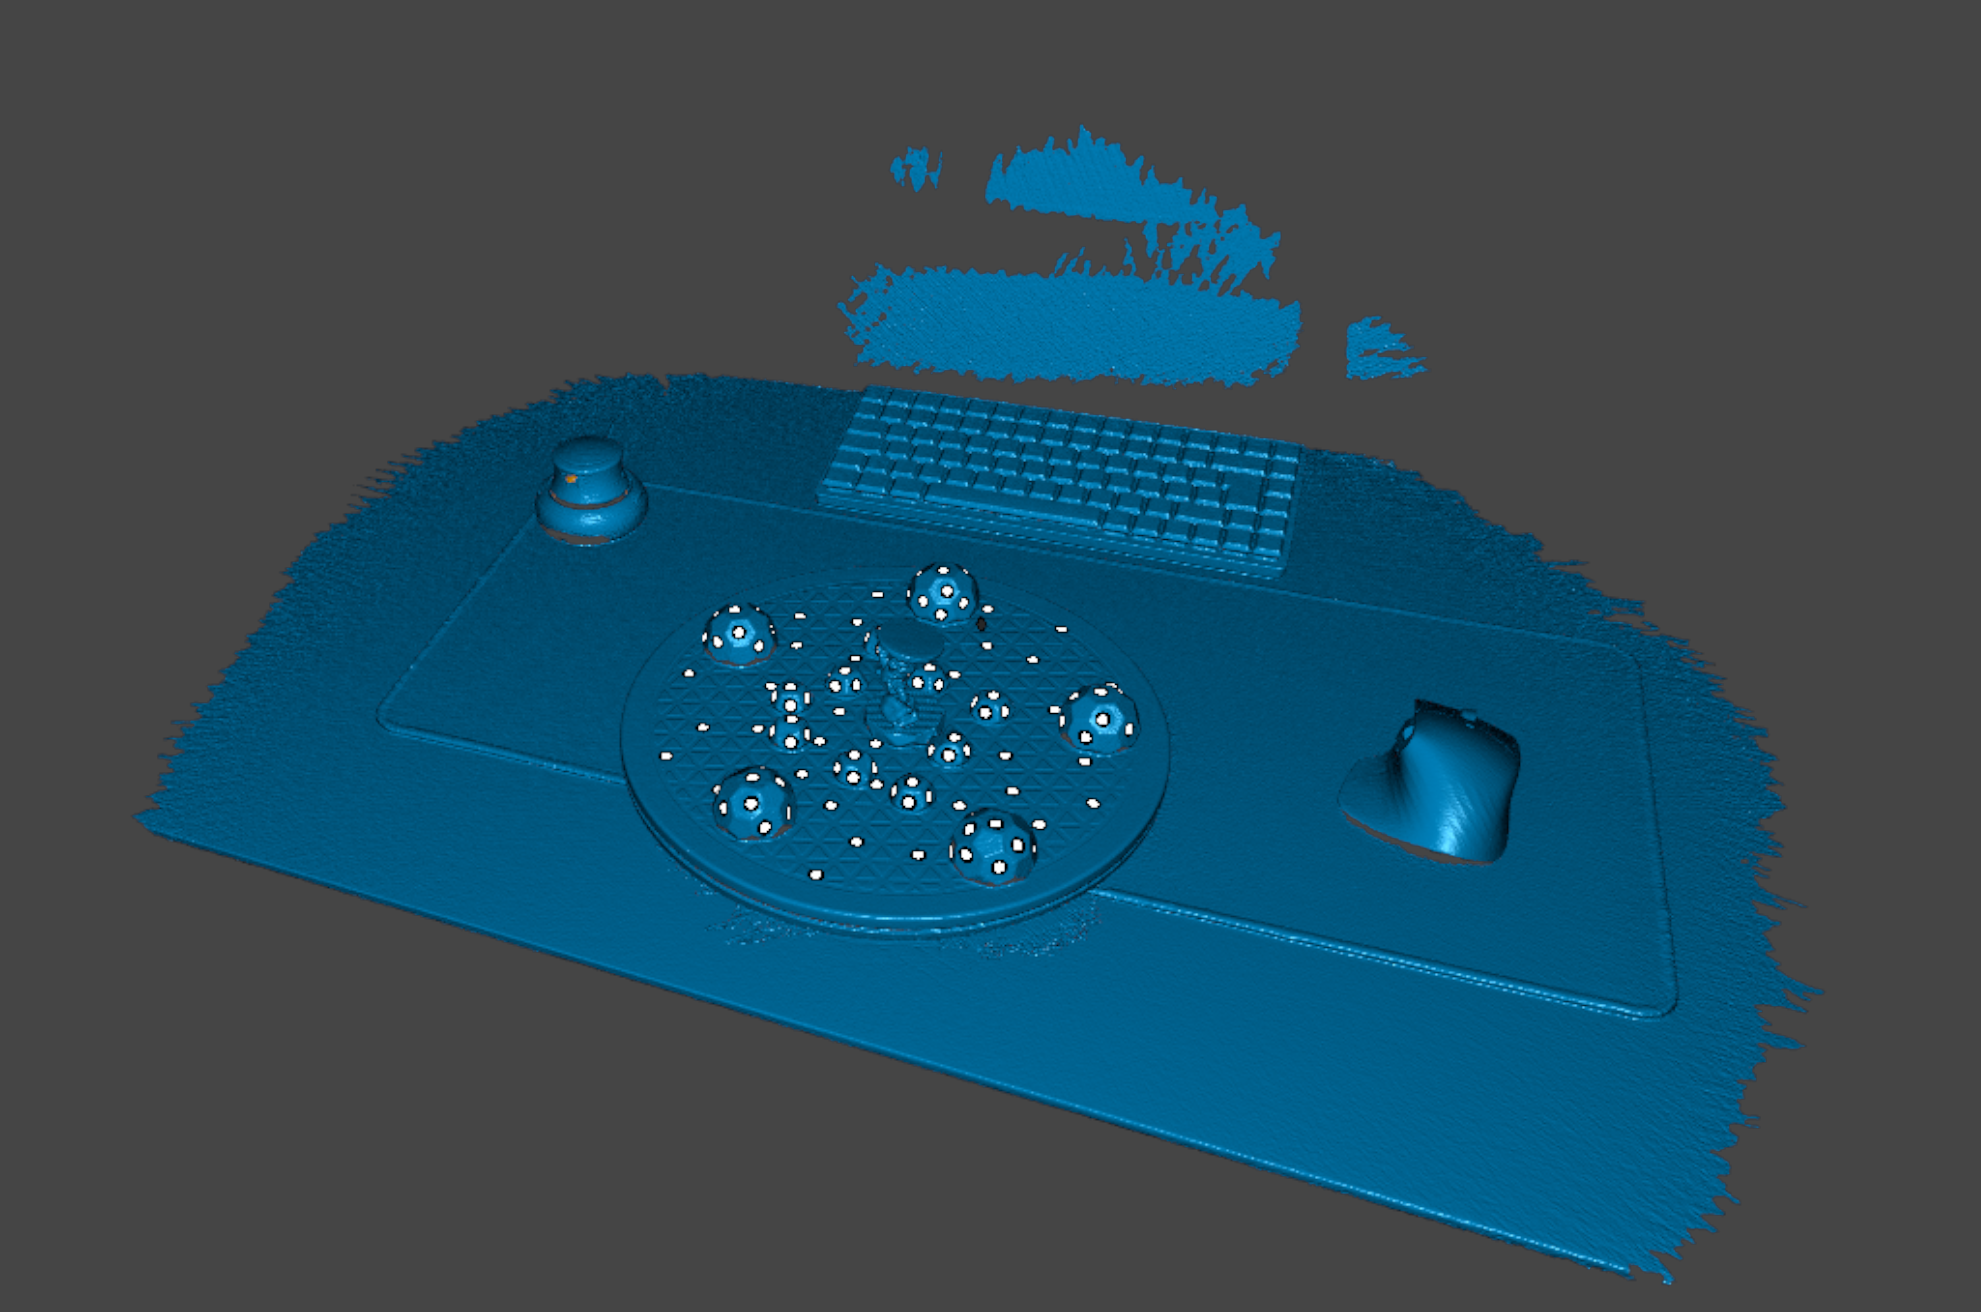
FOV & Depth of Field
This may be the biggest selling point of the S1 over cheaper competitors: Superior optics and therefore more depth of field (DOF) a bigger scan area. From my experience the DOF is more important for marker recognition – therefore tracking quality – than scan data acquisition as you can see in this example: The test-setup was very simple. I placed my turntable equipped with marker-points and marker-geometries on my desk and tried to scan as much as possible of the table. Scanning was performed until no more data could be acquired due to tracking loss.
Sermoon S1:
Metro X:
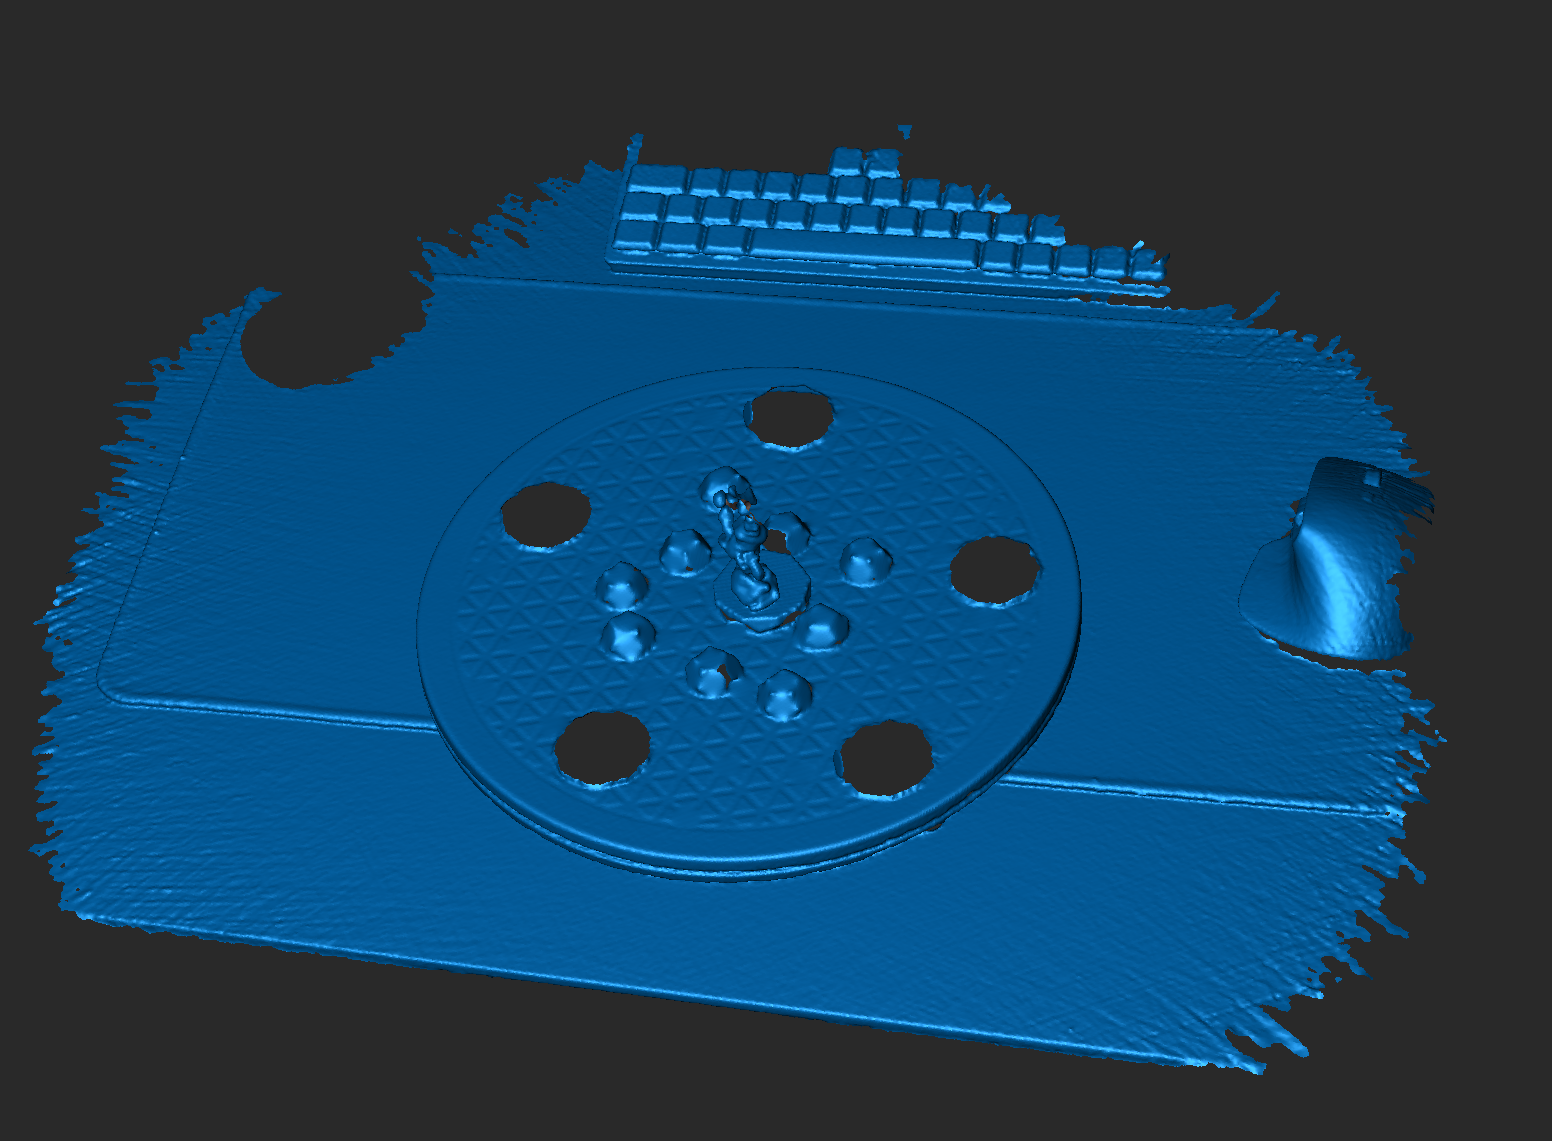
Most prominent is the difference in captured area. The S1 shines with its DOF of 600mm in comparison to the MetroX with 400mm. This difference also affects the scanning area. FOV feels quite similar but due to the increased range the Sermoon has a substantially larger scanning area at max. range (506433mm vs 320215mm or larger by a factor of 3.18). In my opinion this is the most significant difference between the two scanners even bigger than the improved laser-line count or framerate.
Additionally, you may notice the absence of some feature in the second scan. The raw-data of the MetroX included traces of the SpaceMouse or marker-domes but after fusion they disappeared due to low data-quality.
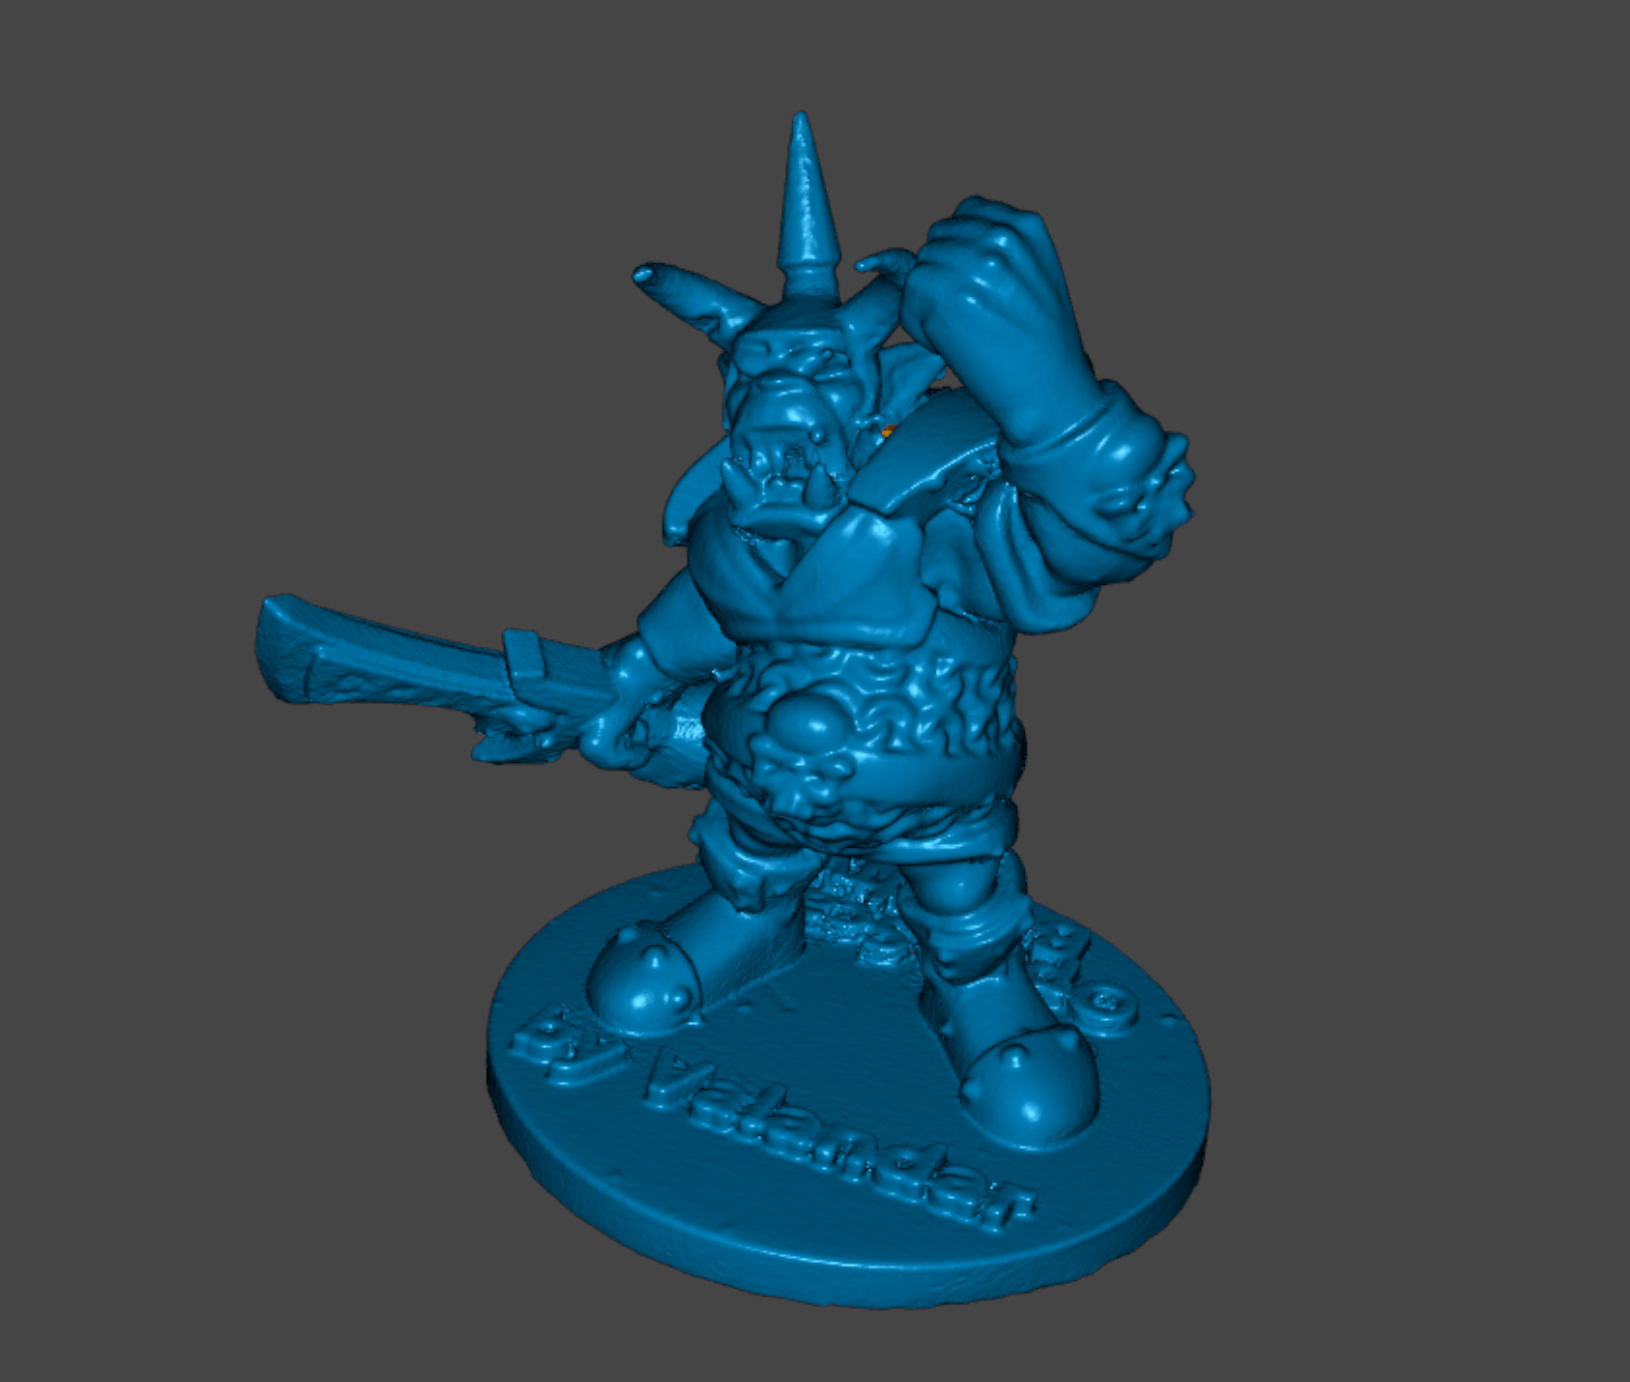
High Detail Scan
The typical test for maximum scanning resolution and quality is the OpenScan Benchy. It was scanned in parallel lines with manual laser brightness and exposure to prevent overexposure. The turntable I used my have introduced some vibrations, maybe I will later build the one from Payo using a proper thrust-bearing. For comparison a scan from the MetroX in Auto-Turntable mode will also be included. In both scans the most detailed settings were used for fusion and meshing (whilst also staying realistic, 0.002mm fusion with the S1 induces more noise than 0.05mm).
ScanBenchy Sermoon S1
Sketchfab-link: https://skfb.ly/pASVs
| ScanBenchy Front | ScanBenchy Back |
|---|---|
 |
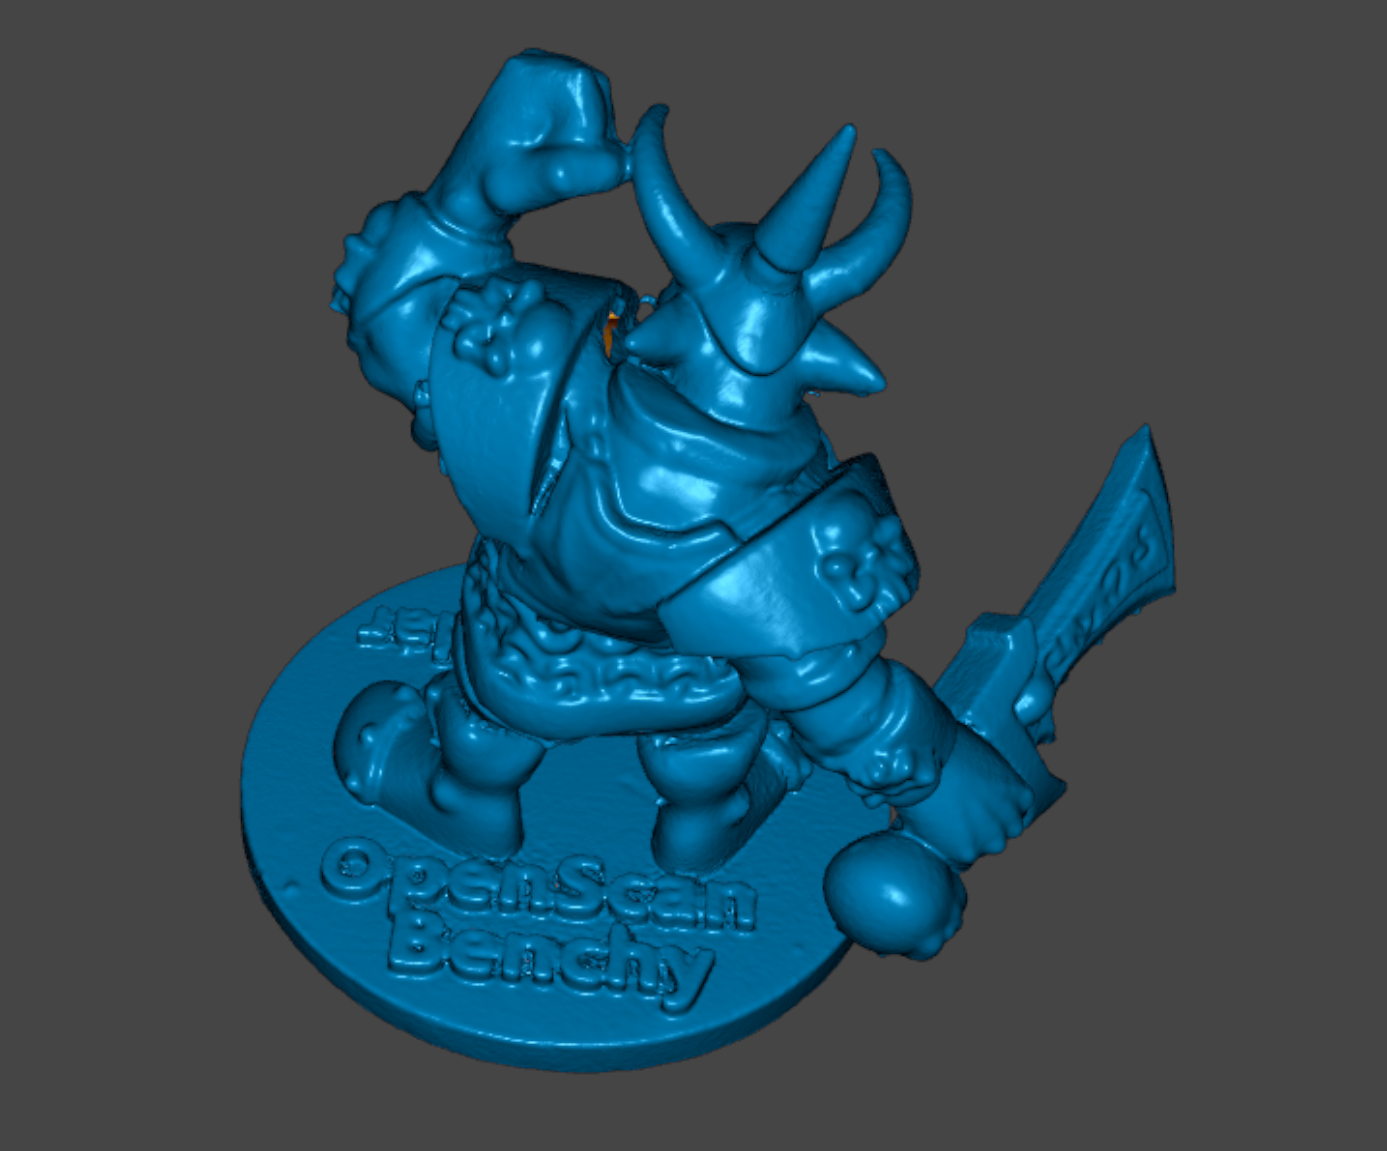 |
ScanBenchy MetroX
Sketchfab-link: https://skfb.ly/pASVx
| ScanBenchy Front | ScanBenchy Back |
|---|---|
 |
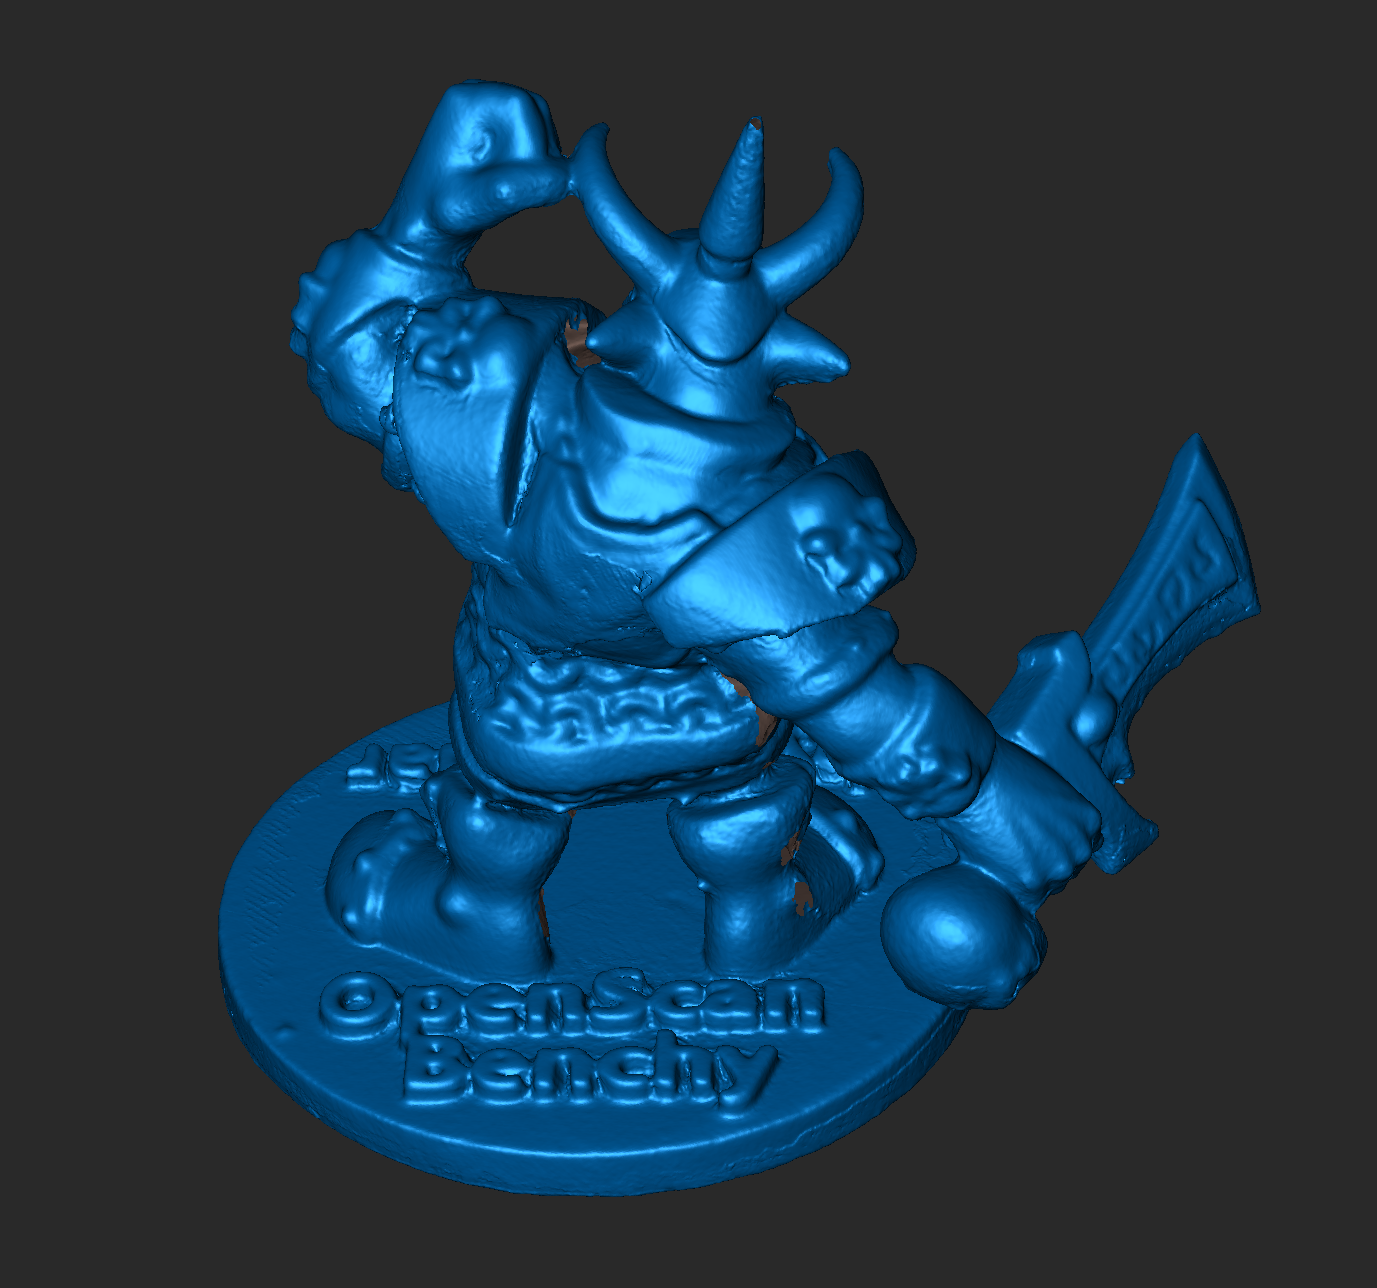 |
For me it feels like a tie, but you should compare the results for yourself on sketchfab.
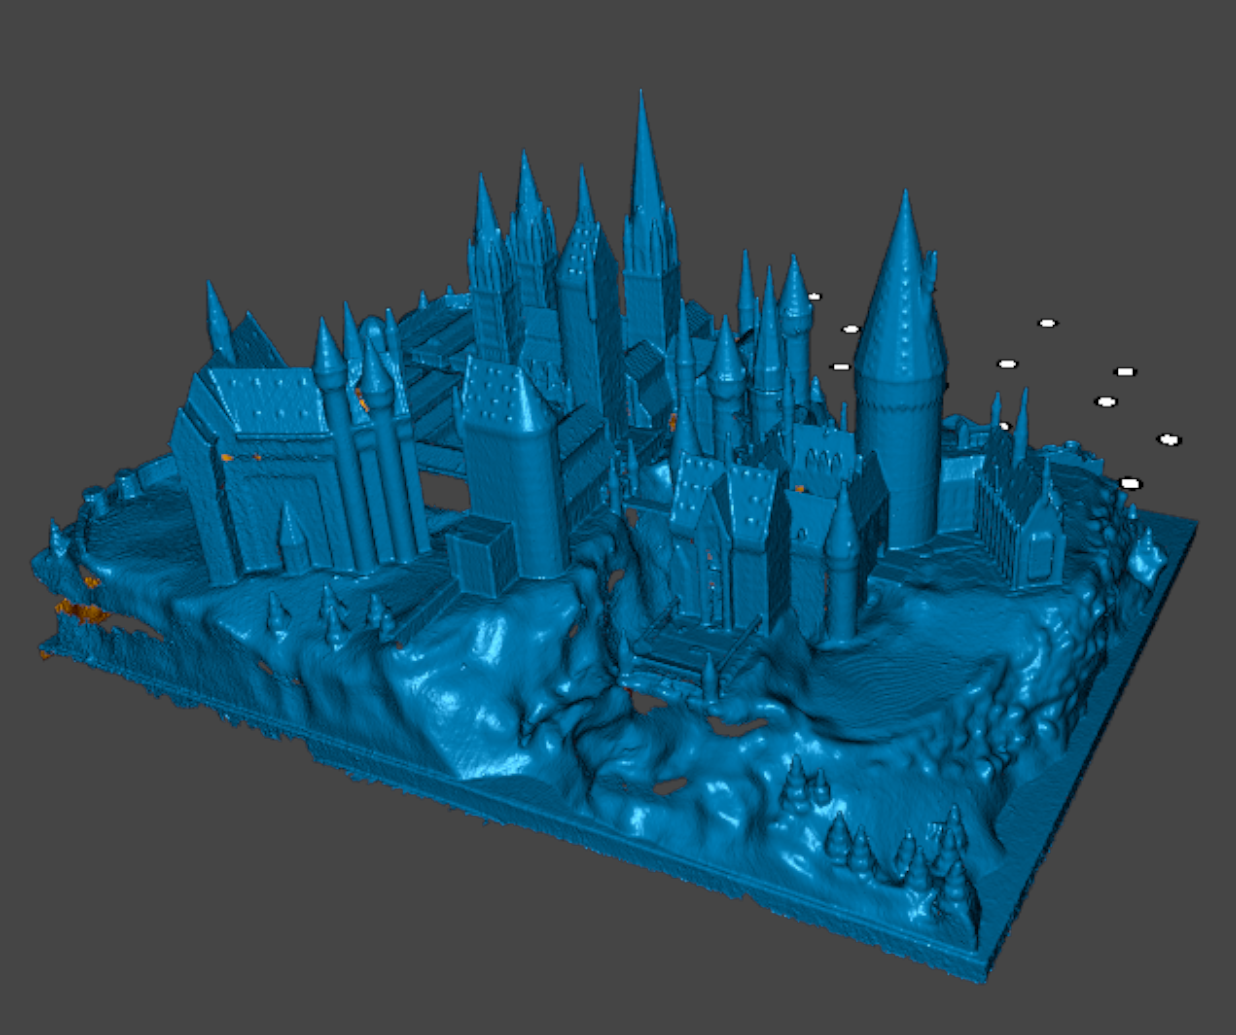
3D-printed Castle Sermoon S1
Sketchfab-link: https://skfb.ly/pASVH
This is part of the printed castle used in previous tests. Print was performed with a 0.6mm nozzle and 0.3mm layer-height. If you have the patience it should be possible to measure it from the scan.
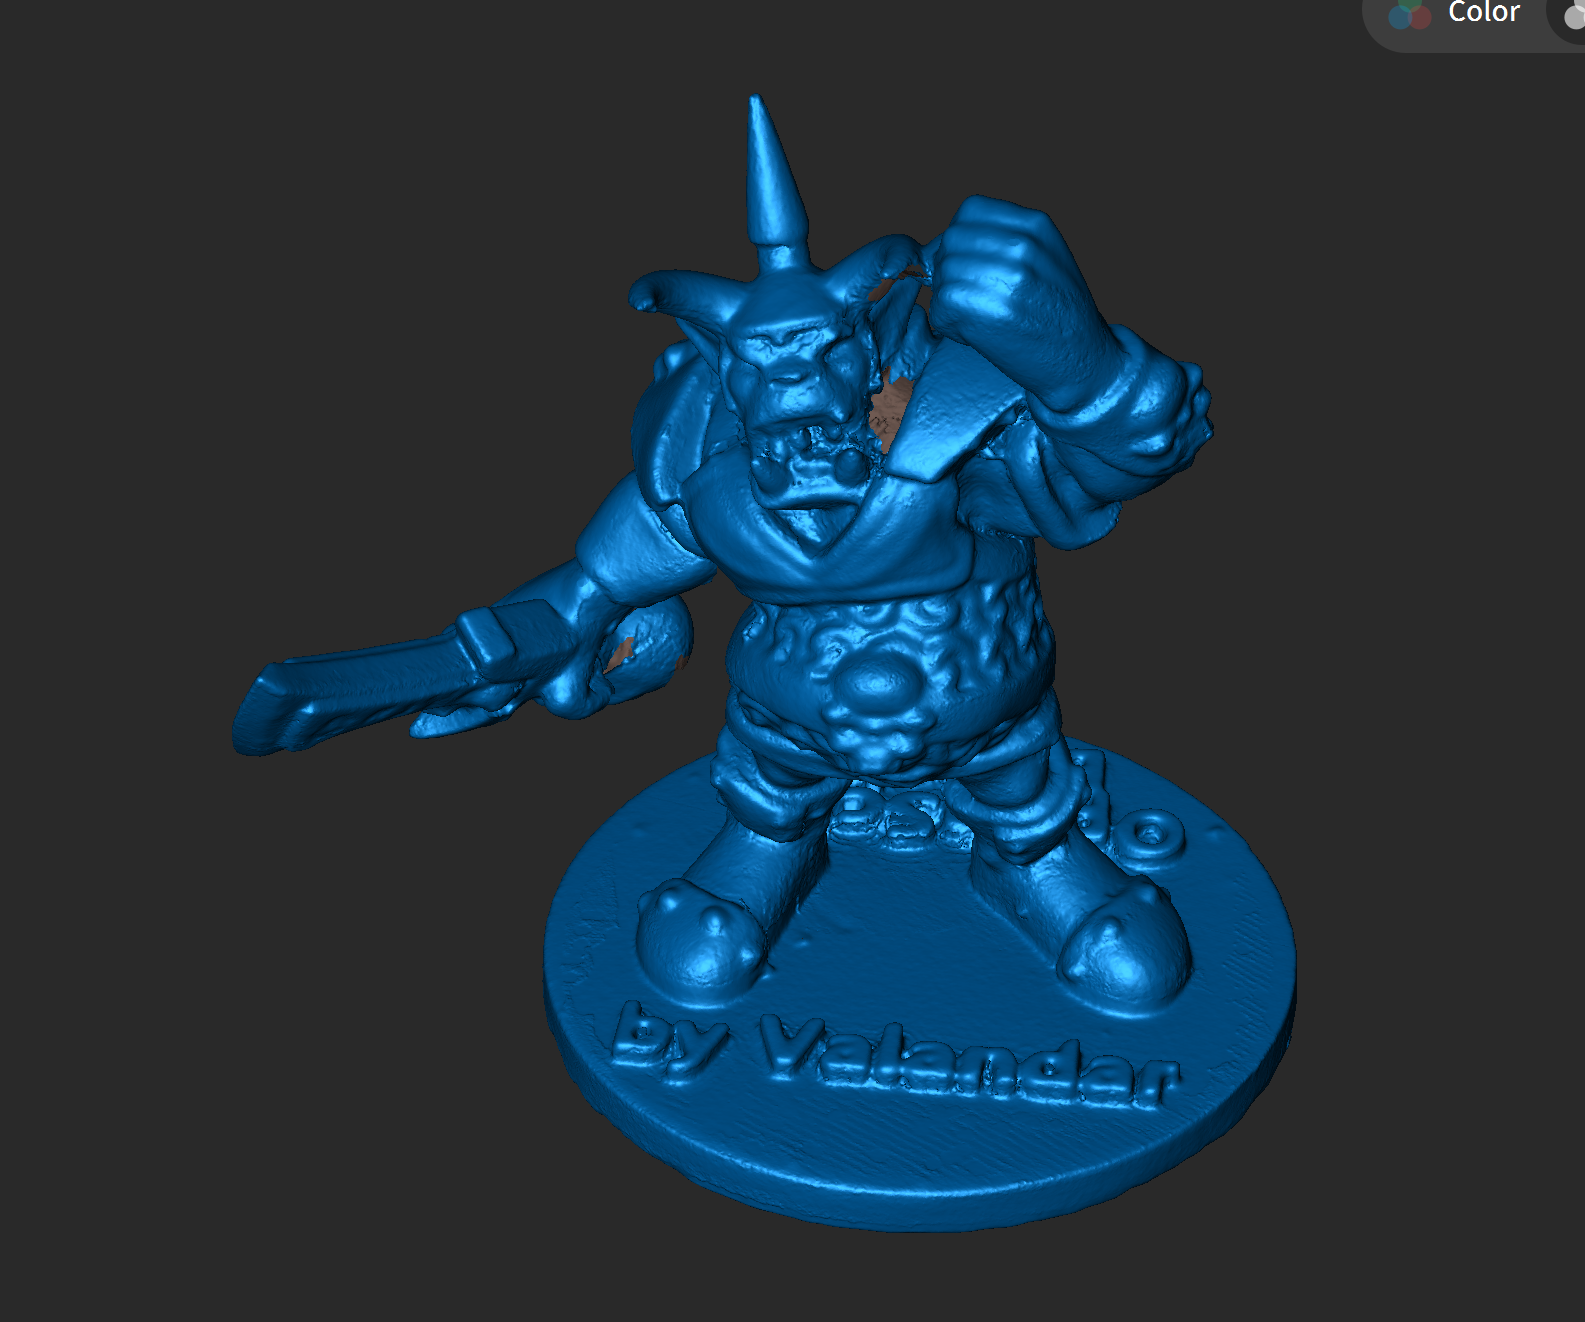
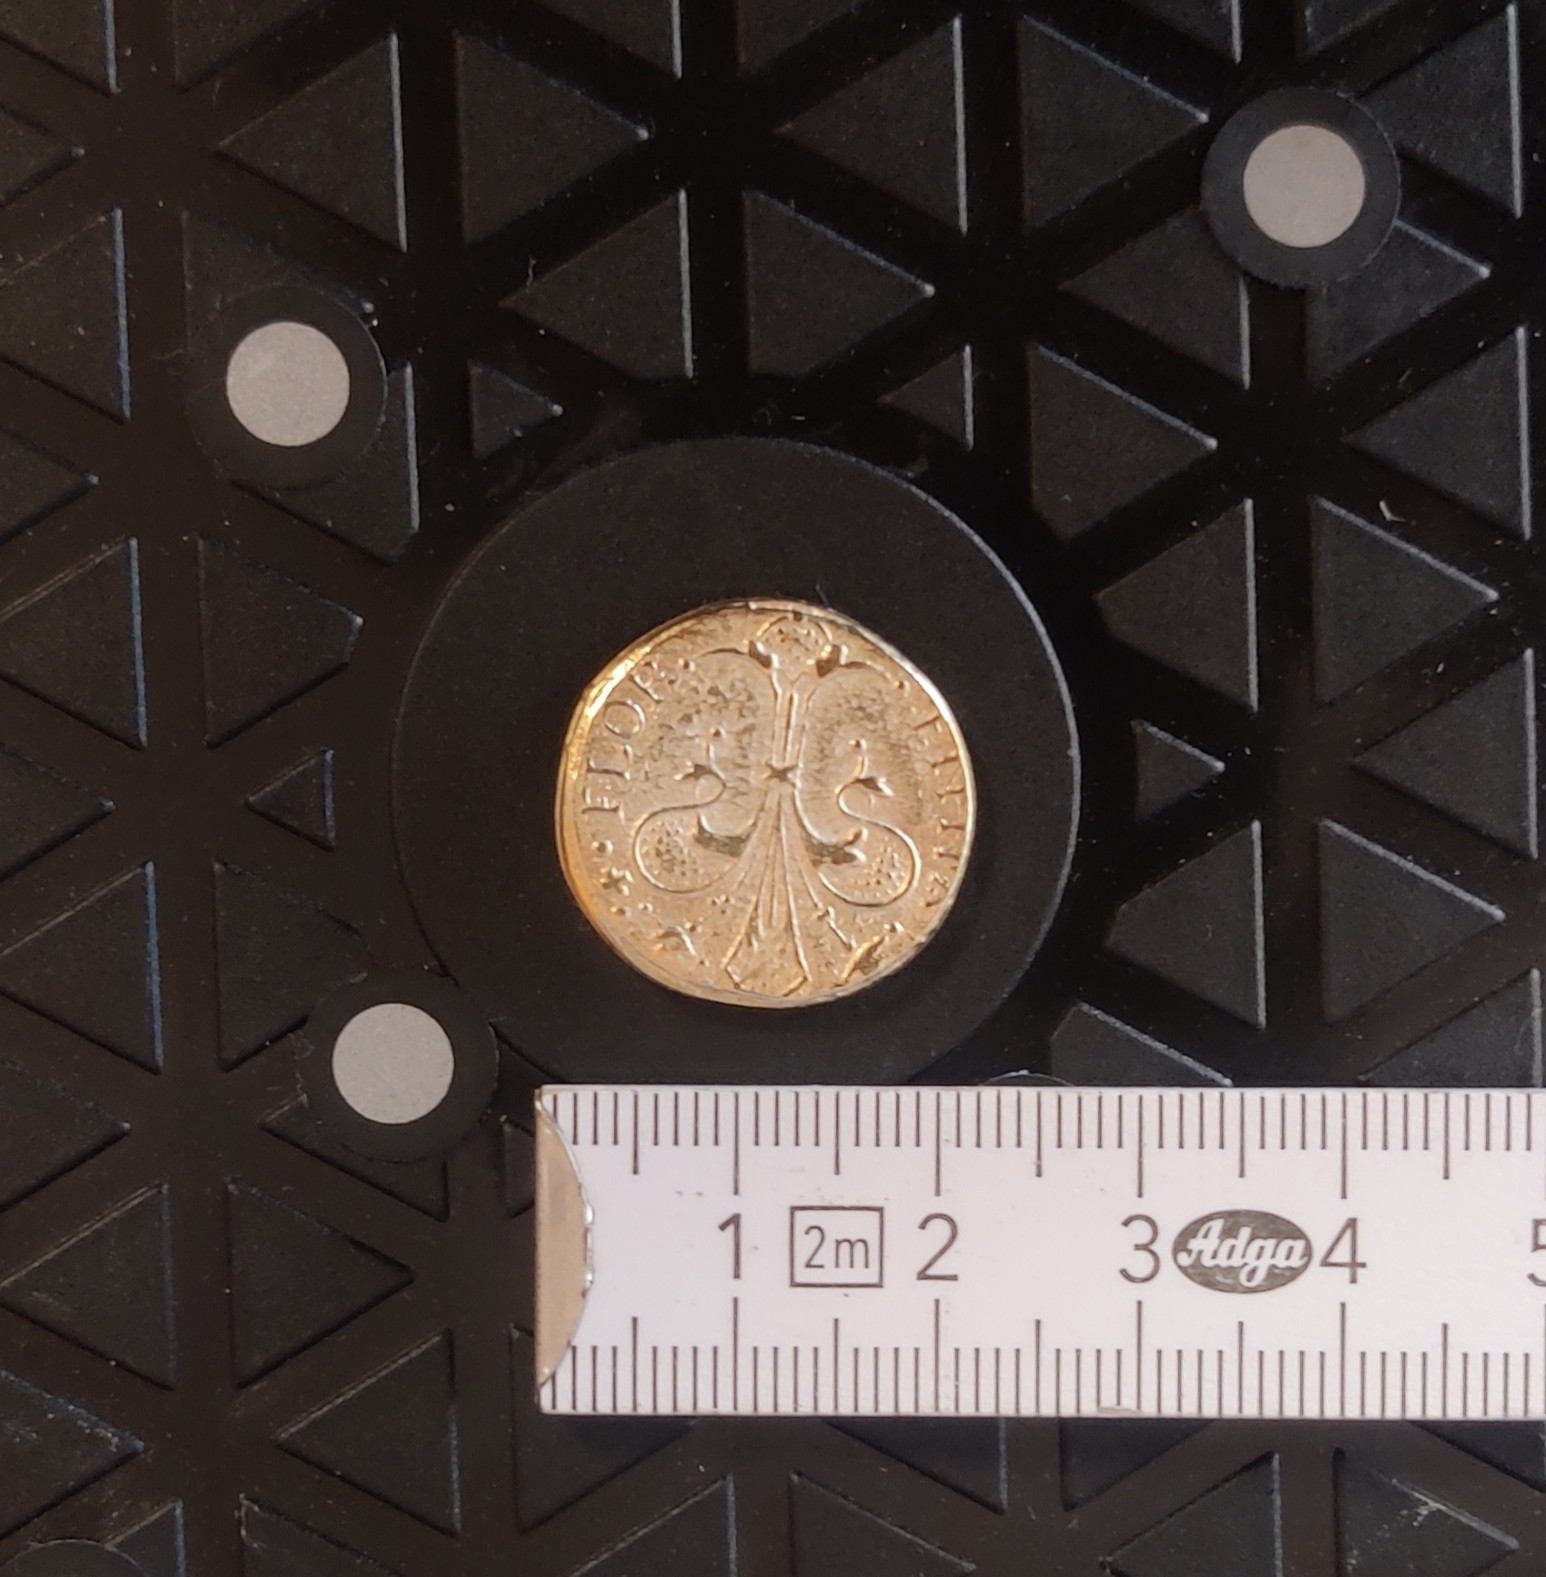
Golden Coin Sermoon S1
After some feedback regarding laser-scanning capabilities of the Sermoon S1 I created further tests and one of them is the high-detail scan of a coin. It is roughly 20mm in diameter and was covered with sublimating scan-spray in preparation.
All scans were conducted with highest preview quality and highest post-processing quality.
Four test scenarios were created with the results from left to right:
- Parallel laser lines, manual exposure, turntable (may induce vibration), scanned until fully blue -> roughly 5k frames
- Parallel laser lines, manual exposure, static (no turntable used), scanned until 20k frames captured
- NIR small (marker-tracking), manual exposure, turntable, scanned until fully blue -> roughly 1k frames
- NIR small (marker-tracking), manual exposure, static (no turntable used), scanned until 5k frames captured
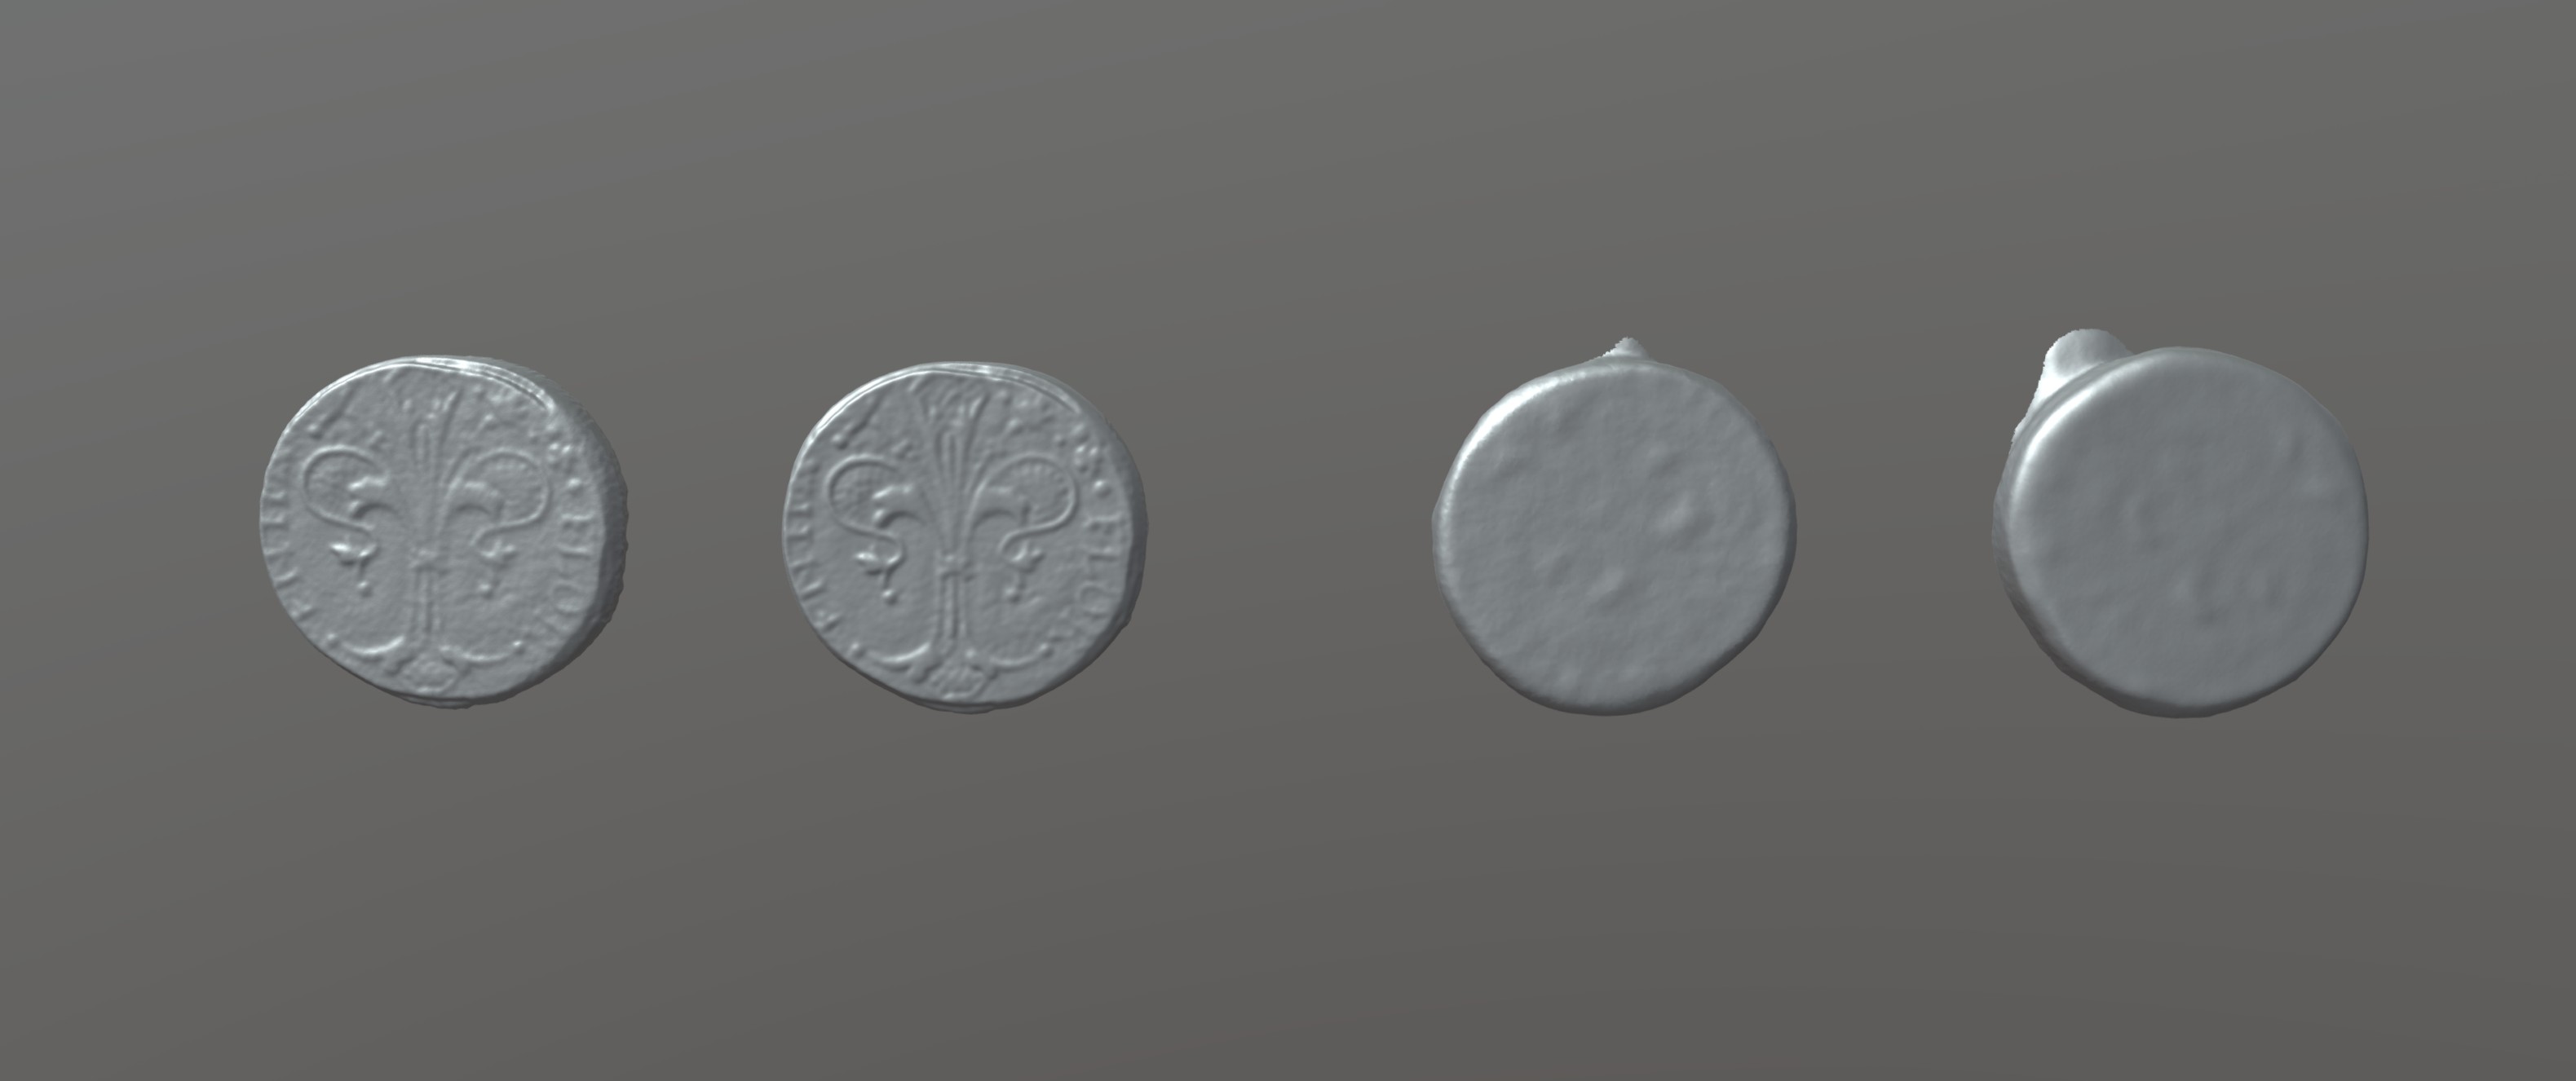
Sketchfab-link: https://skfb.ly/pAXZE
The results are as expected. The laser-mode fused at ultra-quality (0,02mm) drastically outperforms NIR mode. Thinking about the Creality Otter the capture of small parts in NIR is worse since it simply isn’t the goal of the scanner.
The difference between the two laser scans is subtile but present: 20k frames simply provided more data to fuse and mesh, therefore less noise and more detail is there.
When scanning in ulta high quality I would advise to use the scanner wired to benefit from the 90FPS. Otherwise it can get quite heavy when capturing this much data.
NIR
Different NIR modes tested
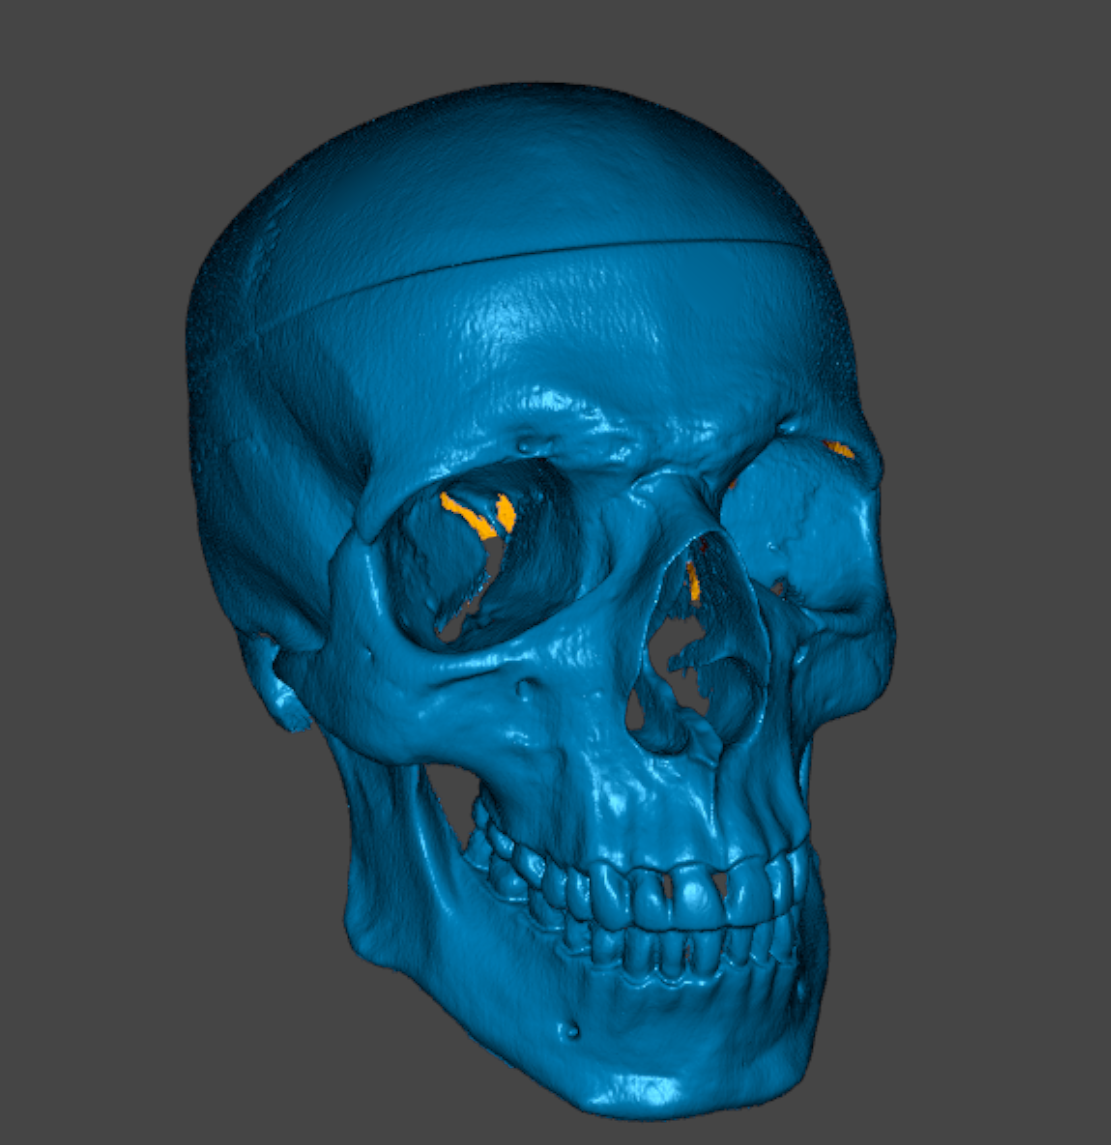
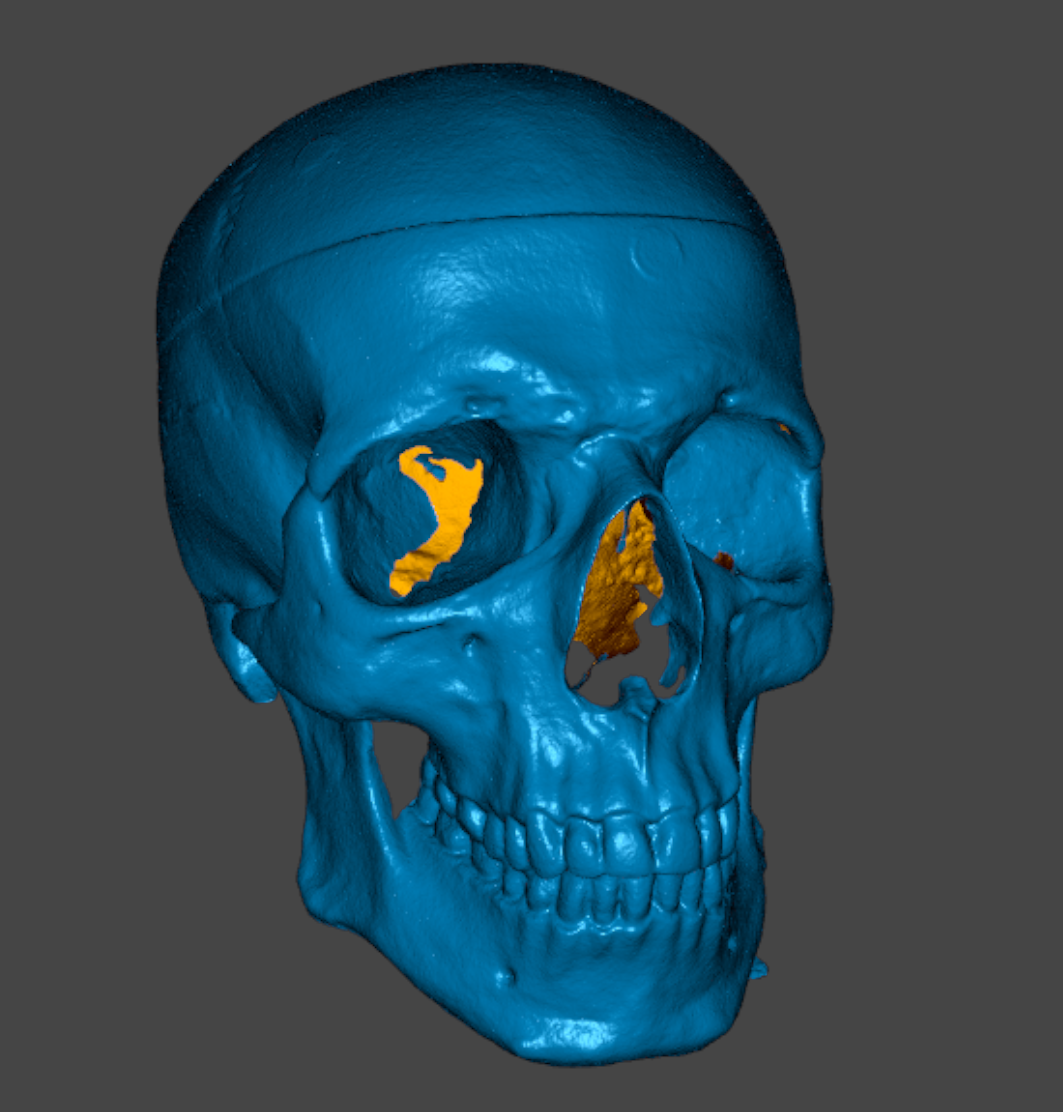
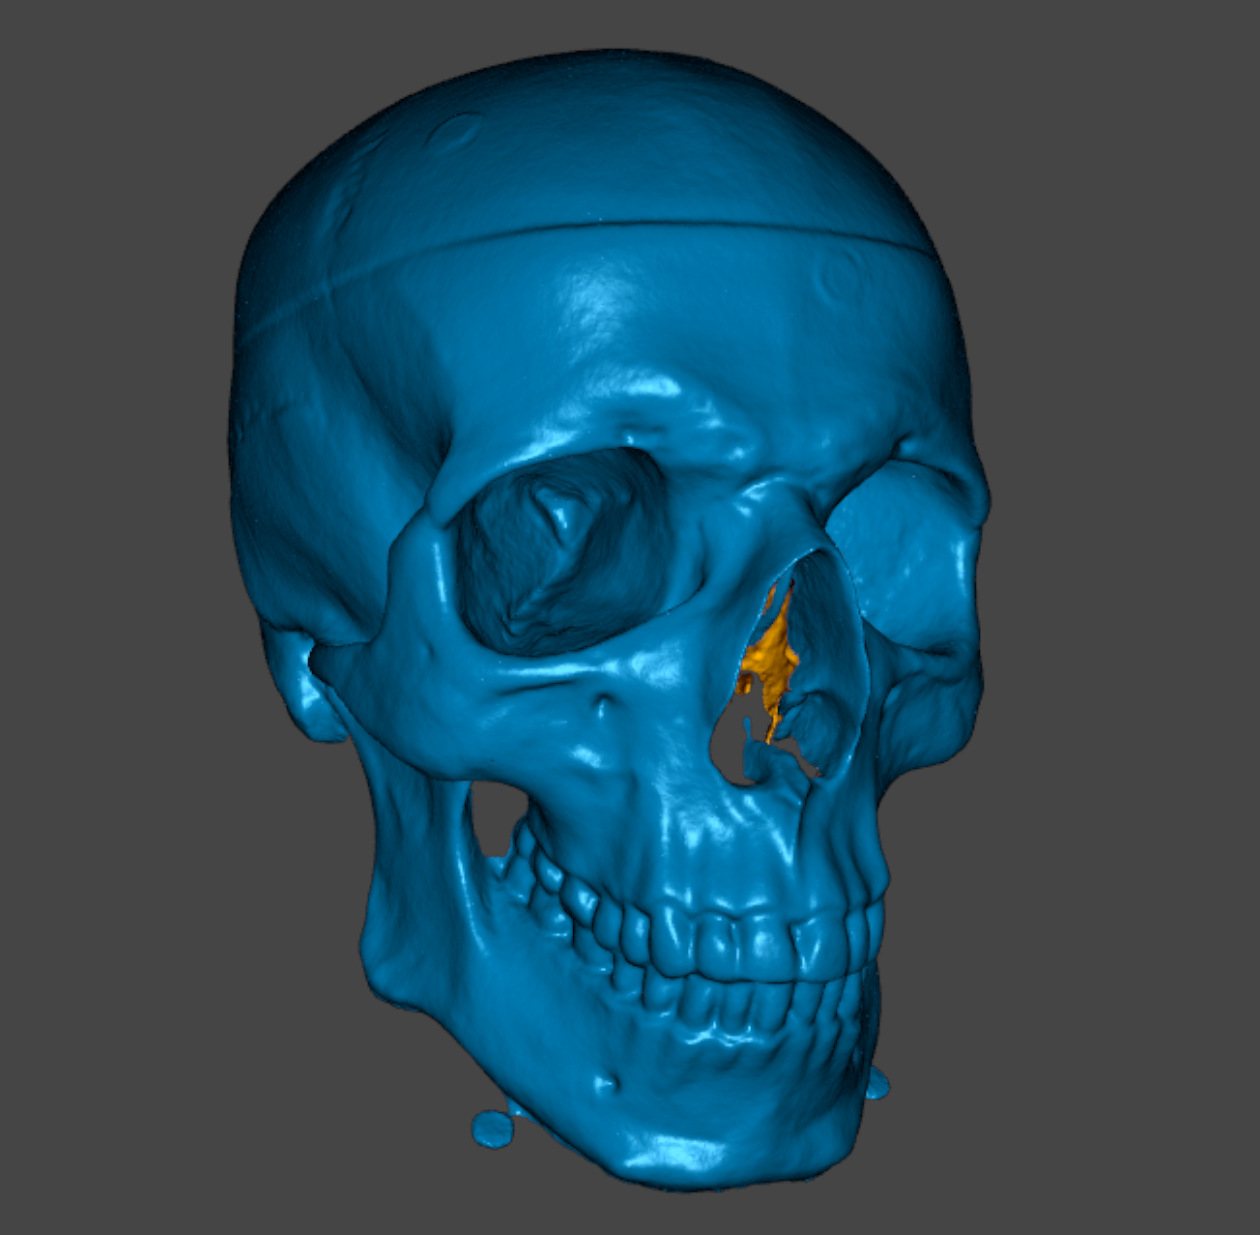
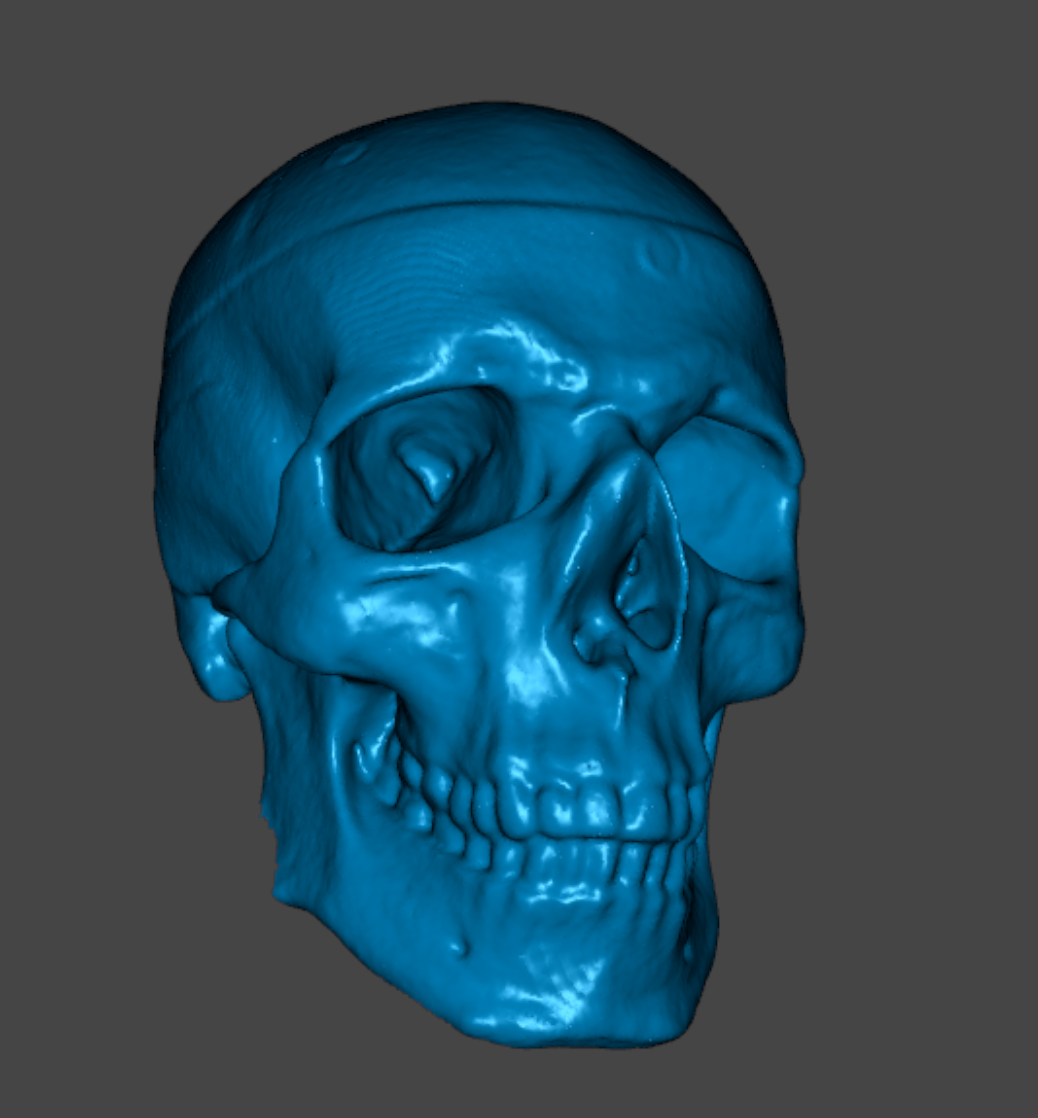
With these scans I wanted to directly compare the different NIR-modes by scanning an anatomical skull in feature-tracking mode. We start by looking at a laser-scan.
Laser – all modes
NIR – small
NIR – medium
NIR – large normal
NIR – large wideangle
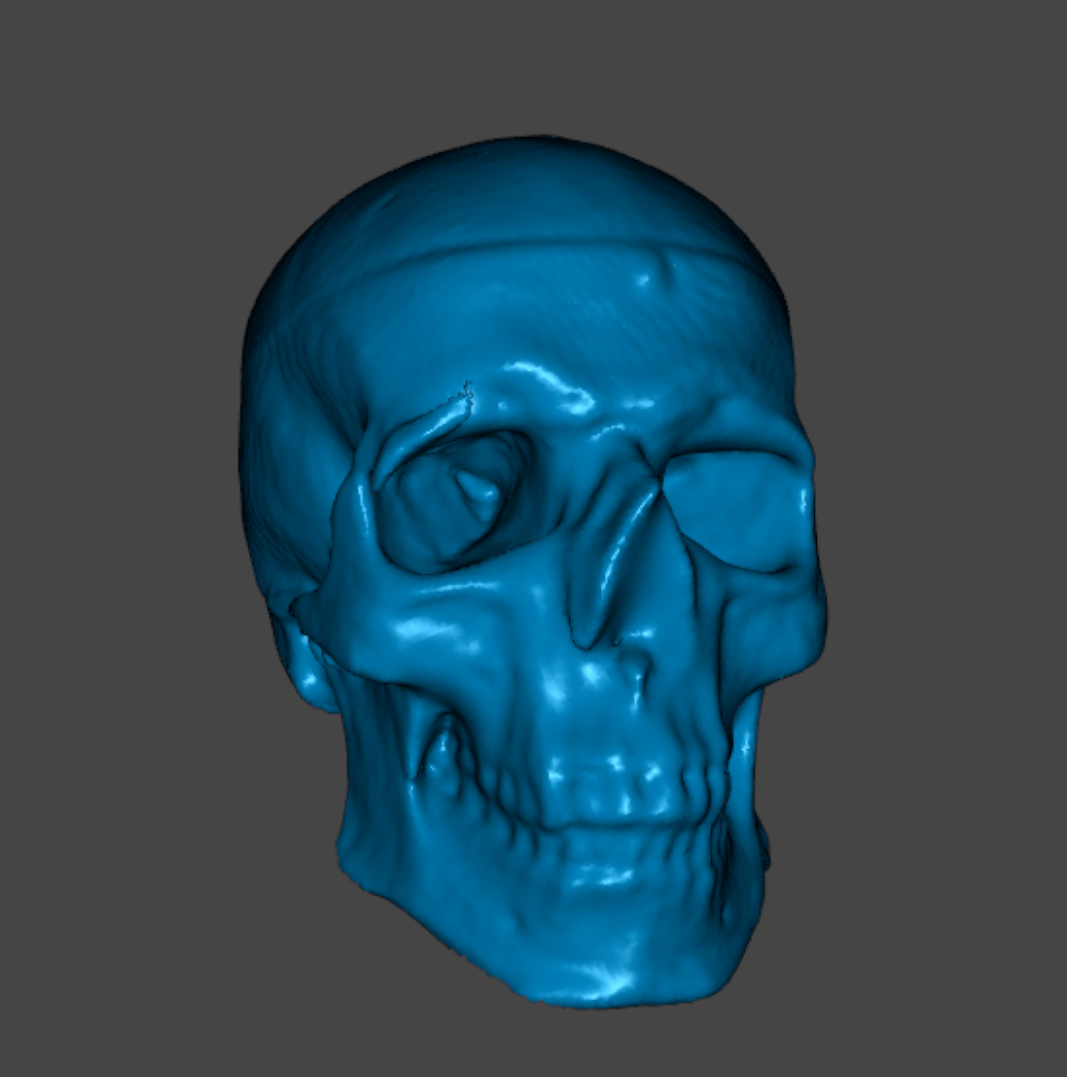
It is always fascinating what NIR can do, for organic shapes. Often, I prefer it for the simplicity of fast scanning and the option for feature and texture tracking.
Wardrobe and furniture
NIR mode in large setting is awesome for quickly scanning furniture and clothing. Furniture works best with fabric cover since the wrinkles and natural curves are excellent for feature-tracking. For wooden furniture markers will most likely be needed. Currently only markers up to 6mm are supported. Hopefully this will increase in the future to 10 or 12mm markers to better work with the wideangle NIR mode.
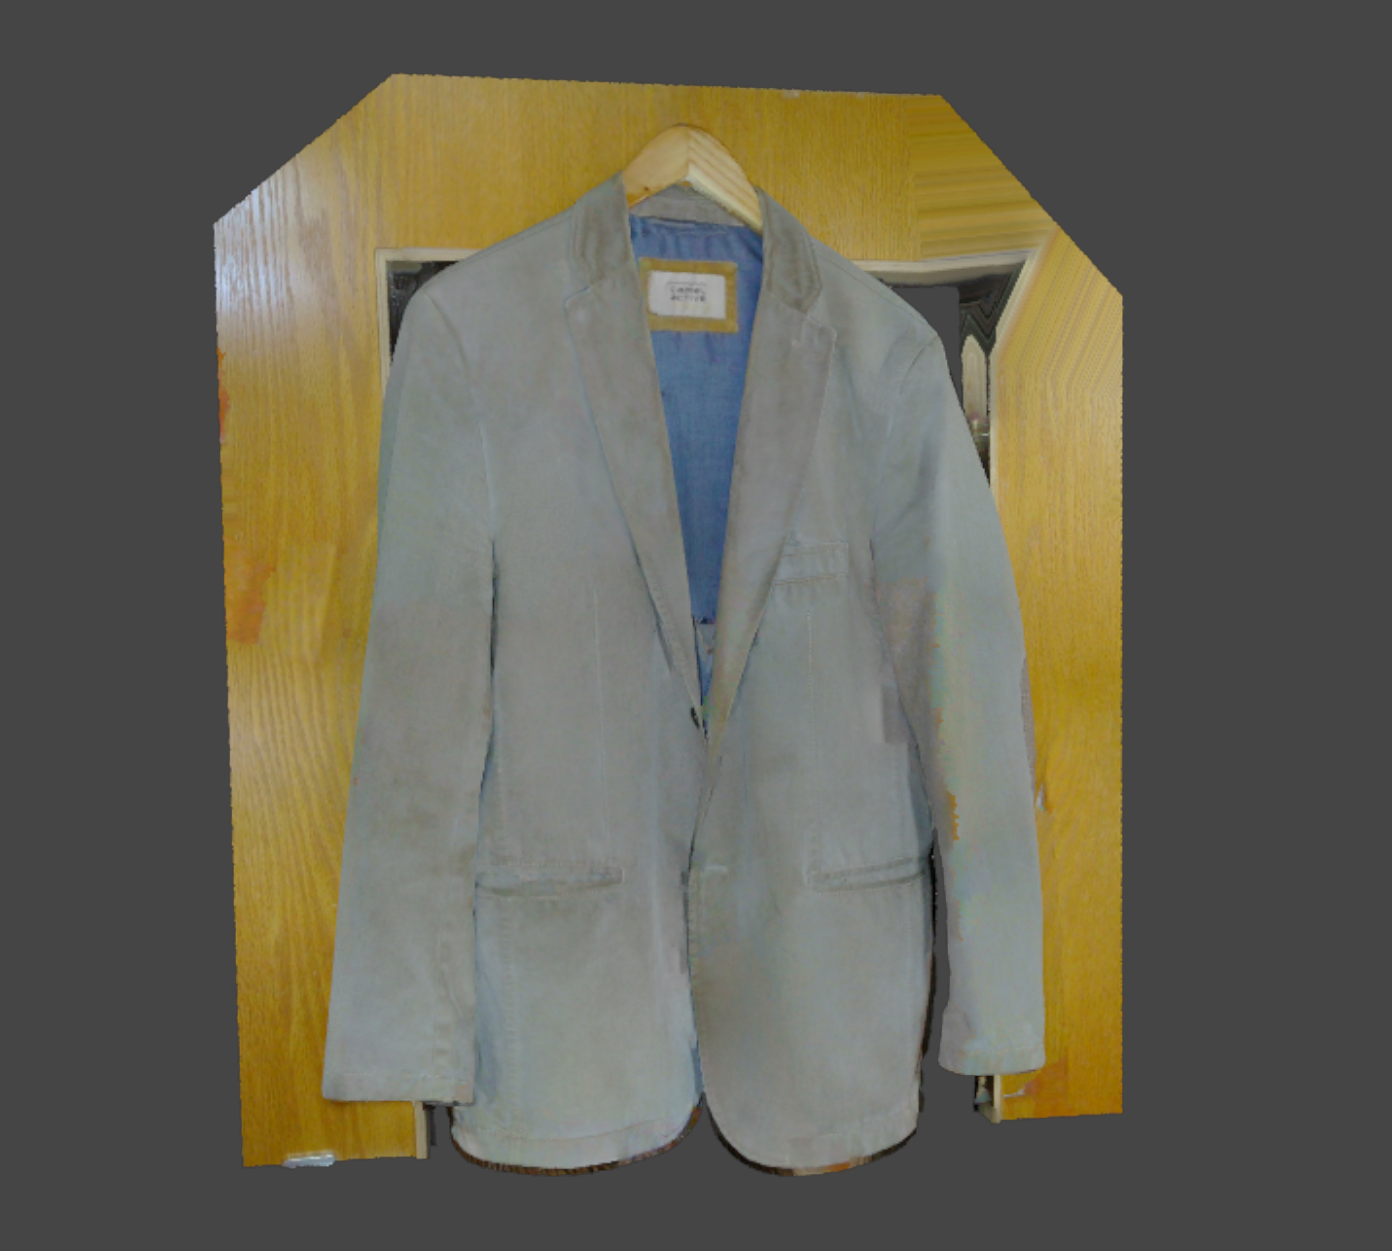
Blazer – NIR large wideangle
Mesh | Tectured
:————————-:|:————————-:
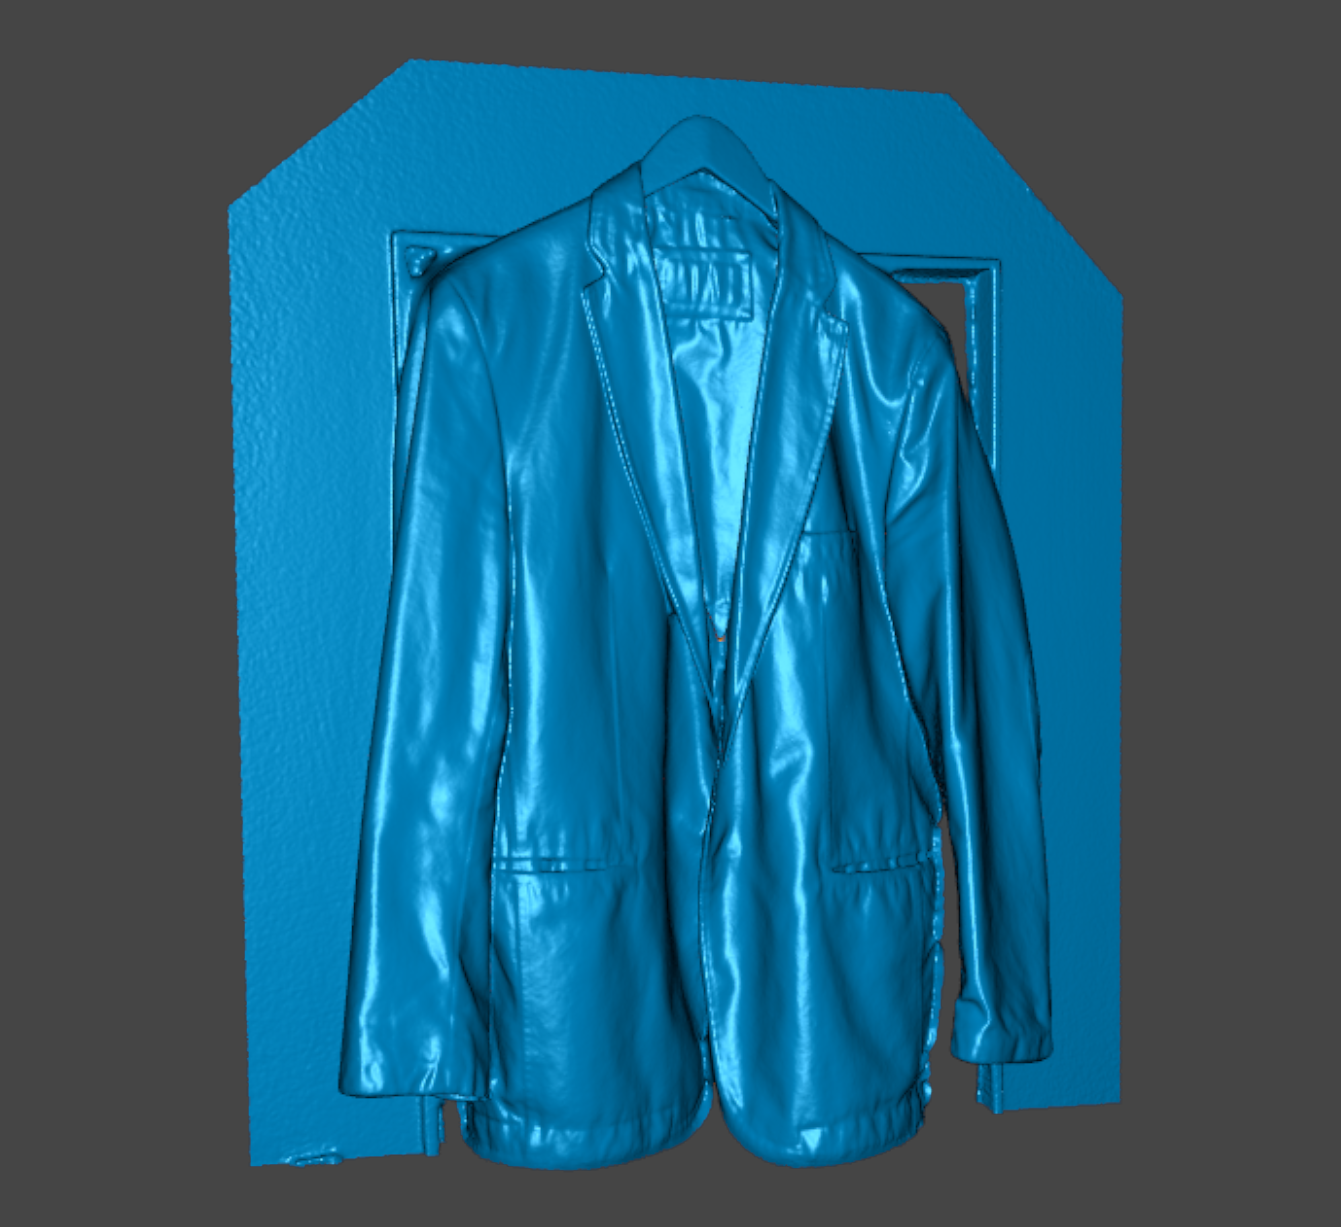 |
| 
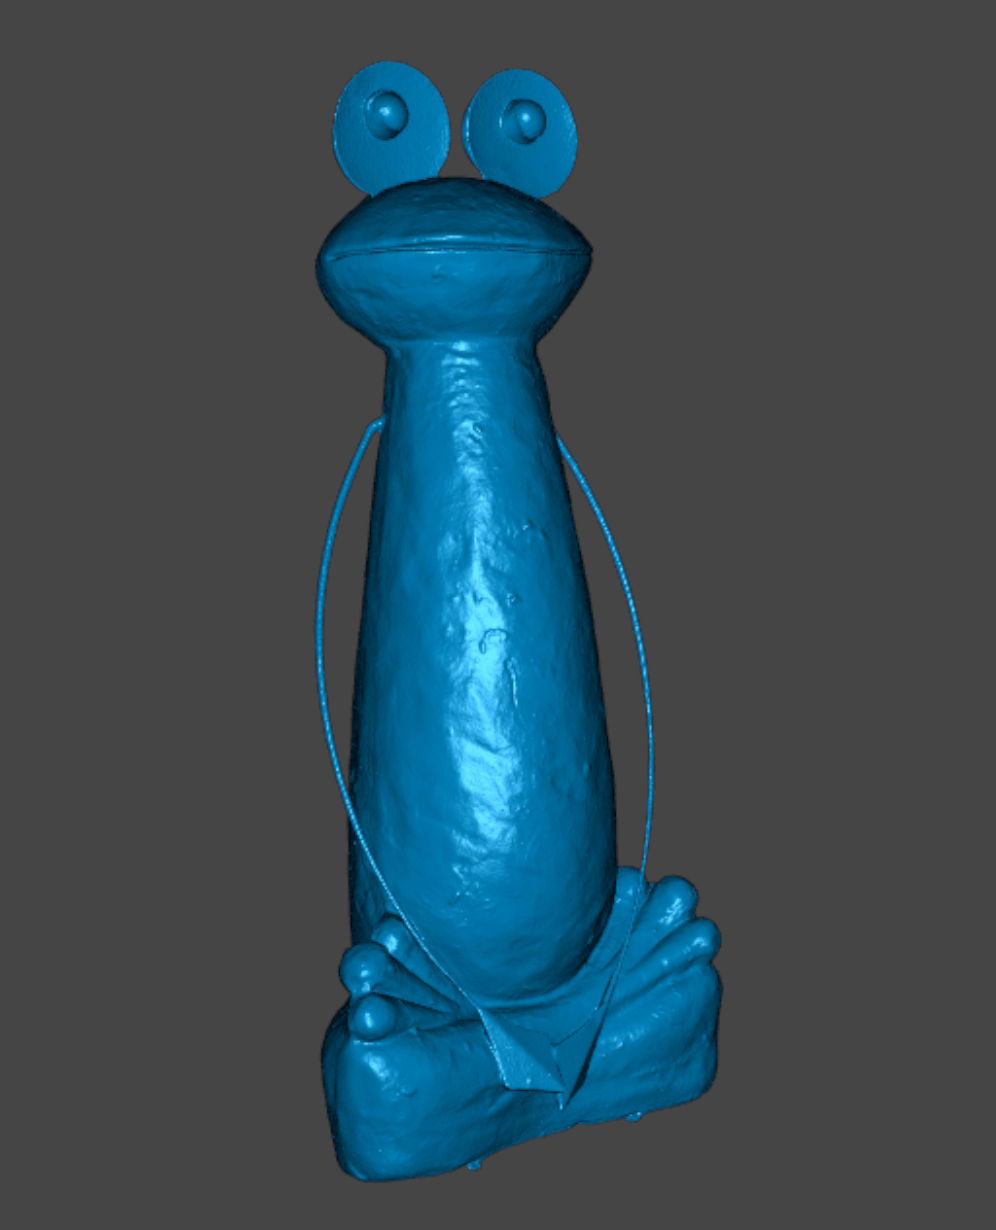
Decorative frog – NIR large normal
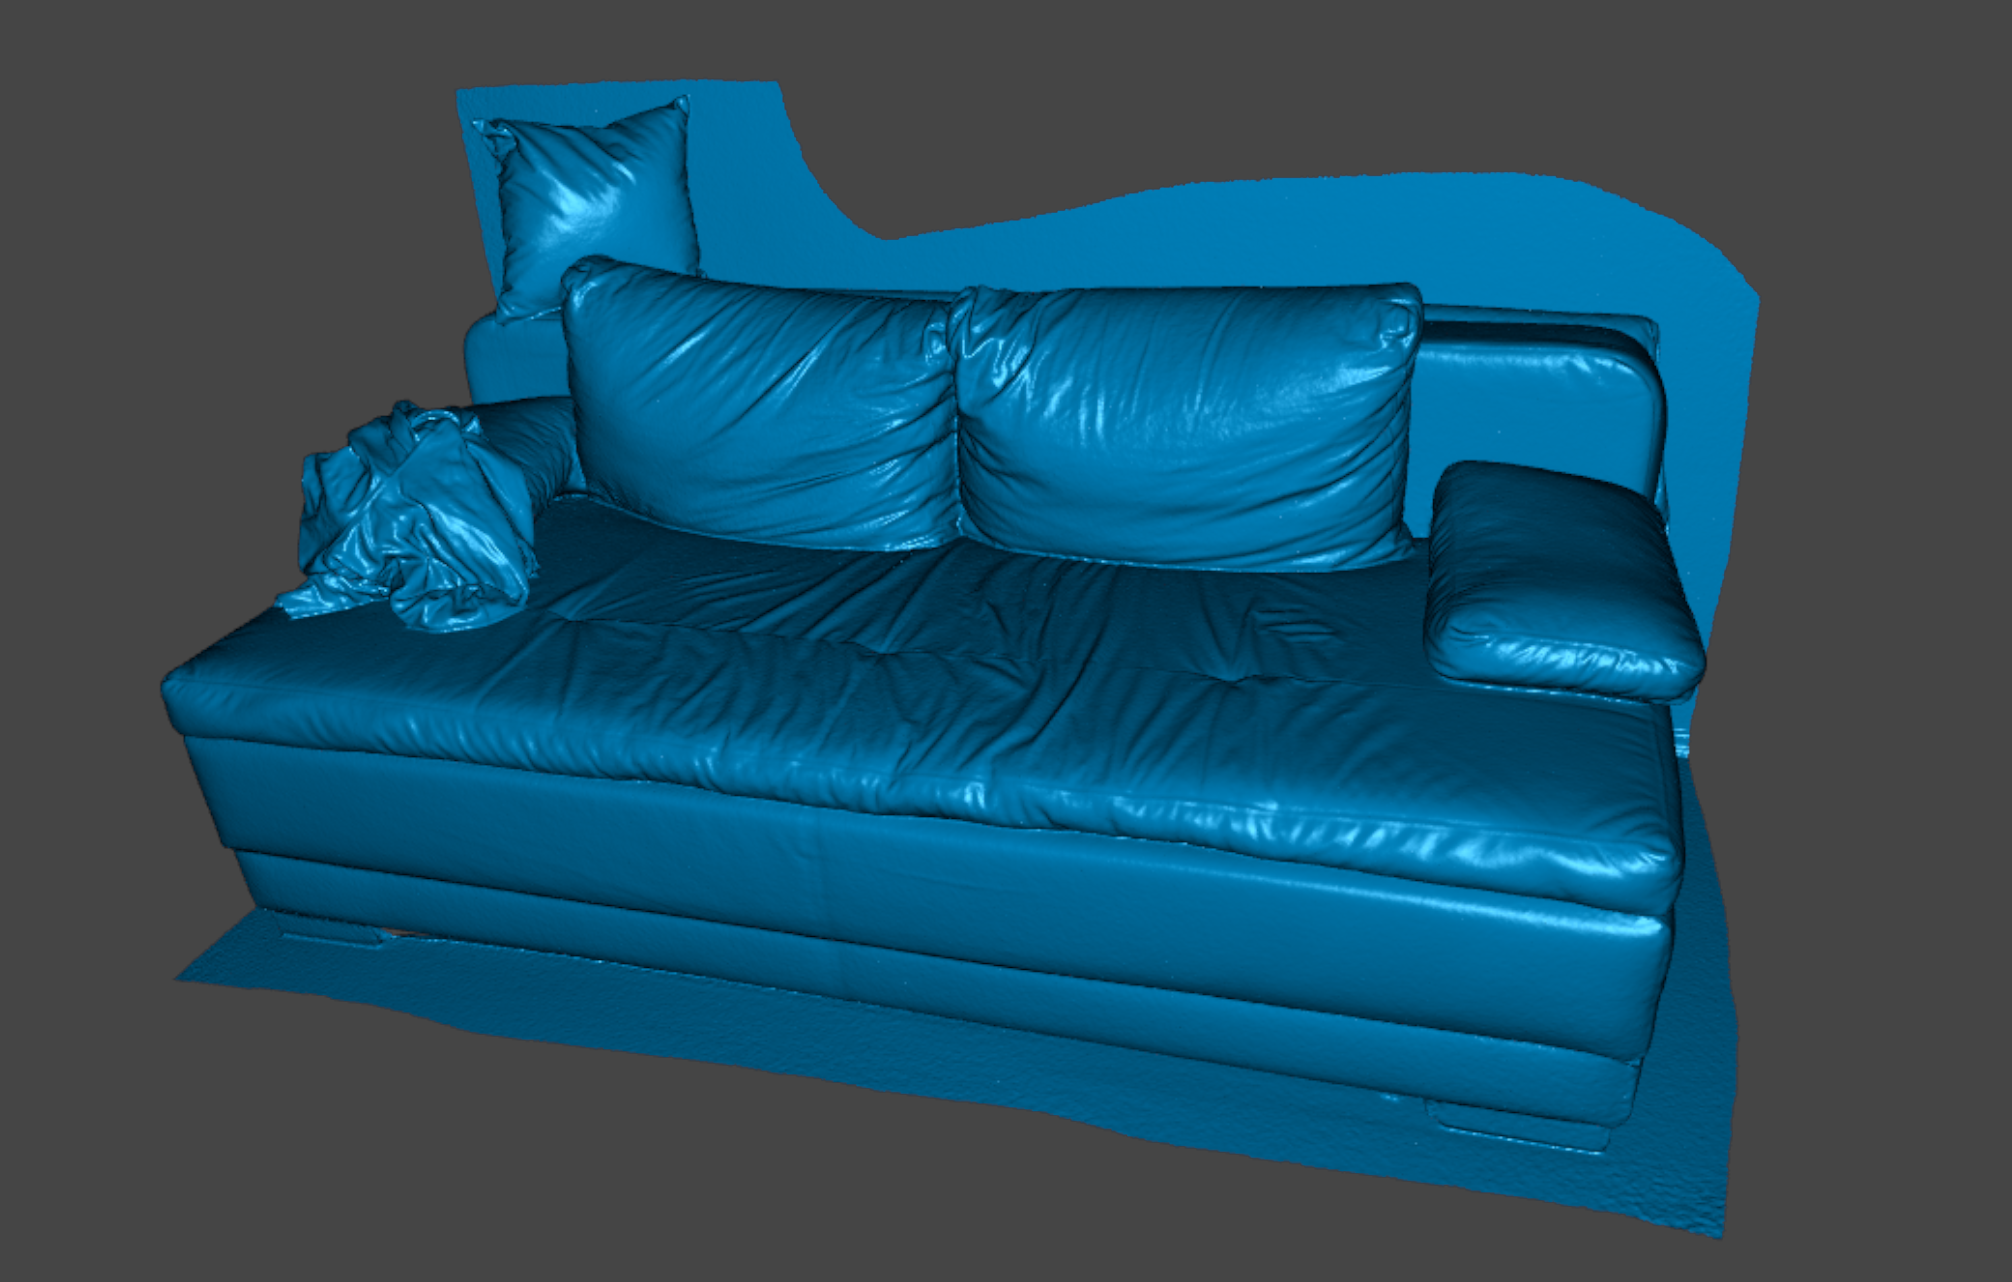
Couch dark grey - NIR large wideangle:
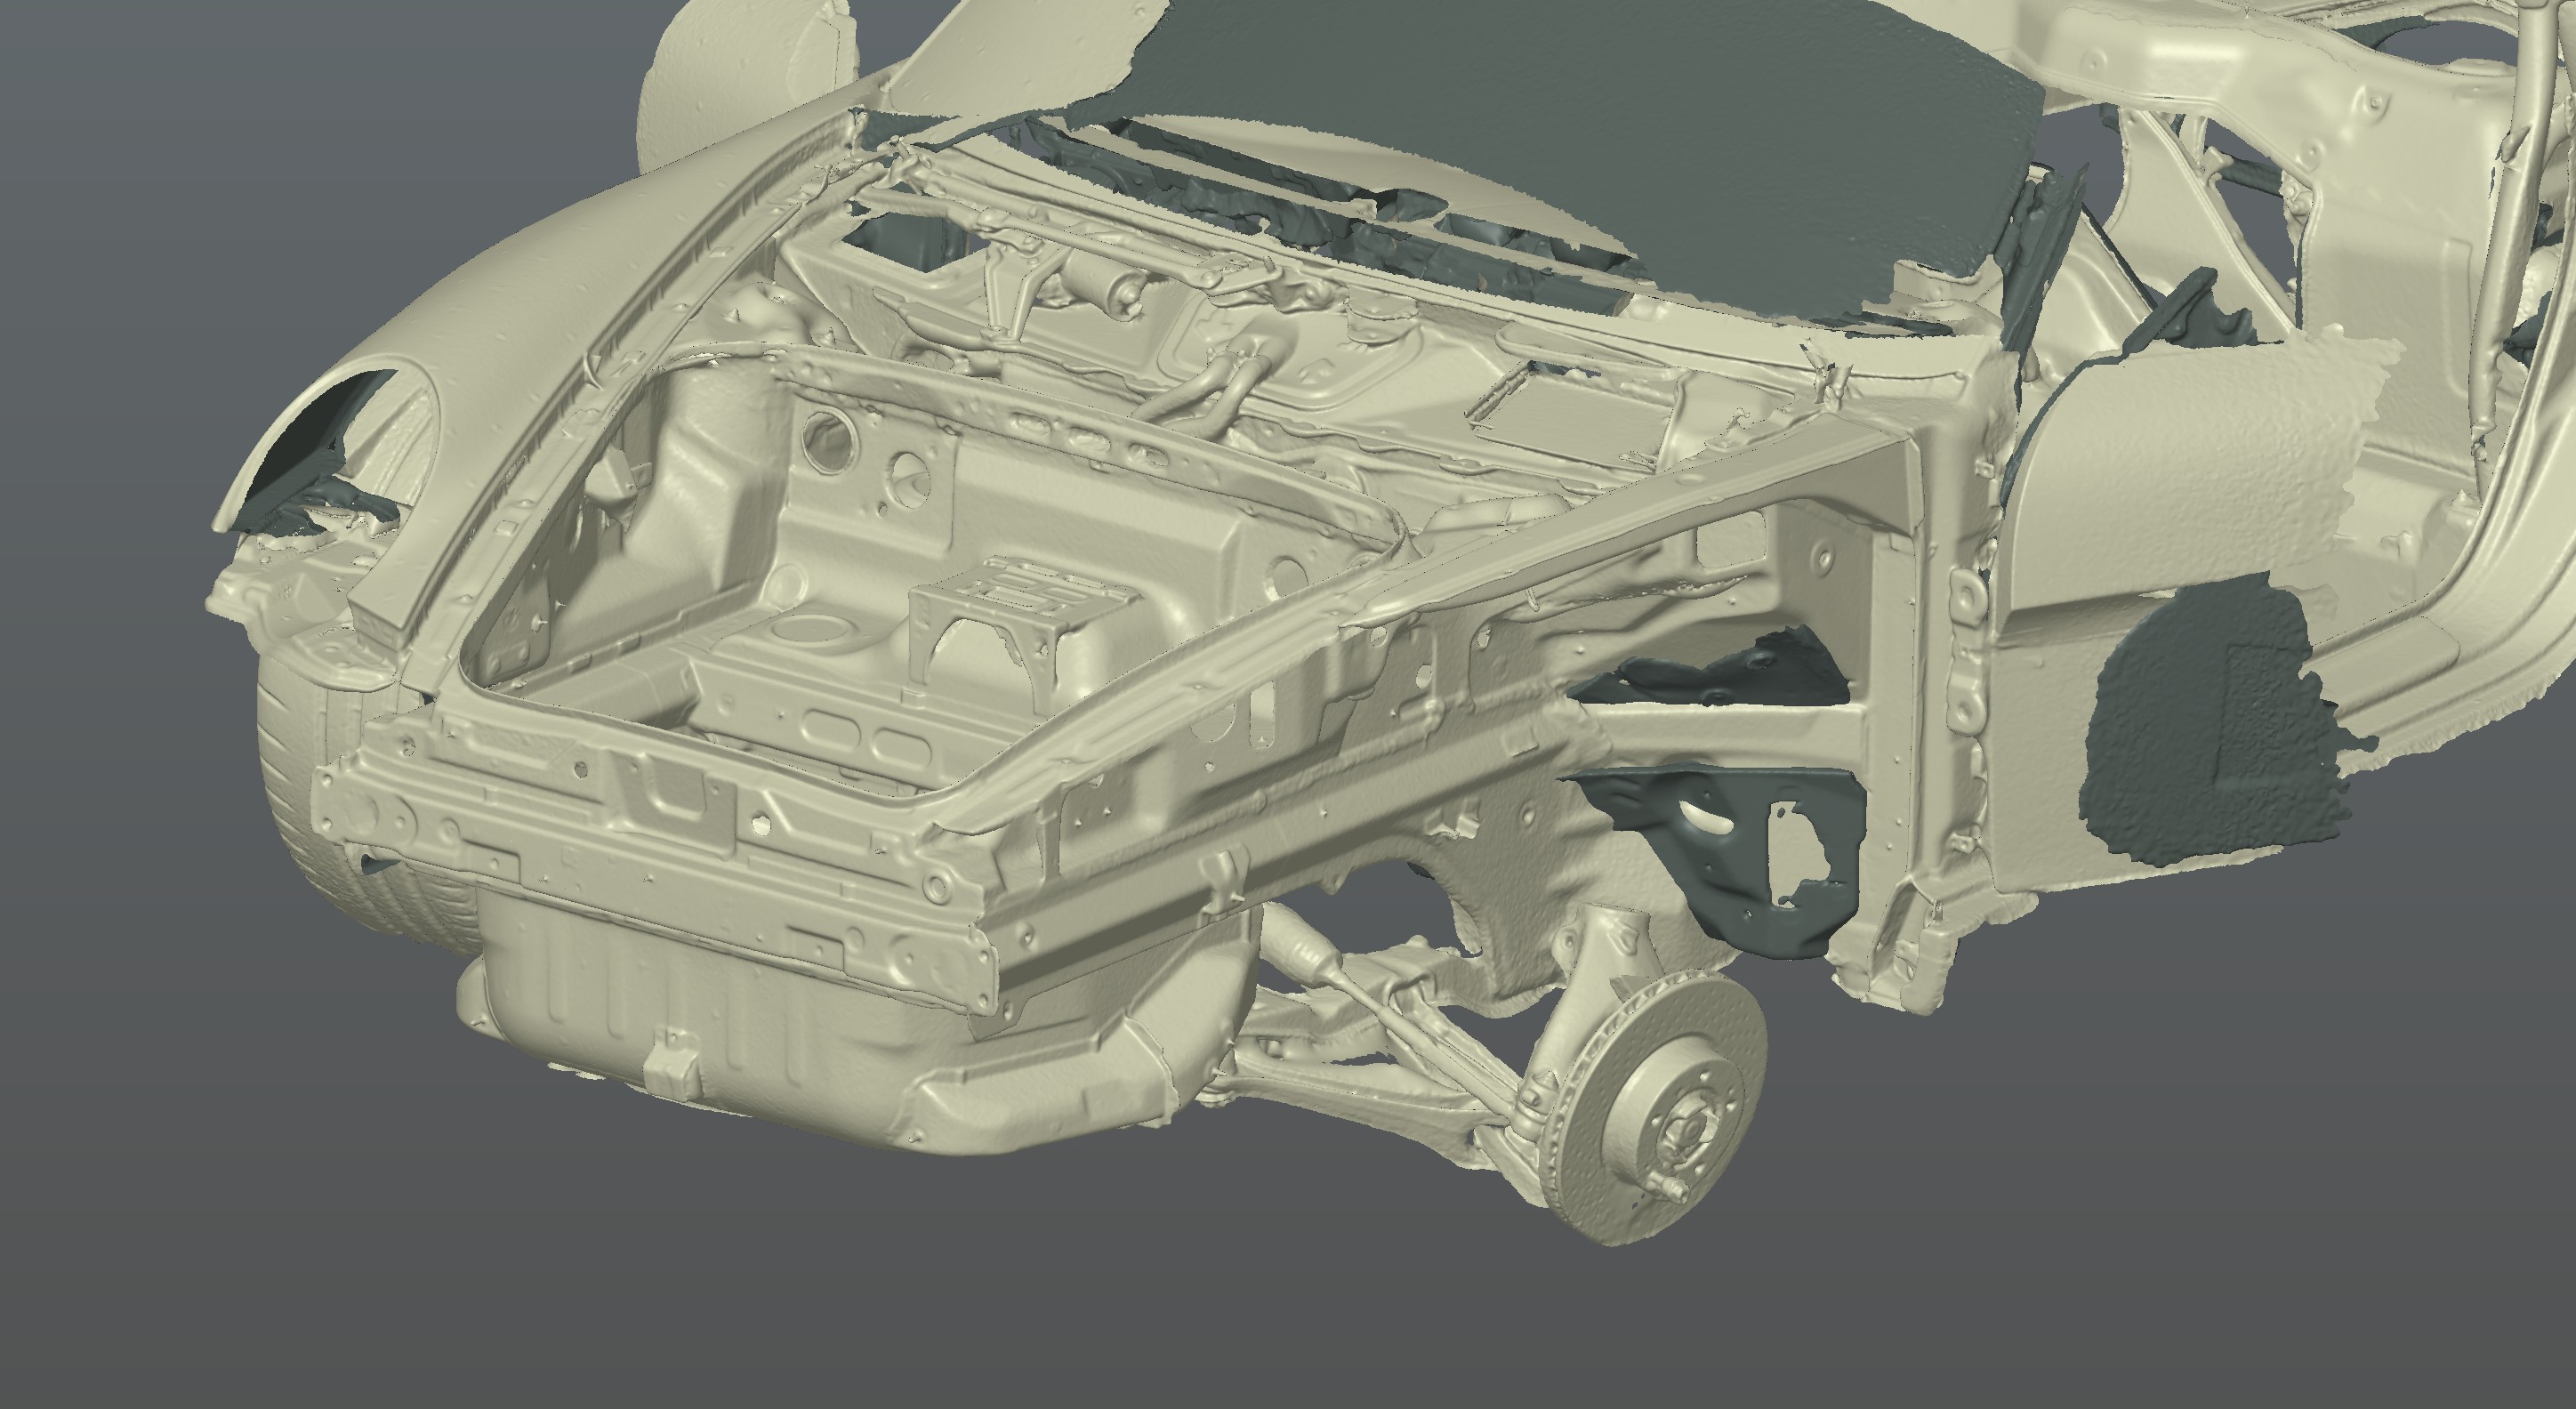
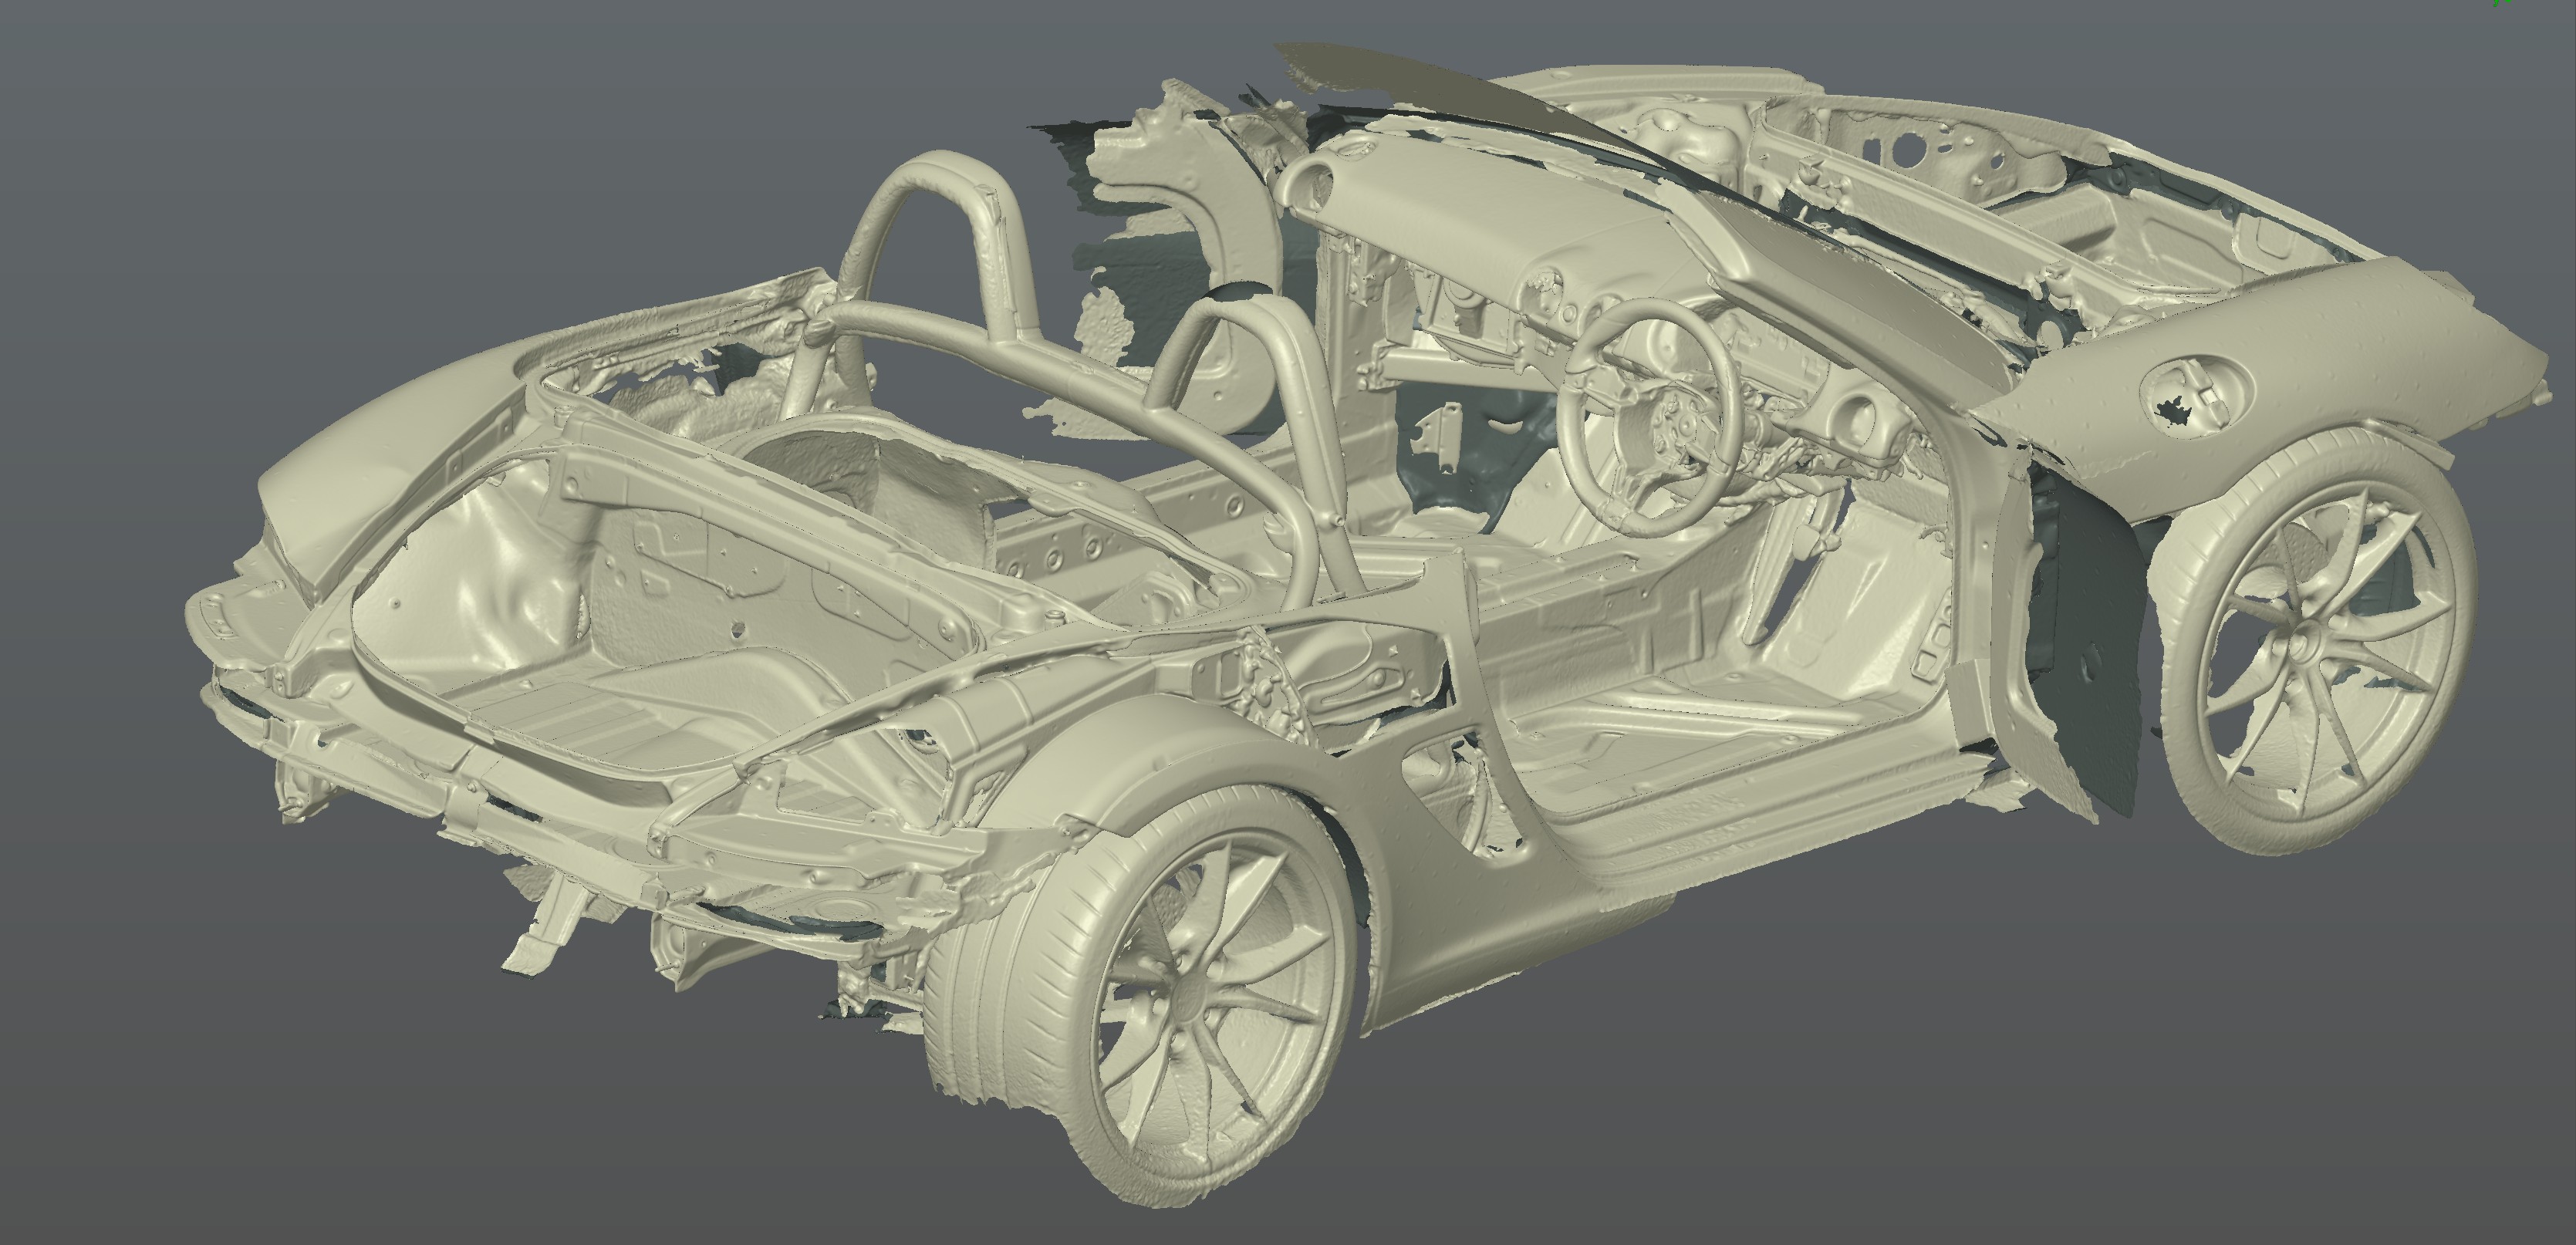
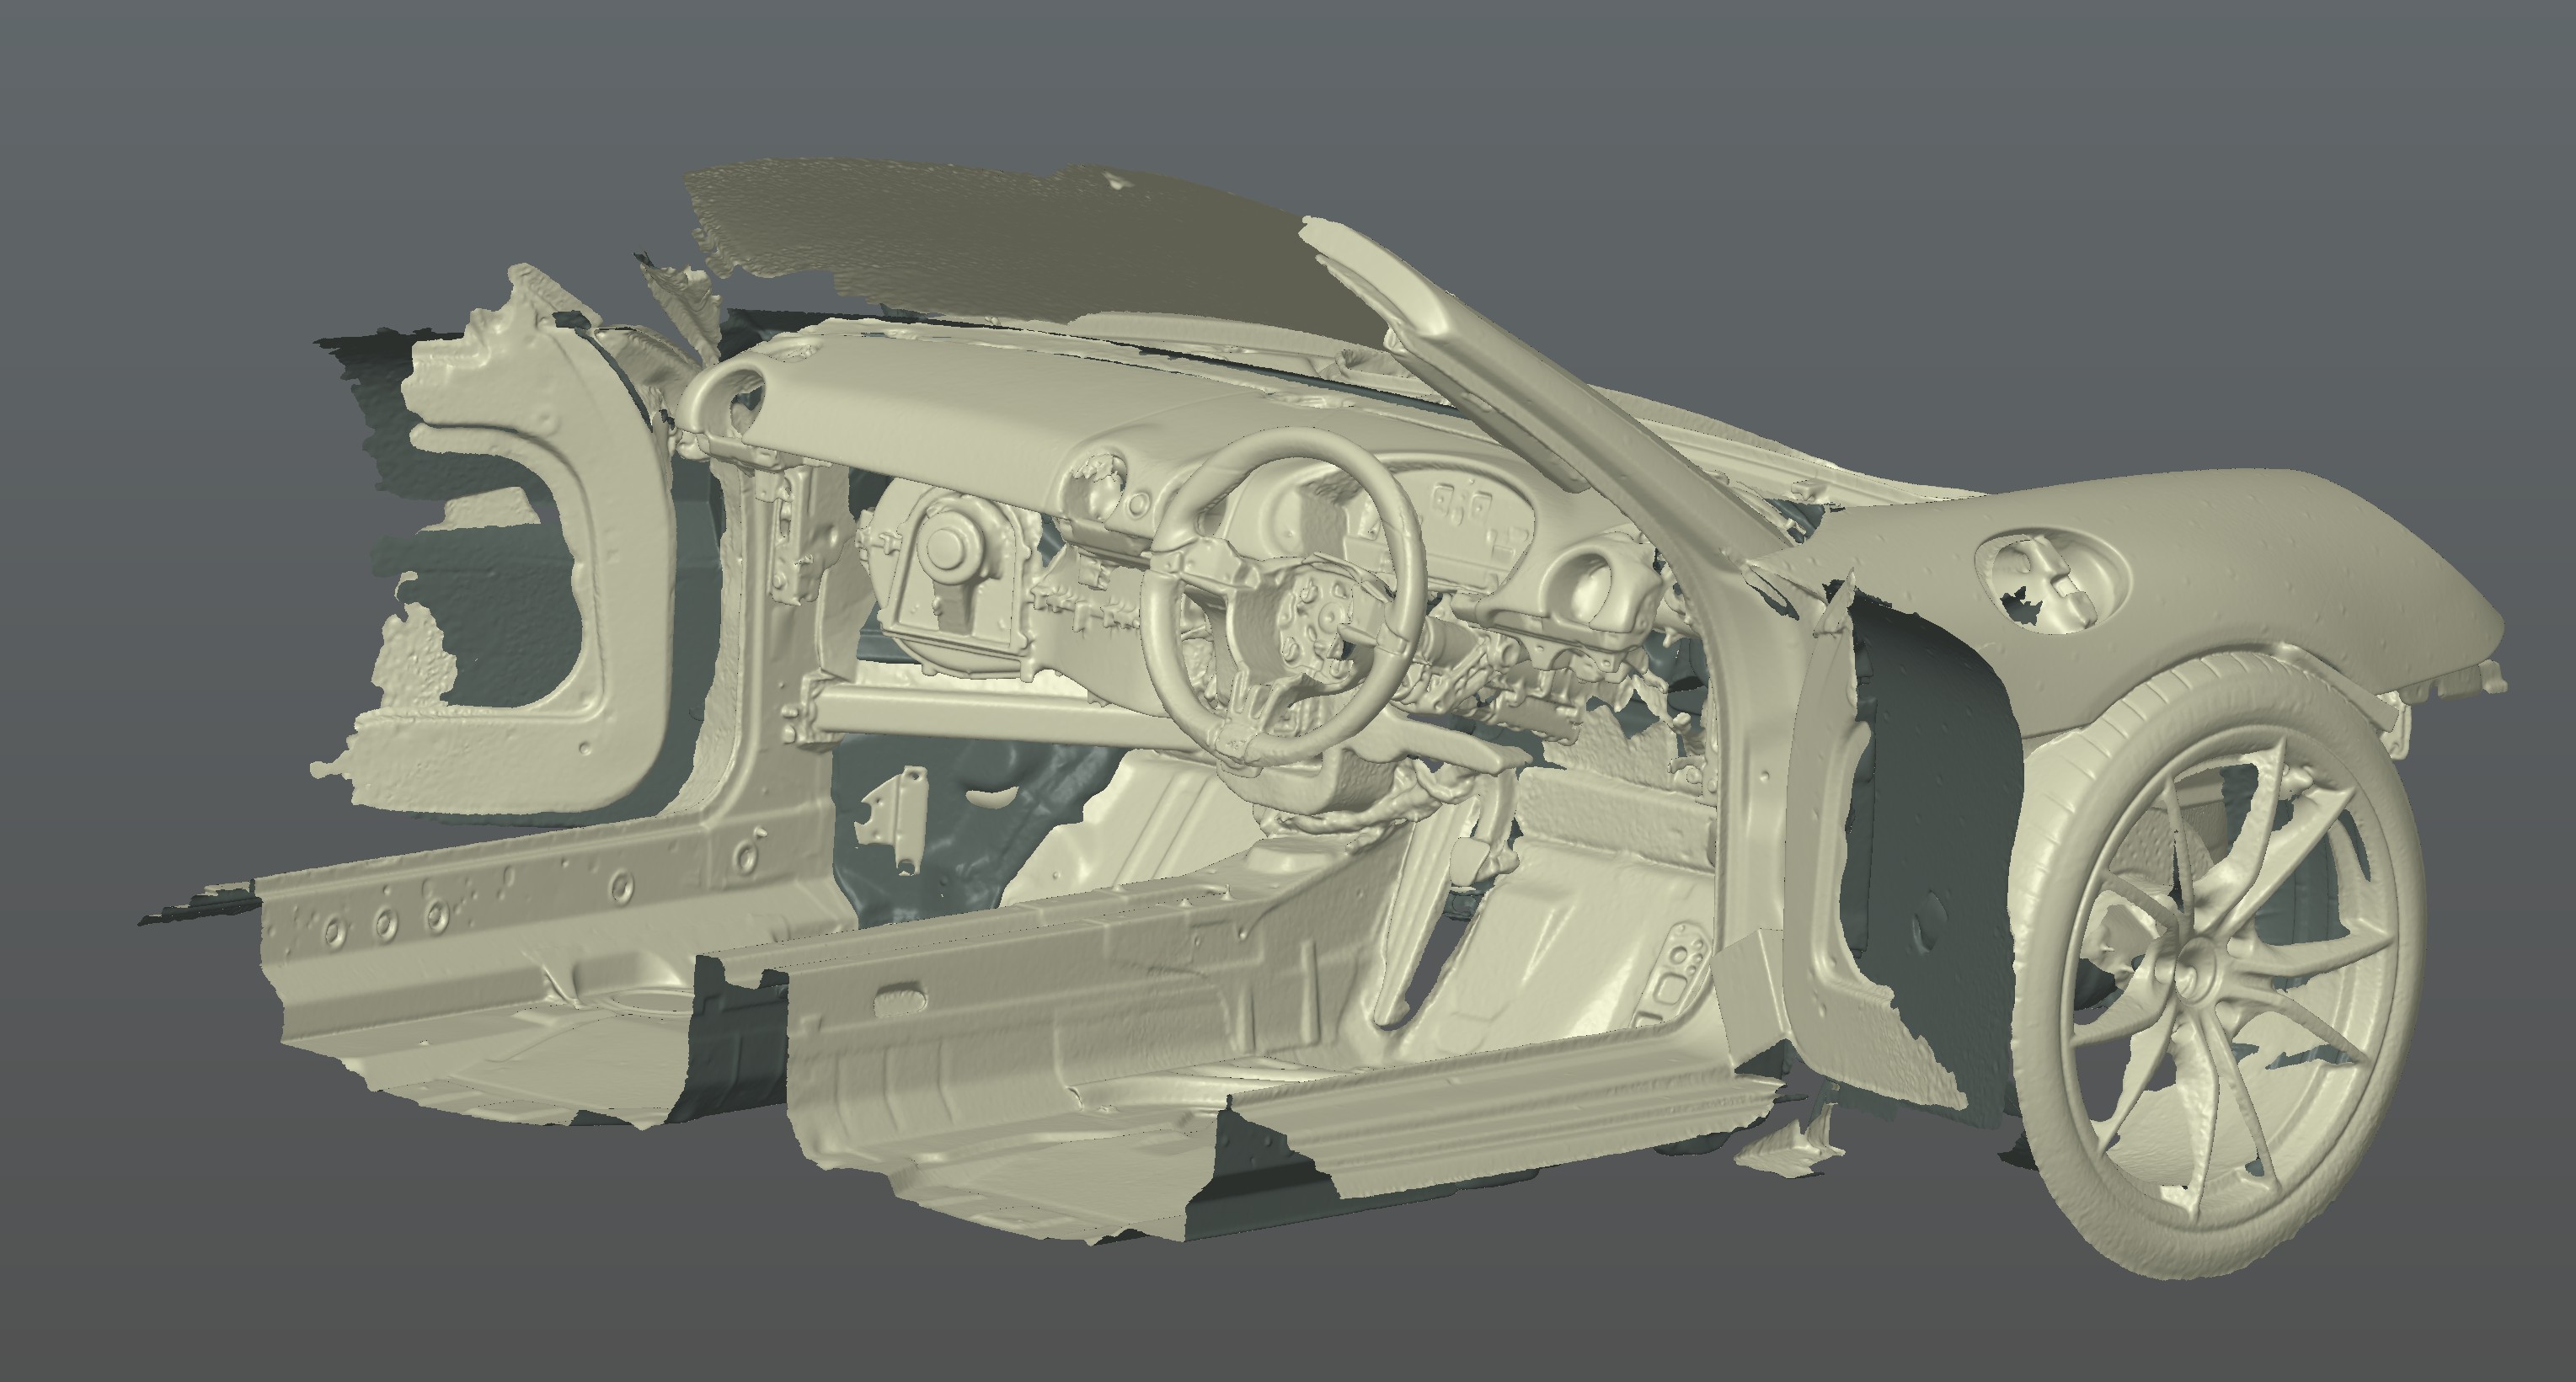
Automotive
This Porsche chassis was scanned in NIR wide-angle mode and feature-tracking. Scanning worked flawlessly but over the whole length of the car some volumetric deviations accumulated. Otherwise, the S1 is excellent for fast capture of say a bumper of trunk, especially with the Scan Bridge.
Initially I scanned the chassis with my Otter but decided to redo the scans with the S1. The results were similar.
Sketchfab-link: https://skfb.ly/pASWO
Art
Visiting my parents one weekend I decided to scan an ancient oil-painting created from one of my ancestors. I tried different scan modes.
To start here is a picture of the original:
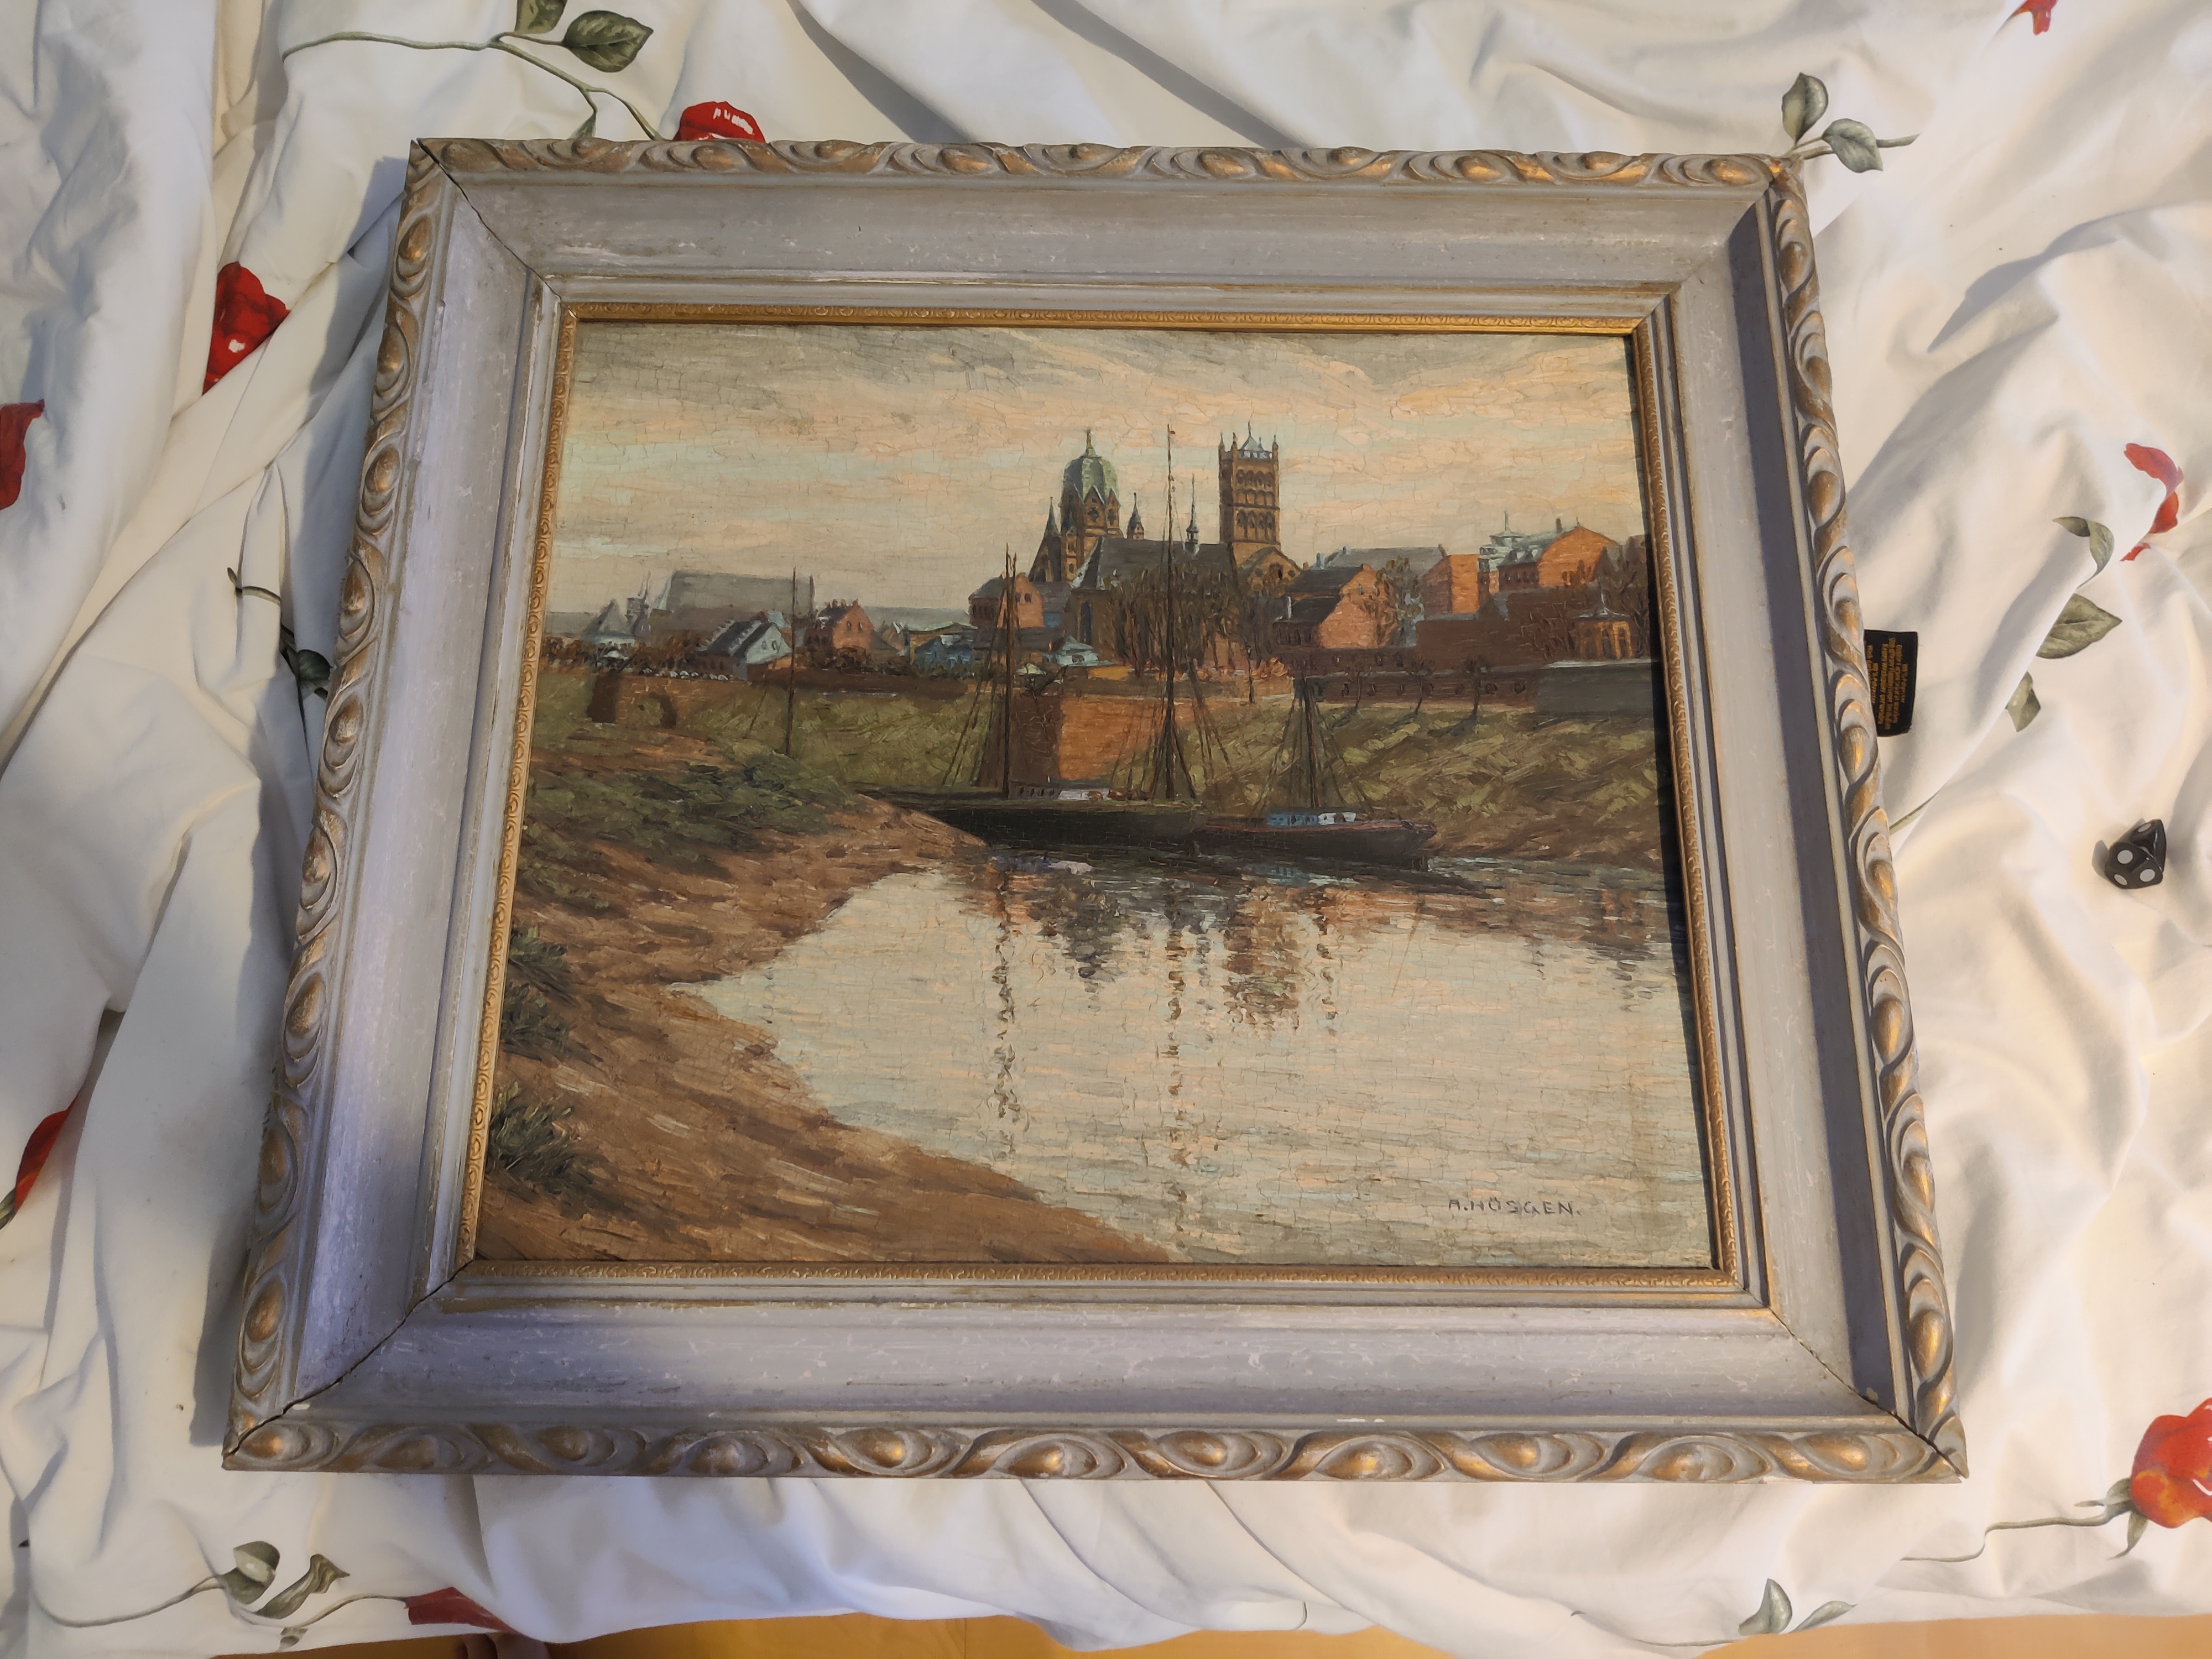
The following scan was taken in NIR medium with the fill-light enabled and texture-tracking:
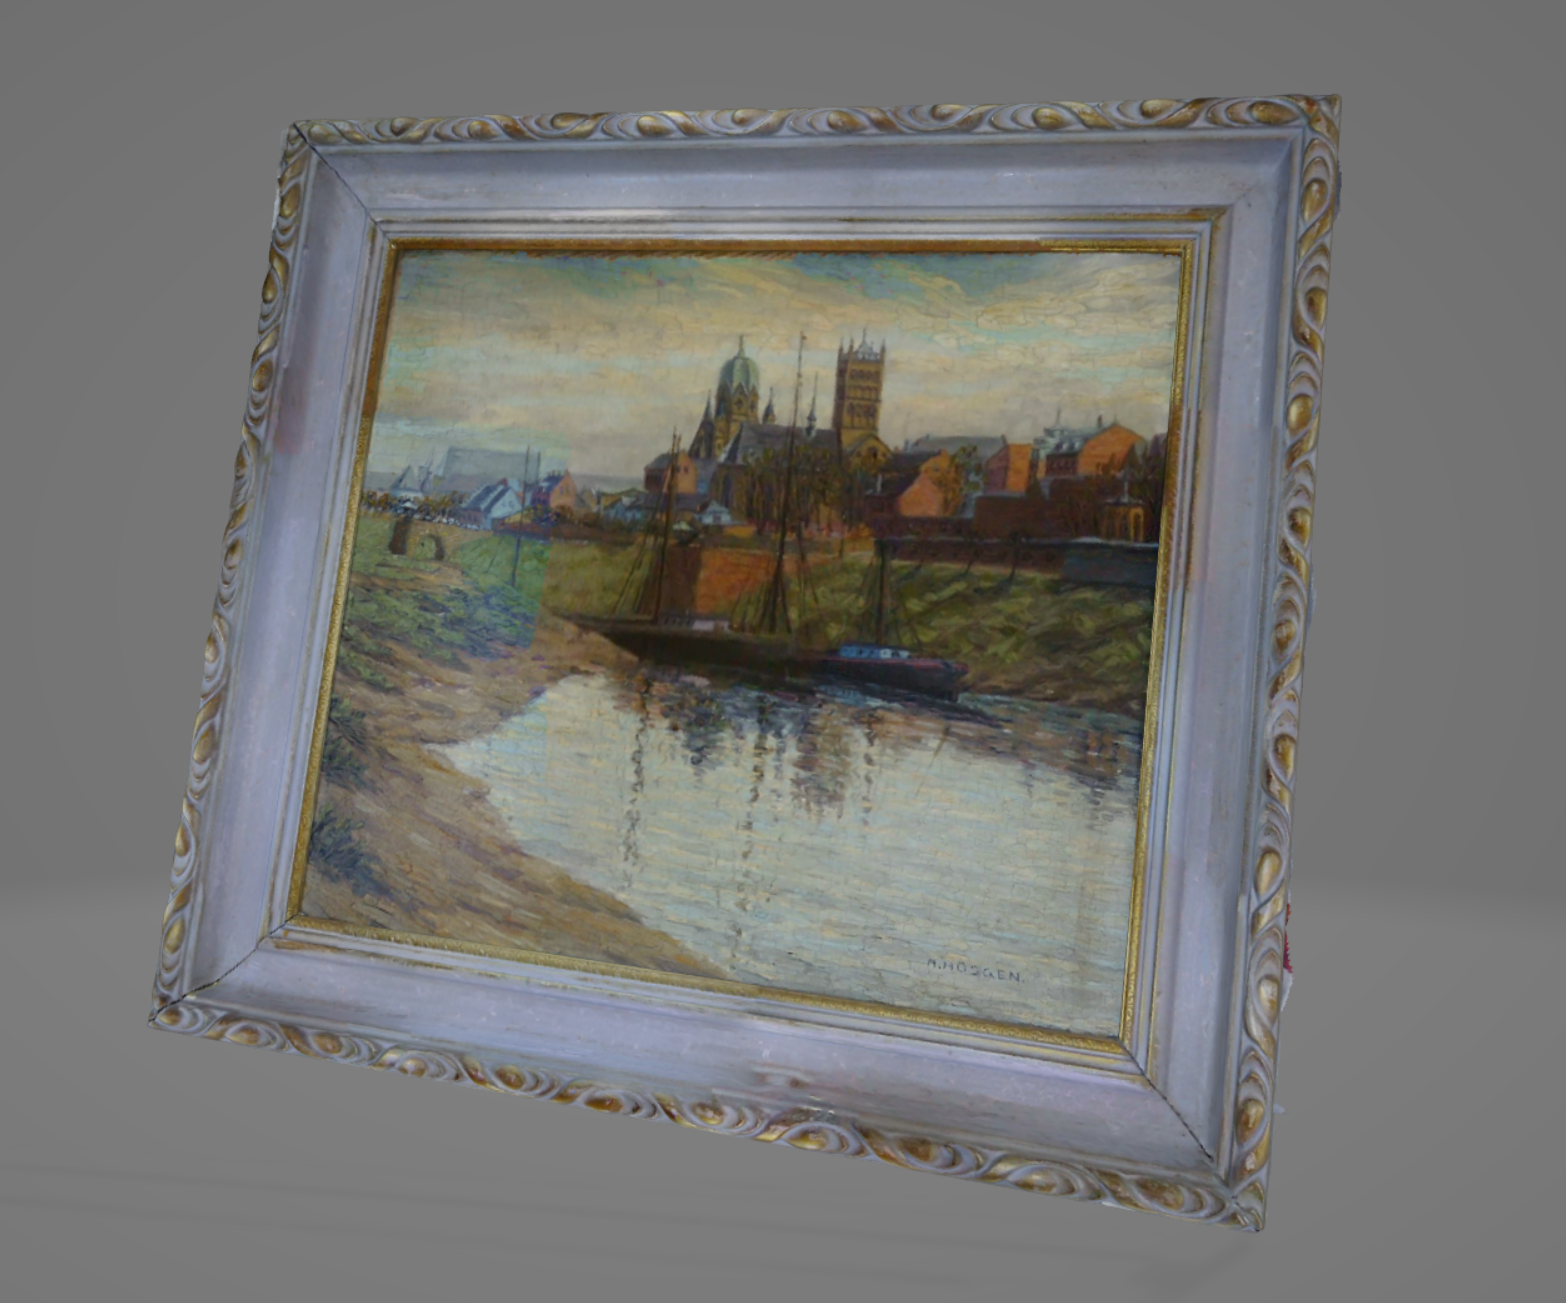
I was quite impressed by the performance in NIR mode but didn’t expect anything less coming from the Otter. Other users and even me sometimes forget how good NIR can be for scanning whilst being completely taken by shiny lasers. And here are the lasers with a max detail scan in parallel-mode of the frame and paint-texture:
Quite impressive to be able to see the pen-strokes and even slight indicators of the author’s signature. Sadly, texture is not supported in laser-mode (they removed it starting with the Raptor Pro, my og Raptor supported it).
Wireless Scan
Not much to show since the scan results are the same, it just takes a bit longer than wired in laser-mode. In NIR it makes no difference at all.
Conclusion
In short: The Sermoon S1 is an excellent scanner and well worth the price. Longer: My initial goal was to replace the MetroX, Range 2 and Otter but I wasn’t ready to compromise in any of their capabilities, I even wanted better performance and this goal is reached. The laser-scanning capabilities of the Sermoon S1 are far superior and the NIR modes focus more on scanning larger parts (I didn’t use the small mode in the Otter at all). Wireless scanning is a nice addition and greatly improves my ability to scan in different environments, hopefully Creality will bring smartphone-based scanning to their app for the S1 as it is currently still missing and at least NIR should be possible with a decent device.
Build quality of the scanner and bridge are excellent and the software is taking steps in the right direction while still missing some features I would like (mainly marker-less laser scanning and SpaceMouse support). Hopefully Creality will continue this road and improve the S1 even more to cater its current focus on more industrial buyers where long-lasting software support and improvement are a must. Some other issues are already addressed: When buying the scanner, no spare cables were available for the Scan Bridge and scanner on their store. By now the bridge cables are in stock and the scanner-cables are supposed to be available soon.
This led me to reduce three scanners in my carrying case to one and therefore improve my workflow drastically whilst also speeding it up. In the future I may add more tests and updates to this review but for the moment all aspects of notice were covered and sadly time is a limiting factor in the end even with fun things like scanning …
My designs for the Sermoon S1
You can find all my models for the Sermoon S1 on my printables page: https://www.printables.com/@PrintedForFun_341882/models